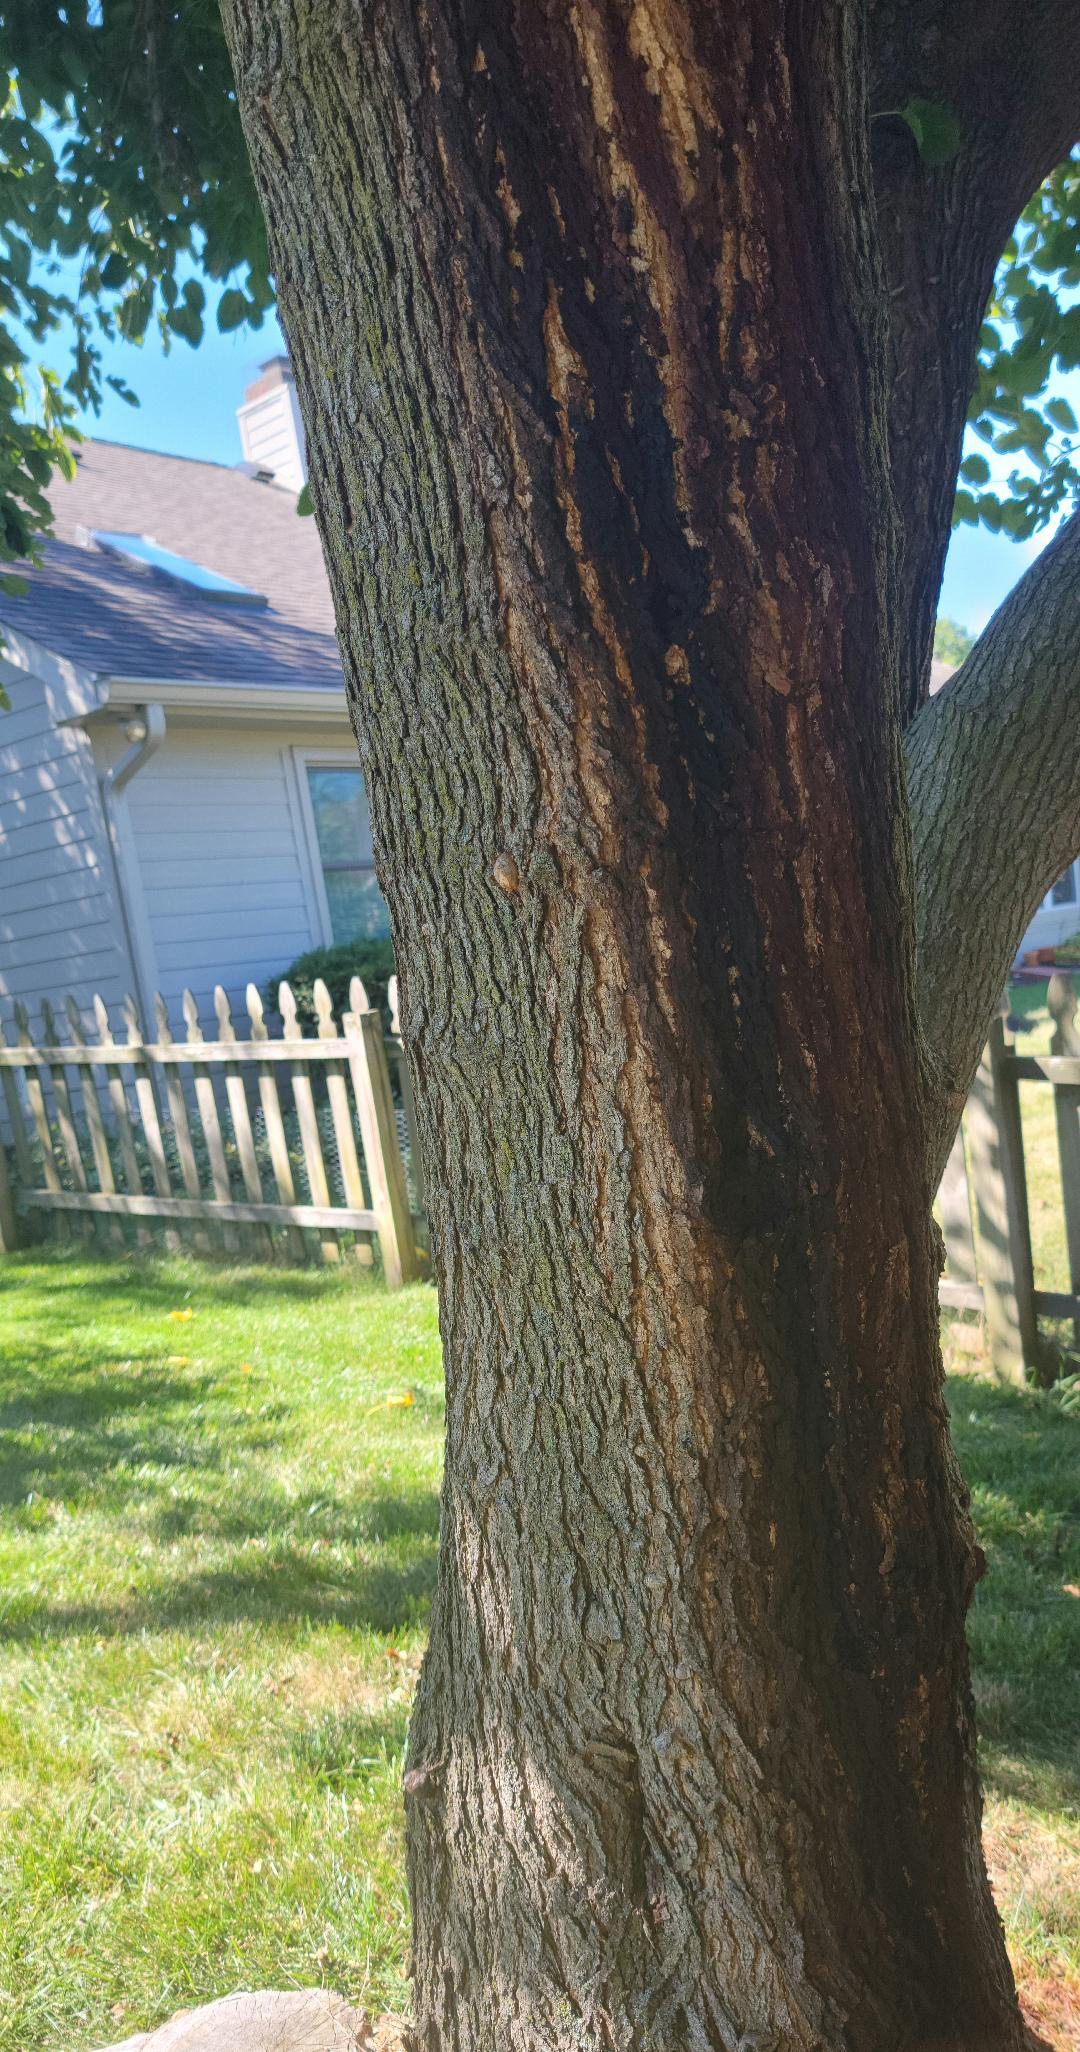
Question: We have a large 60+ foot mulberry tree in our backyard that is located by our pond. This is the first year I have seen these dark streaks on the bark of the tree. Should I have concerns?
Answer: From the photos, it looks like wet wood/slime flux is affecting your tree. It is a bacterial infection on trees and in most cases is not a serious issue, but unfortunately, there is nothing to be done about it. Many years ago they used to drill holes to try and allow gases and liquids drain from an area with the slime flux but through research and experience this practice is not recommended.
The Purdue Landscape Report titled Slime Flux of Trees shares more about this disease:
Slime flux (also known as wet wood) is a dark, foul-smelling and unsightly seepage of sap from tree trunks. The disease is not usually a serious problem but the appearance can be alarming. Slime flux is caused by common surface-inhabiting bacteria or yeast fungi that enter the trunk through wounds associated with improper pruning, stem breakage, injections, cracks from freeze injury or weak limb crotches. The bacteria and yeast may live on sap nutrients within injured trees for many years without any outward evidence.
Symptoms
The main symptom is the appearance of the dark sap oozing on the trunk exterior which happens when gasses produced by growth of the bacteria and yeast cause the internal pressure of the sap to become high enough to force the sap out through cracks in the bark. The dark streaks usually turn light gray or white upon drying. Oozing sap may be frothy and white at the point of exit. Airborne bacteria, yeasts, and fungi often colonize the wet oozing material, which ferments and releases a foul odor. Slime flux may delay wound healing (callus formation).
Lenny Farlee, sustaining hardwood Extension specialist for Purdue’s Department of Forestry and Natural Resources (FNR), has been named a 2024 Fellow of the Society of American Foresters (SAF). The SAF Fellow Award, one of the highest honors bestowed on an SAF member by their peers, recognizes long-standing service to forestry at the local, state, regional and national levels.
Farlee was honored with the award during the 2024 SAF National Convention, which took place in Loveland, Colorado from Sept. 17-20.
Zhao Ma accepts the 2024 Family Forests Education Award on behalf of Lenny Farlee and the other project team members.
“Being named a Fellow of the Society of American Foresters is particularly meaningful to me since it originates from a nomination by my peers at the state level,” Farlee said. “I am very grateful that my colleagues in forestry here in Indiana considered my service worthy of recognition, and I owe much of the credit to them for their support of me through my career. It has been my privilege to serve the people and the profession as an Extension forester here at Purdue.”
Farlee educates people about forestry in many ways, including through the popular Extension YouTube series “ID That Tree,” which has over 100,000 views.
Farlee, Ronald Rathfon, Don Carlson, Jonathan Ferris,Dave Osborne and Phil Woolery worked together to develop the course. The course introduces forest landowners to the biology and management of forests and what resources and professional assistance are available. According to survey results from 2021 participants, “94.4% stated that the information was useful to help them make future decisions and 92.5% stated that the information was useful to help act to manage their property objectives.”
“We in FNR, along with forestry professionals in Indiana and the landowners who have communicated with Lenny and his colleagues through the ‘Forest Management for the Private Woodland Owner’ course, know how valuable this program has been to sustainable forest management in Indiana,” said Zhao Ma, interim department head and professor of forestry and natural resources. “So it is absolutely wonderful when others outside of our FNR community and beyond Indiana also recognize the excellent work that Lenny and his colleagues have been doing…, I would also like to share one more note about Lenny – not only has Lenny been a highly valued and respected member of FNR and the forestry profession for many years, but he is also one of the nicest people I have met. He is knowledgeable yet humble, effective yet gentle, serious about his work yet able to have fun, very busy yet always willing to help others and try to be present. We are lucky to have Lenny as our colleague in FNR.”
Purdue Landscape Report: August was National Check Your Tree Month, but this is something that every tree owner/manager should be doing year-round. As the last hot days of summer are finishing up and we look forward to cooler fall days, we can look to our trees for different signs of trouble.
Most people tend to look up at the canopy before anything else in trees. Check leaves for dieback, discoloration, stickiness or signs of chewing. Check branches and the main stem for damage like splits and breaks, peeling bark, tunneling patterns under the bark, oozing wet spots, or sawdust around the tree. These could be signs of issues in the root system, pathogens like bacteria or fungal organisms, insect problems, or structural damage.
This is not an exhaustive list and if you notice these or anything else that seems off, it could be time for a deeper dive into what might be wrong. If you know the species of your tree the Purdue Plant Doctor is a great tool to narrow down a diagnosis. You can also contact your local Extension office or an ISA Certified Arborist.
On a more positive side, you don’t have to be on the lookout for damage, decline, or signs of pathogens and pests. It is also a matter of enjoying the trees in your landscape. Take some time out of your day to sit in the shade especially as we transition from hot summer temperatures into the cooling of autumn. Revel in the color changes as chlorophyll production slows revealing the carotenoids (that give us yellows, oranges, and browns) and anthocyanin (that produces reds and purples). In winter, not only can you better see damage in the canopy hidden by leaves in the growing seasons, but also the structure and architecture of the canopies in different tree species and the differences in bark textures. And in Spring, new growth of leaves and flowers shows us Winter is nearing its end, bringing warmer days.
So check your trees throughout the year. But not only for potential issues and risk management but also for enjoyment. Trees offer us no many benefits and sometimes it takes a little reminder. If you do see any signs of decline or damage, again, be sure to contact your local Extension office or an ISA Certified Arborist.
In this edition of ID That Tree, Purdue Extension forester Lenny Farlee takes us through the different characteristics of coniferous trees found here in Indiana, particularly their foliage and the features that pertain to them. Come along as we look through real examples of shape, scales, leaf and branches of various local trees. The featured species include Eastern red cedarwood, Northern white cedar, and more.
If you have any questions regarding wildlife, trees, forest management, wood products, natural resource planning or other natural resource topics, feel free to contact us by using our Ask an Expert web page.
Purdue Landscape Report: Recently a homeowner in Hamilton County posted on the Indiana Native Plant Society Facebook page with concerns about aphids, mites, and apple scab in her maple and oak trees. She asked for a second opinion and treatment options for these pests. I reached out to the homeowner and requested permission to collect samples from the trees. Let’s look at what I found (or didn’t find) and discuss when and if these issues should be treated.
Apple Scab on Maples?
First, we can eliminate the concern about apple scab because maple and oak trees are not hosts for this pathogen. Apple scab is caused by the fungus Venturia inaequalis, and hosts include apples, crabapples, hawthorn, mountain ash, firethorn, and loquat. There are other fungal diseases which cause leaf spotting in maples, such as Anthracnose, tar spot, and Phyllosticta leaf spot. To diagnosis these diseases, homeowners can submit a sample to the Purdue Plant & Pest Diagnostic Lab, or hire a certified arborist to assess the tree. However, all these diseases are primarily aesthetic issues. A healthy tree will not die from these pathogens and does not require treatment. You can find more information about maple diseases in this publication: Diseases in Hardwood Tree Plantings. You can also find a previous article on Tar Spot in Maple in the Purdue Landscape Report (Issue 18-12).
Fig. 1. Severe spider mite damage on maple leaves. (Photo: S. D. Frank, North Carolina State University)
Spider Mites
The next pest concern on these trees is spider mites. Out of the dozens of leaves I collected, I found only two immature mites on a couple of maple leaves I examined. This is a very small mite presence, and it is not recommended to treat for spider mites unless the populations threaten the health or appearance of the tree. Limiting pesticide usage will conserve the natural enemies, which are vital to keeping mite populations in check. In fact, improper pesticide applications can kill these important natural enemies and worsen mite infestations.
When do you know if the mite population is large enough to merit intervention? Check your trees for signs of heavy feeding damage, such as leaf stippling (Fig. 1), or dense webbing on the leaves. Mites can also be monitored by placing a sheet of paper (8.5×11”) beneath a branch and striking the limb. Chemical treatments should be considered when you count ≥24 mites per strike. You can find detailed management recommendations and a full list of pesticide options in this Purdue Extension publication: Spider Mites on Ornamentals.
Fig. 2: Adult painted maple aphids found on maple in Hamilton Co, Indiana. (Photo: Andrew Johnston, Purdue University).
Aphids
The aphids I found on the homeowner’s maple trees are Drepanaphis acerifoliae, or the painted maple aphid (Fig. 2). This species only feeds on maple trees, and is not a threat to the oak tree on this homeowner’s property. Painted maple aphid is a very common aphid in our region. I found only a few aphids on one of the maple trees I sampled, which is not enough to require treatment. In addition, one of the aphids was a “mummy”, or a carcass left behind from a parasitoid wasp. This indicates that natural enemies are already at work managing the aphid population. Aphids may rarely require chemical control if their numbers grow large enough to produce significant amounts of honeydew, which can result in sooty mold outbreaks.
Tussock Moth
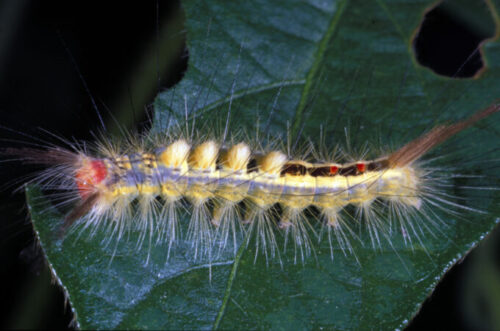
The only insect I found on the oak tree was a white-marked tussock moth caterpillar, Orgyia leucostigma (Fig. 3). This is the likely culprit for the minor feeding damage I noticed. These are not significant pests and do not require treatment. Don’t touch them, though! The setae of this caterpillar are irritating and may cause allergic reactions.
Overall, the pests I found were minimal and non-threatening to the trees. It’s normal to find some insect pressure in the landscape. Knowing when and if to treat requires accurate diagnosis and monitoring of pest levels. Check out PurduePlantDoctor.com for an easy-to-use diagnostic aid and treatment recommendations.
In this episode of A Woodland Management Moment, Purdue Extension forester Lenny Farlee talks about the importance of oak regeneration. Oak is a ‘keystone’ species, integral to supporting many different facets of wildlife. This includes insects to large mammals all across the environment in Indiana and the central hardwood region. This video also shares details regarding Purdue’s initiatives to ensure the diverse ecosystems maintained by oak and to provide the resources needed to keep regenerating this integral tree
If you have any questions regarding trees, forests, wildlife, wood products or other natural resource topics, feel free to contact us by using our Ask an Expert web page.
Populus deltoides, more commonly known as the Eastern cottonwood, becomes a topic of conversation & complaint every year around this time.A member of the willow family, this tree is found along rivers, roads, in parks, and around residential areas.It grows to heights of 75 to 100 feet spanning up to 75 feet wide.It prefers moist to wet well-drained soils but tolerates many types of sites.Cottonwoods also produce small seeds with a tuft of cotton fluff (to assist with dispersal) that can number in the millions for a single tree.
That’s right, we are in the season of the cottonwood seed.You may be walking or driving around or just looking out your window and it can look like winter is trying to attack with one last blizzard before summer sets in.Seed production occurs between May and June for about 2 weeks with the floating cotton balls accumulating on roads and paths, in yards and parks, and in other locations with a little bit of grab.Seedlings easily germinate, but are delicate, and in urban areas with an abundance of lawn care, many do not survive or are killed by excessive heat or rain.
Many concerns that I hear about are clogging of waterways or air filters, and the worry of fires.Seeds usually flow easily downstream without the volume or mass to clog waterways.They can accumulate on air conditioner units or other filters but are easily cleaned off.Cottonwood seeds are highly flammable, can pose a risk in drier climates, and should not be ignited to clean them up.They can be cleaned like leaves with fine-tined rakes or picked up in clusters and bagged.The good news is this usually only lasts for about 2 weeks.
If you do have any questions about managing your cottonwood trees, feel free to contact your local extension office or you can search for ISA-certified arborists in your area at Find an Arborist.
Purdue Landscape Report: Temperatures are finally dropping and leaves are changing color. Autumn is progressing well in my opinion. Before you know it winter will be here, and some people will be wondering is there anything to be done to better protect the trees around you? The answer is yes, and I applaud you for your initiative to continue caring for your trees. To give your trees the best chance to survive the winter and better thrive next year there is an assortment of activities available ranging from diy projects up to calling in an ISA certified arborist to help you out.
Figure 1. Maintenance of trees in the fall include many tasks before dormancy occurs.
Mulching:
One simple task to better prepare your trees for winter is to add a new layer of mulch, which benefits your trees in multiple ways. Adding a 2-3 inch thick layer of mulch will better maintain moisture levels and buffer extreme temperature changes in the soil and will add some organic matter too. Mulching to the drip line will benefit the tree the most, but in the case of larger trees it’s not always feasible. Try for at least a 3-foot radius from the trunk and make sure to leave a 2 inch or so gap between the trunk and the mulch. Remember, no volcano mulching.
Fertilizing:
That mulch you just added will add some organic material to your soil as it slowly breaks down, but an autumn fertilization can benefit your trees too. Unlike trees in the forest that have a natural supply of nutrients from fallen leaves and twigs, trees around our homes are usually deprived as we rake and clean up our yards. Adding a slow-release fertilizer in the fall helps provide a nutrient boost over the winter, can promote root growth, and better prepare your tree for Spring.
Watering:
Water is still an essential part of your tree care plan, but as temperatures drop and trees begin to head into dormancy they don’t need as much water as is required in the hit summer months. If you have irrigation systems in your yard start to drop the frequency of watering. You can water up until the first freeze, but make sure soils are just a little damp and not soaked. Evergreens in particular will benefit from slow deep watering 1-2 times a week until the soil freezes. Winter winds and temperatures can desiccate the needles without an adequate supply of water.
Pruning:
Now is a good time to prune out any dead, damaged, or diseased limbs in your trees. If you have access to hand saws and pole saws or pruners, you can remove smaller branches or those closer to the ground. Make sure you are making proper pruning cuts though, and if there are large limbs, those at heights, or you are just unsure of how to make a good cut enlist the help of a professional arborist.
Trunk damage:
Sunscald or southwest damage occurs on young and/or thin barked trees in the winter. Wounds can occur between the south to southwest facing part of the trunk on sunny days in the winter as temperatures rise and suddenly drop. Over time these wounds can become quite large. Trees can also incur damage from deer during the rut. Bucks will scrape trees with their antlers, scraping off the bark and damaging the cambium. Both of these injuries can be reduced one younger trees by installing tree guards in the fall. Tree guards are plastic barriers you place around the main stem of the tree. I recommend using white corrugated drainage pipe that can be found at most home centers. You can make a cut lengthwise along the pipe for easy installation and make sure it has a large enough diameter to leave a space between it and the tree. Just remember to remove it come Spring.
Inspections:
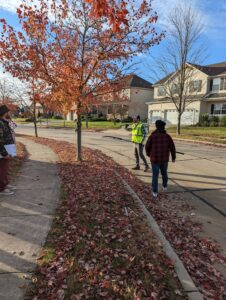
Visual inspections can be done year-round, but this time of the year it might be easier to see changes in your tree as leaves are falling and the canopy becomes more visible. From the ground up to the canopy, some of the things you’re looking for include fungal growth around the base of the tree, any sort of damage on the main stem or branches, premature leaf drop or color change, and branches that are dead, cracked, diseased, or seem weak. Any concerns you find are also great information to share with an ISA Certified arborist which can be found using the Trees Are Good website.
To view this full article and other Purdue Landscape Report articles, please visit Purdue Landscape Report.
Question: we have several maple trees in our neighborhood afflicted with this black spot (see attached photo). What can we do to protect our maple trees?
Anwer: while it is difficult to confirm a diagnosis from photos alone it looks and could be a fungal disease called tar spot. The most common species are Rhytisma acerinum and R. punctatum. Symptoms first appear in late spring or early summer as infected leaves develop light green or yellow-green spots. During mid to late summer these produce black tar-like raised structures on the upper surface of leaves within the yellow spots. R. acerinum causes larger spots that are 0.5 to 2 cm in diameter; R.punctatum causes many small punctate spots that are smaller (about 1mm in diameter). Spots caused by R. punctatum are sometimes called speckled tar spots.
Tar spot is a common disease on silver maple and is primarily considered to be a cosmetic problem rather than a serious threat. The Purdue Plant and Pest Diagnostic Laboratory has additional information on tar spot including more photos and best treatment, Tar Spot on Maple.
Purdue Landscape Report: Some of the questions that I get asked quite frequently are “Are my trees ok?”, “Do I need to have an arborist come work on my trees?”, and “Is there anything I can do to help my trees without hurting my savings?”. Just like many questions, the answers are dependent on the situation. There are a multitude of cases where it is in the best interest of both you and the tree to hire a professional. From removals and storm damage, to pruning at height and/or around utilities, and other dangerous situations, you really should invest in the cost of a certified arborist. But there are instances where you can save some money and feel the pride of caring for your trees yourself by doing some of your own pruning work.
You might not think too much about pruning. Maybe you feel like “Hey! Anyone can cut off a branch”, and you’re right but also not. There is a right and wrong way to pruning and cleaning out dead wood. Depending on where you cut and how much you remove, you might end up doing more damage to your tree and end up requiring the assistance of an arborist earlier than needed. For the pruning layperson, there are several topics that can help you prune like a pro: safety, equipment, and proper pruning cuts.
First and foremost is safety. From this time of the year onward it’s only going to get hotter, but it’s important to protect your body from accidents with your tools, from the elements, and even from the plants you’re pruning by wearing the proper personal protective equipment (PPE). From the toes up, skilled professionals have their work boots (closed toed shoes), pants (not shorts), at the very least a t-shirt, gloves and safety glasses, and hearing and head protection depending on the equipment and scale of work. And if you’re using power equipment like chainsaws make sure you’ve got protective chaps for that added level of safety.
The standard equipment available for pruning includes hand pruners, loppers, and hand and pole saws (I’ll touch on chainsaws more in a later article). The two main types of pruners and loppers are called bypass and anvil styles. Bypass pruners have two blades that “bypass” each other like scissors, leaving clean cuts on your trees and shrubs. Anvil pruners have a single blade that shuts against a flat surface, the “anvil”, and can leave bruised or crushed plant material after cuts. Use your hand pruners for smaller cuts (up to 3/4” in diameter depending on the quality of your blade) and your loppers for larger diameters that might not require a hand saw.
When choosing a hand or pole saw, it is best to have one specifically designed for pruning. Pruning saws come in different configurations. They can be straight or curved, have fixed or folding blades, and come in different lengths and teeth sizes. A good rule of thumb is shorter blades or blades with smaller teeth for finer pruning cuts and longer blades with larger teeth for bigger diameter limbs (pole saws will usually have larger blades attached to single or extendable poles). You’ll also want a blade that isn’t so thin that it buckles on the first cut. For pruning at home, I recommend a 10-12” saw with medium sized teeth. That coupled with a hand pruner and some loppers should cover most of your pruning projects.
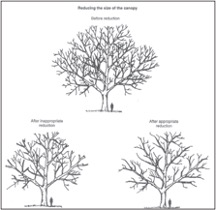
Now that you have your PPE and your pruning equipment you’ll want to begin cutting, but there are some considerations along with dos and don’ts for pruning. First, you want to decide what your goals are (raising the canopy off the ground or a building, thinning the crown to increase light and/or wind, or reducing the canopy by shortening limbs) and how much you need to remove from your tree (Fig. 1). In most cases, less is more. Whenever you remove plant material you are doing two things:
Figure 1a: Examples of canopy reduction, thinning, and raising (FNR-506-W).
Figure 1b: Examples of canopy reduction, thinning, and raising (FNR-506-W).
1) you are injuring the tree, exposing open cuts to pests, diseases, and the elements
2) you are removing plant material that could continue to create energy for the tree if left on.
Both will stress your tree and it will need time to adapt and heal. You can always remove more later, but once you make your cuts you cannot put them back. If your tree needs a heavier prune, it’s time to bring in an arborist.
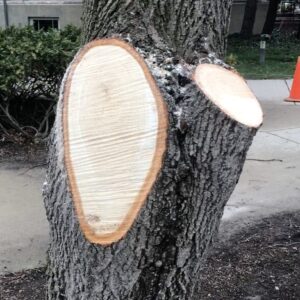
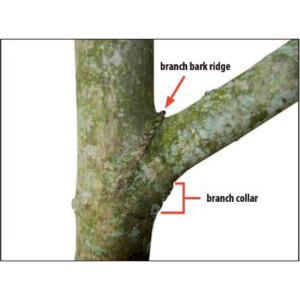
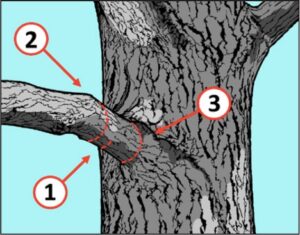
Next you need to consider what are you cutting? Are you removing whole limbs back to the trunk or are you shortening limbs? If you are removing limbs you want to avoid flush cuts, cutting back even to the trunk. Flush cuts (Fig. 2) are usually oval and have a larger surface area exposing more of the tree to pests, diseases, and the elements. Instead, you want to cut up to the branch bark ridge, a raised portion of bark on the top of the limb where it meets the trunk, and the branch collar, usually a swollen area on the bottom side of the limb where it begins to flare out from the trunk (Fig. 3). This is a proper removal cut that has the smallest surface area exposed and is usually more circular than oval.
Figure 2: Examples of a flush cut (left) and a proper removal cut (right).
Figure 3: Identifying the branch bark ridge and the branch collar for proper removal cuts (FNR-506-W).
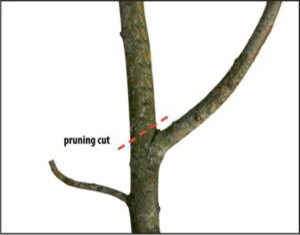
If you are shortening limbs you want to perform a reduction cut, which is removing a larger stem by cutting back to a lateral branch that is at least 1/3 the diameter of the portion you are removing (Fig. 4). This provides sufficient energy production the keep the remaining limb alive. In this situation, you want to avoid heading cuts, which are length reductions without regard to the position or diameter of the lateral branch you are cutting back too. Cutting too far away from the lateral will lead to dead stubs that increase exposure and the time needed to heal over wounds. Cutting to laterals that are too small won’t allow the limb to produce enough energy to survive.
Figure 4: Correct placement of a reduction cut to an properly sized lateral branch (FNR-506-W).
Figure 5: The 3-cut method for safe removal of limbs (FNR-506-W).
Last, whether you are applying removal or reduction cuts, you want to utilize what is called the ternary or 3-Cut Method (Fig. 5). The purpose of this method to stop damage from splitting and tear-outs in larger limbs that can’t be controlled by hand. The first cut is the undercut, about 1/3 the diameter of the limb and usually 6-12 inches from your final cut. The second cut is the top cut just outside the undercut. This cut continues down until it meets the same plane as the undercut where gravity will take hold as the branch snaps and falls. The final cut is to the branch collar, or the chosen lateral as noted above.
Proper pruning can be a daunting task at first. With time, the correct materials, and practice you can better care for your trees, your landscape, and yourself. If you are still worried about your trees, there are plenty of resources at Purdue Extension and The Education Store or you can always find an ISA Certified Arborist nearby using the Trees Are Good website. They will be able to help assess any other issues and provide excellent professional help.




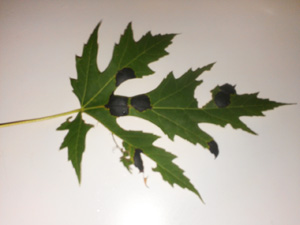 Question: we have several maple trees in our neighborhood afflicted with this black spot (see attached photo). What can we do to protect our maple trees?