 Purdue University - Extension - Forestry and Natural Resources
Got Nature? Blog
Planting food plots is a popular activity for landowners interested in attracting wildlife for viewing or hunting. The following are answers to questions we commonly receive regarding food plots, providing basic information to consider when planning for food plots as part of a comprehensive wildlife management plan for your property.
What is a food plot, and how important are food plots for wildlife in general?
A food plot is simply an agricultural crop or forage planted to attract wildlife for observation or hunting. While food plots are readily used by wildlife, they are not necessarily needed by wildlife. When we manage wildlife habitat, we break the habitat down into four basic components. Those components are food, water, cover and space. When we assess a habitat for the needs of a particular wildlife species, we want to determine which of those basic habitat components are most limiting or in need of the most work. Food is rarely the most limiting factor for wildlife. The most limiting factors are usually cover and space. Therefore, food is usually not the first habitat component needing to be addressed on the landscape. The primary purpose of planting food plots is to meet human desires to attract wildlife, rather than a necessity for wildlife. That said, food plots can still be incorporated and managed as part of a comprehensive management plan for any property in which wildlife viewing or hunting is an objective.
What are the different types of food plots?
What plants you provide in a food plot is largely determined by what species of wildlife you are interested in attracting. If you are interested in attracting white-tailed deer, which is quite often the wildlife species for which most food plots are planted, plants that provide green browse throughout most of the year would be recommended. The most popular green browse plants are typically forage plants and include clovers and wheat. Other green browse options might include soybeans, alfalfa, brassicas, turnips, kale, rye, oats and triticale, among others.
Wild turkeys will also use green browse plots, especially during the spring. Due to the short growth stature of green browse plots in the spring, male turkeys will often use these areas for strutting. Hen turkeys will bring broods to food plots of clover or other legumes for “bugging.” These areas are often high in insect biomass, providing an abundant and easily accessible food source for growing turkey chicks.
Agricultural grains are often planted for small game wildlife, including northern bobwhites, ring-necked pheasant and eastern cottontails. Grains like milo (or sorghum), sunflowers and corn are popular for small game food plots. Eastern cottontails will also readily use green browse plots if there is dense shrubby cover close by to escape predation. Sunflowers are usually planted specifically for hunting mourning doves. Grain food plots will also attract many nongame wildlife, especially songbirds. A mature sunflower field will often be full of American goldfinches, indigo buntings, chipping sparrows and song sparrows.
When should food plots be planted?
When food plots should be planted depends on what plants you will be planting. Most of the agricultural grains should be planted in the spring. Typically April and May are best for spring planted grains. Exact timing for spring planting is not as critical for food plots as it is for agricultural production. For example, soybeans can be planted in late June or even early July as a food plot. Soybeans planted for food plots are usually to provide green browse through the summer rather than bean production for harvest. Although late planted soybeans may not grow as optimal as earlier planted beans, they can still enhance the nutritional quality of summer forage for deer. Green browse plots for winter forage, including wheat and clovers, are usually planted in late summer through early fall. Clovers can also be planted in late winter or early spring.
Are food plots expensive?
Food plots vary in their expense to establish. Much of the expense depends on what you plant, equipment costs, herbicides and soil amendments. The expense really boils down to how much effort you want to put in the food plot and how successful you want it to be.
Seed costs vary considerably. Some conservation organizations, like Quail Forever and Pheasants Forever, offer free seed for its members to plant grain food plots. You might check with a local agricultural seed dealer or Ag co-op for availability of old seed. Older seed is not usually sold for agricultural production, and seed dealers may be willing to make a deal to get it out of their storage facilities. Some seed suppliers can provide additional services such as mixing your seed order for a small fee to save you time in the field. Of course, there are also the name brand seed varieties available through many sporting goods stores; however, they are usually much more expensive.
Equipment can be a considerable expense for planting food plots. Small tractors and utility vehicles can be quite expensive alone. Then you will need the implements to do the job, such as discs, planters, sprayers and possibly tillers or cultivators. If you lease part of your land for farming, you might be able to negotiate food plot work as part of the contract. Some Soil and Water Conservation Districts have implements, especially grain drills, available for loan at a small fee or deposit. Some equipment can be rented from rental supply companies. There are also individuals who specialize in food plot establishment and other habitat management projects available for hire.
Expenses associated with food plot preparation should be considered during the planning process. You will likely need to control undesirable vegetation with herbicides. Fertilizer may be necessary, and fertilizer costs fluctuate yearly. You may even have to consider exclusion of wildlife during the establishment phase, especially where deer are extremely abundant. Fencing for exclusion can be a considerable cost.
What are the basic steps in establishing a food plot?
The first step in food plot planning is to consider your objectives for having a food plot. Are you a hunter wanting to attract game to increase your hunting success? Are you interested in bringing wildlife closer to you and your family for viewing and enjoying?
Once you have determined your objectives, you need to determine the location(s). If you are planting for viewing only, where do you intend to view from? A back deck or perhaps from your living room or kitchen with large windows? You will need to consider the movement patterns of wildlife through the landscape, especially if hunting is your objective. Wildlife are more likely to utilize food plots when they are planted in areas through which they are already moving. It can be difficult to attract wildlife to an area they do not otherwise occupy unless you intend to address other habitat needs, especially cover requirements. If you are hunting, you will also want to consider wind patterns that will impact your movement into and out of the food plot during hunting. Providing multiple food plots increases hunting opportunities.
Site preparation is determined by several factors, including the amount of undesirable vegetation you will have to treat with herbicides, soil tests and planting method. If the site you have selected contains a large amount of herbaceous vegetation, you will want to consider using herbicide to kill as much of the competing vegetation as possible. Which herbicide needed depends on the nature of the plants you will control. A general herbicide most people use is glyphosate. If you have mostly grass to control, then a grass-specific herbicide can be used. If you need to control mostly broad-leaved plants, then a broad-leaf specific herbicide can be used. It is critical that before you use any herbicide, you read and follow all label directions.
A soil fertility test should be conducted for each food plot in order to determine if any of the essential soil elements are lacking and in need of amendment. The basic test will provide information on soil pH, plus the amounts of nitrogen, phosphorus, potassium and lime (calcium) that should be added. The folks at your county Extension or Soil and Water Conservation offices will provide you with the information you need for soil sampling and submission for testing. After you receive the test results, it is up to you on whether you want to amend the soil as per the test recommendations. Factors to consider are cost of the amendments and the desired vigor of the crop you plant. The more vigorous the crop, the more nutritional value it will have.
The planting method you choose will dictate how much soil work will be necessary. If you will be using a no-till drill, then you will be able to drill your seed directly into the soil through vegetation without disking it first. If you are using a conventional drill or broadcasting the seed, you will need to disk the soil prior to planting. If broadcasting, you will want to make another pass over the field with a cultipacker, harrow or other drag to lightly cover the broadcasted seed.
Annual plants, such as agricultural grains, will need to be planted every year. You could lightly disk a field of annual grains following seed set and perhaps get a second growing season from the seed production, assuming all the seeds have not been consumed. You could also leave the field fallow the next year, which means do nothing with it and let it go without disking or spraying. Either way will result in some germination of the previous year’s seed production along with annual weeds. The annual weeds are likely to be of good value for wildlife. Invasive weeds, such as Canada thistle, should be controlled with herbicide. Keep in mind that ragweeds and foxtail, while agricultural weeds, are highly valued by wildlife who consume seeds.
Other food plot plants, such as many clovers, are short-lived perennial plants and do not usually need to be planted every year. Once established, many clovers can be mowed periodically to maintain a vigorous growth. It would be beneficial to allow the perennials to produce seed to help maintain the field. Reseeding perennial plants may be necessary where browse pressure by deer is excessive.
Are there negatives associated with food plots?
There are not many negative impacts of food plots on wildlife. Two that could potentially impact wildlife are disease and predation. Any time you concentrate animals, you increase the risk of communicable disease transmission and predation. These negatives can be reduced through vigilant observation of your plots and habitat management. If you do notice a disease problem, then you may want to take the plot out of production for a year or two to reduce the concentration of animals. Disease transmission associated with food plots is rare.
Anytime you concentrate a food resource, you attract animals that eat that food, and this logic follows on up the food chain. If you plant milo, you will attract northern bobwhites and other birds. This, in turn, will attract predators of those birds. You can reduce predation by providing adequate escape cover in close proximity to the food plot.
What resources are available to help with food plots?
One of the best resources available for wildlife habitat management, including food plots, is your local District Wildlife Biologist from the Indiana Department of Natural Resources. The District Wildlife Biologist will be able to assist you in meeting your land management objective, especially as it relates to wildlife habitat. They will also be able to determine if your wildlife management objectives qualify for any cost share opportunities. If you are not in Indiana, your state’s natural resource management agency will also have a team of wildlife biologists dedicated to assisting landowners.
Another source of information is the Cooperative Extension Service. All states have Extension Wildlife Specialists housed within a Land Grant university that can provide you with information on managing wildlife habitat. Your county Extension Educator/Agent will also be able to provide you with information. The University of Tennessee Extension Service has several food plot resources available that are applicable throughout the eastern United States, including the book, A Guide to Successful Wildlife Food Plots: Blending Science with Common Sense (8MB pdf). For more resources, view Food Plots from The University of Tennessee Extension.
There are many books about food plots available from online bookstores. You can also get information about food plots from non-profit conservation organizations such as Whitetail’s Unlimited, Quality Deer Management Association, Pheasants Forever, Quail Forever, Duck’s Unlimited, etc. If you use the Internet for information, look for information from organizations previously listed, from government natural resource agencies and the Cooperative Extension Service.
Don’t forget to ask neighbors, friends, hunters and others with similar interests from your area. They may be experienced with planting food plots and, from my experience, enjoy talking about their experiences. They can be a wealth of knowledge, especially in regard to what will grow and what will not in your area. They may also be willing to help you with the planting of your plots!
If you have any questions, please feel free to contact Jarred Brooke, extension wildlife specialist, at jmbrooke@purdue.edu.
Resources
Food Plots, The University of Tennessee Extension
A Guide to Successful Wildlife Food Plots: Blending Science with Common Sense, The University of Tennessee Extension
Indiana’s District Wildlife Biologist, Indiana Department of Natural Resources
Food Plots for White-Tailed Deer, The Education Store
The Basics of Managing Wildlife on Agricultural Lands, The Education Store
How to Score Your White-tailed Deer, video, The Education Store, Purdue Extension Resource Center
White-Tailed Deer Post Harvest Collection, video, The Education Store
Jarred Brooke, Wildlife Specialist
Department of Forestry and Natural Resources, Purdue University
 This appears to be Northern Tooth Fungus, but I would need to look at it more closely for certain identification. This fungus causes a heart rot on maples and other trees. In most cases, the tree has to be tested for the extent of the decay. Presence alone of the fruiting bodies is usually not reason for removal; however, it should be reviewed by a certified arborist for risk assessment.
Resources
Northern Tooth Fungus-Climacodon septentrionale, Department of Biology, University of Wisconsin
Indiana Certified Arborists, International Society of Arboriculture
Lindsey Purcell, Urban Forestry Specialist
Department of Forestry and Natural Resources, Purdue University
A girdling root is one that circles the base of a tree at or just below the surface. Girdling roots can also girdle other roots but without harm. The most commonly affected species are maples, lindens and ashes.
The threat of a girdling root depends on two major factors, the size of the root and the amount of circumference affected on the tree. The expansion of the root and the stem squeezes them against each other, interfering with the transport of water, nutrients, sugars and other necessary compounds. Eventually, there may be damage which reduces vigor and often leads eventually to whole stem failure.
The only sure sign is to see a root circling the main stem at or crossing other roots at or just below the soil surface. Typically, roots should grow laterally, away from the trunk. Poor root systems grow horizontally, across each other and the main stem at the root flare. Look for a crossing network of roots near the trunk or larger woody roots growing horizontally. It may be helpful to gently displace the soil at the tree base to see if a circling root lies just under the soil surface.
Common symptoms include one side of the trunk flattened, marginal and/or tip scorching on the leaves, crown discoloration or dieback. However, many of these symptoms can be caused by other factors such as root damage, flooding or wilt diseases.
Treatment should be conducted by a qualified, International Society of Arboriculture Certified Arborist who understands the proper protocol for root surgery. This is done by the use of a saw or chisel to sever the girdling root. Arborists who remove stem girdling roots as part of their regular tree care program report that roots can be removed until their total cross sectional area is 25 percent of the trunk cross sectional area at 4.5 feet from the ground. Root severance is very serious work that requires knowledge and experience but can be done successfully in the right situations and especially prior to worsening conditions.
Resources
The Education Store (Search keywords to find the resources you need)
When Tree Roots Surface, Purdue Yard & Garden News
Lindsey Purcell, Urban Forestry Specialist
Department of Forestry and Natural Resources, Purdue University
 Woodland owners seem to have a lot to worry about these days. Threats to the health of their woodlands are announced regularly as new insects or diseases are detected, drought rages or invasive plant species compete with native vegetation. Some threats, like the emerald ash borer or a large tornado, can result in nearly unstoppable destruction. However, there are some actions that woodland owners can take to make their woodlands more resistant to other damaging agents or events. One of the best preventative measures is to use forest management practices to make the trees in your woodland as healthy and vigorous as possible. Competition between trees is a natural part of forest growth and development, but excessive competition as trees become more crowded and fight for growing space can make trees more susceptible to attack by insects and diseases and damage by weather extremes like droughts. Thinning around desirable trees provides additional growing space and reduces stress on these trees. Thinning can be done by harvesting trees for firewood or other personal use products, selling trees in a timber sale, or felling or girdling trees to be left for wildlife habitat. Gradual thinning in your woodland helps maintain the vigor of the remaining trees much like thinning carrots in a garden result in larger, faster growing carrots.
Vines and invasive plants can also create problems for tree health. Some vines, like wild grape, kudzu and Asian bittersweet, can climb over the crown of the tree, covering the leaves and reducing growth and vigor, and in some cases, killing the tree. Trees with large vines in their crowns may also be more susceptible to damage during wind, snow or ice storms, due to the extra weight of the vines. Cutting vines that climb into desirable trees is a good way to protect their health. Invasive plants like Asian bush honeysuckles and tree-of-heaven can become serious competitors with native forest trees and shrubs for space, water and nutrients required for tree growth and regeneration. Heavy infestations of invasive plant species can even change the soil environment, making it more difficult for trees to regenerate. Controlling invasive plants in your woodland is an important step in encouraging long-term woodland health.
Professional foresters and arborists can help you manage the health of your woodland. You can find professional foresters through the website findindianaforester.org or from the Indiana Division of Forestry.
The Education Store, available through Purdue Extension, has many resources available to help you manage your woodlands. Just place the keyword “woodland” in the search field box.
Forest Improvement Handbook.
Resources:
Resources and Assistance Available for Planting Hardwood Seedlings, The Education Store, Purdue Extension’s resource center
Creating a Wildlife Habitat Management Plan for Landowners, The Education Store
How to Build a Plastic Mesh Deer Exclusion Fence, The Education Store
Planting Forest Trees and Shrubs in Indiana, The Education Store
Shrubs and Woody Vines of Indiana and the Midwest, The Education Store
Investing in Indiana Woodlands, The Education Store
Woodland Stewardship for Landowners Purdue Extension – Forestry & Natural Resources (FNR) Extension YouTube Playlist
ID That Tree, Purdue Extension-FNR YouTube playlist
Woodland Management Moment , Purdue Extension-FNR YouTube playlist
Lenny Farlee, Extension Forester
Hardwood Tree Improvement and Regeneration Center (HTIRC)
Forestry and Natural Resources, Purdue University
Logs need to be at least 8 inch diameter inside bark small end, at least 8 feet long and straight and sound. Good grade logs do not develop until you get into at least the 14 inch diameter range and up. To be commercial, you will need at least a semi load. The issue here is hauling as well as the need to have a loader to load the semi.
If the above is not an option, you might go to the Wood-Mizer website and search for a sawyer. You will likely find one that would saw the logs for you and maybe one that would be interested in smaller quantities of logs.
You might also check with any local sawmill operation or district forester.
Resources
Wood-Mizer (Find a local portable sawmill service)
Indiana District Foresters
Forestry and Natural Resources Extension Workshops (Hardwood Lumber workshop)
The Education Store (Search the keyword “lumber” to find a large list of resources)
Dan Cassens, professor of wood products
Department of Forestry and Natural Resources
Purdue University
Indiana Department of Natural Resources (INDNR) recently received inquiries asking what to do with an abandoned animal. The INDNR web resource titled Orphaned and Injured Animals has steps to follow as you decide if the animal is truly abandoned.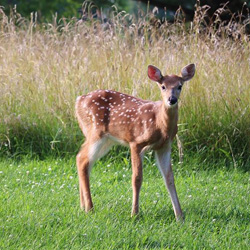
Resources
Got Nature? Orphaned Animals, author Brian MacGowan, extension wildlife specialist, Purdue University:
In most cases, the young animal is simply “spreading its wings” and exploring, or mom simply left it to get something to eat. Fawn deer are programmed to hide and remain motionless while mom is away. The fact is wildlife rarely abandons their young. They may leave briefly only to return.
Remember that you should never handle wild animals unless absolutely necessary. Any animal can bite you, and many harbor diseases and pests that can be transmitted to people.
In Indiana, wildlife rehabilitators have necessary state and federal permits to house and care for sick or injured wild animals. If you think you have found a sick or injured animal, you can find a list of licensed Wild Animal Rehabilitators in your area on the DNR Division of Fish and Wildlife’s website.
Mammals of Indiana, J.O. Whitker and R.E. Mumford
Common Indiana Mammals, R.N. Chapman and R.N. Williams, publication number FNR-413-W
Orphaned and Injured Animals, Indiana DNR
The Education Store (Search keywords to find the resources you need)
 Woodlots are dynamic, vital ecosystems in the urban and suburban landscapes of the Midwest. People own these small wooded lots in urbanized areas for a variety of reasons: timber production, firewood production, recreation, wildlife habitat, aesthetics and alternative forest products. Many owners who keep and nurture these natural areas are motivated by powerful, non-economic motives based primarily on aesthetics and environmental protection.
This new Purdue Extension publication titled Indiana’s Urban Woodlots is a great way to aid you in a management plan and build your knowledge of what trees can do for you and the environment. This 24-page booklet covers benefits of trees, laws and zoning, stewardship planning, management, planting and renewal, and more.
View The Education Store for this and other Purdue Extension publications. Just type keywords in the search field to find the resources you need.
Lindsey Purcell, Urban Forestry Specialist
Department of Forestry and Natural Resources, Purdue University
Lenny Farlee, Sustaining Hardwood Extension Specialist
Hardwood Tree Improvement and Regeneration Center (HTIRC)
Department of Forestry and Natural Resources, Purdue University
An unsatisfactory approach to tree maintenance or pruning is “topping” it. Topping is the indiscriminant removal of branches of a tree above an arbitrary height, leaving unnatural, grotesque stubs and misshapen tree forms. In addition, increased risk tree conditions are introduced with development of decay, weak branch attachments and poor health.
Large evergreen trees do not respond well to topping. The removal of the upper main stem through topping opens the tree to internal decay, disease or damaging insects; it also removes the most productive portion of the tree. The practice of topping to control tree size or growth is not justified. If the tree is too large to fit the space, it should be removed and replaced with a smaller, more suitable species for its growing space.
Be aware that unprofessional tree service crews use this approach because it takes little skill and is easiest for them to perform. Do not let yourself be persuaded that topping serves your best interest; both you and your tree will suffer from such mistreatment.
The topmost part of an evergreen whose shape is pyramidal, such as a spruce tree, has a growing point known as the apical meristem. In evergreen trees, the apical meristem contains a hormone that suppresses lateral growth, helping it to keep its excurrent or pyramidal form. The further away from the tip (apical meristem), the less affect this hormone has on the lateral growth of the tree’s branches. This is why spruce trees have that pyramidal shape and are not more rounded or decurrent. By topping evergreen trees, it will destroy the apical dominance of the plant and result in growing more round than tall with a misshaped top. It will try to re-establish apical dominance as it matures, but it will most likely look very unusual and not like these species should appear with multiple competing growing tips. Remember, this is a natural form for many evergreens to help shed the heavy loads from snowfall. Remove the apical meristem (tip), and you reduce the suppression of lateral growth. This affects the shape of the spruce tree and exposes it to potentially splitting the tree down the trunk as well as exposure to the problems associated with topping.
Resources
Trees are Good
What’s Wrong with Topping Trees?
Lindsey Purcell, Urban Forestry Specialist
Department of Forestry and Natural Resources, Purdue University
Spring brings an opportunity to spend more time outdoors but also increases our exposure to tick bites and infection from some of the diseases that ticks carry. Taking some precautions to reduce risks of exposure and infection from ticks can make your outdoor activities more safe and enjoyable. Ticks can be found in almost any location that has animals and vegetation, so completely avoiding ticks is very difficult. But there are some practices that will help you prevent ticks from biting and passing disease organisms to you.
Here are several suggestions:
- Wear light-colored clothing that makes it easier to see ticks and remove them before they get to bare skin.
- Tuck in shirt-tails, tuck pants into boots or socks or use “tick gators” that are essentially a legging that covers where your pants and socks or boots meet.
- Wearing a hat is another good precautionary measure.
- Treat bare skin with repellants containing 20 to 30% DEET. Always read and follow label directions!
- Treat clothing (not skin!) with repellants containing permethrin prior to entering areas with ticks. Once dried on the clothing, permethrin can still be effective after several washes. Follow label directions.
- Upon your return, inspect clothing for any ticks. Tumbling clothes in a hot dryer for an hour will kill ticks. Shorter times may be effective if the clothes are not wet.
- Wash up after visiting tick-infested areas and do a body check for any ticks.
If you find a tick attached, remove it by using tweezers or a tick removal tool to grasp it as near to the skin as possible and pulling straight out. DO NOT use hot match heads or needles, nail polish, gasoline or similar techniques. Ticks that are removed shortly after they attach may not have the opportunity to pass disease organisms to you, so quick detection and removal are good prevention methods.
If you experience a rash, fever, chills, aching or other unusual symptoms after a tick bite or exposure to tick-infested areas, see your physician immediately. Most tick-borne diseases can be effectively treated with early detection.
Enjoy the outdoors by taking precautions to reduce your risks.
Purdue has an informational webpage on ticks at Purdue Medical Entomology.
The Center for Disease Control and Prevention has an information site on ticks and tick diseases.
Lenny Farlee, Sustaining Hardwood Extension Specialist
Hardwood Tree Improvement and Regeneration Center (HTIRC)
Forestry and Natural Resources, Purdue University
Tree owners who have broken limbs in their trees or are just taking advantage of early pruning opportunities may notice large amounts of “water” that seem to be pouring out of the branch. This is actually “sap” seeping out of the damaged area, and it would have been going into the limb or branch that was removed. However, since the limb is no longer there, the sap has nowhere to go but out of the freshly cut limb or wound.
Spring weather signals to trees to come out of dormancy, and all trees start pumping water, minerals and carbohydrates upwards into the tree to allow growth of buds, leaves and shoots and will continue throughout the growing season. Certain tree species, such as maple, birch, dogwood and elms, have an exceptionally heavy sap flow in the early spring. When pruned or wounded, these trees will “bleed” quite noticeably. Under normal circumstances, it is best to delay pruning these trees until later in the growing season when the flow of sap is slower.
There is no need for alarm if this sap flow occurs and the overall health of the tree is not going to be affected. The “bleeding” may be objectionable from a cosmetic standpoint, especially if the sap is dripping directly onto people, cars or other targets beneath the wounded area. As the affected area on the tree develops callus material and naturally seals off the wound, it will slow the flow to a stop.
It is not recommended to use any type of wound dressing or covering as this will impede the ability of the tree to seal off the damaged area. Be patient and allow natural healing of the wound to occur. Always use good pruning practices and minimize the size of cut branches to reduce wound size on the tree.
Refer to the following Purdue Extension publication, Trees Need a Proper Start: Prune Them Right, for more information.
Other resources can be found at The Education Store: Pruning Ornamental Trees and Shrubs.
Lindsey Purcell, Urban Forestry Specialist
Department of Forestry and Natural Resources, Purdue University
Recent Posts
- Celebrate Pollinator Week With Flowers of June Tour
Posted: June 15, 2026 in Forestry, Gardening, How To, Wildlife - Connecting Research to Practice: Natural Resources & Land Use Spring Training
Posted: June 5, 2026 in Forestry, Forests and Street Trees, How To, Invasive Animal Species, Invasive Plant Species, Land Use, Natural Resource Planning, Urban Forestry, Wildlife, Woodlands - Indiana Monarch and Pollinator Conservation
Posted: June 1, 2026 in Forestry, Forests and Street Trees, Gardening, How To, Natural Resource Planning, Plants, Urban Forestry, Wildlife - Spring Storms Are Coming: How to Reduce Tree Damage and Risk
Posted: May 1, 2026 in How To, Urban Forestry, Wildlife, Woodlands - It’s Timberdoodle Time!
Posted: April 3, 2026 in Got Nature for Kids, How To, Wildlife - When is the Peak Migration For Hummingbirds and How Can You Attract Them?
Posted: April 2, 2026 in How To, Wildlife - 2026 Winter Bat Survey In Progress, MyDNR
Posted: March 27, 2026 in How To, Wildlife - IN-PREPared: Essential Resources for Indiana’s Severe Weather Season
Posted: March 11, 2026 in How To, Safety - Getting Certified as an Indiana Certified Prescribed Burn Manager
Posted: March 2, 2026 in How To, Urban Forestry, Woodlands - Control Management of Poison Hemlock
Posted: February 24, 2026 in Ask the Expert, Forestry, How To, Invasive Plant Species
Archives
Categories
- Alert
- Aquaculture/Fish
- Aquatic/Aquaculture Resources
- Ask the Expert
- Christmas Trees
- Community Development
- Disease
- Drought
- Forestry
- Forests and Street Trees
- Gardening
- Got Nature for Kids
- Great Lakes
- How To
- Invasive Animal Species
- Invasive Insects
- Invasive Plant Species
- Land Use
- Natural Resource Planning
- Nature of Teaching
- Plants
- Podcasts
- Ponds
- Publication
- Safety
- Spiders
- Timber Marketing
- Urban Forestry
- Webinar
- Wildlife
- Wood Products/Manufacturing
- Woodland Management Moment
- Woodlands