 Purdue University - Extension - Forestry and Natural Resources
Got Nature? Blog
Seeding rates for native warm-season grass and forb mixtures (NWSG) have changed drastically over time. In the past, native grasses were planted without forbs at rates exceeding 10 lbs/ac. This may be ideal from a forage production standpoint, but this created dense stands of native grass with little to no forb component and lacked benefits to most wildlife.
Mixtures have shifted from heavy planting rates of tallgrass species with few forbs to reduced rates of mid-stature grasses with an abundance of forbs. Recommended seeding rates of some current mixtures may be lower than what no-till drills are capable of planting. In this case, fillers may be needed to increase the bulk weight of the seed to allow the equipment to plant at the correct rate.
Seed mixtures are also more commonly being established by broadcasting seed during late winter (frost seeding) using cyclone fertilizer spreaders. Broadcasting native warm-season grass and forb seed usually requires the use of a carrier to ensure the mixture flows correctly through the spreader and the seed is distributed evenly across the field.
Using fillers when no-till drilling native warm-season grass and forb mixtures
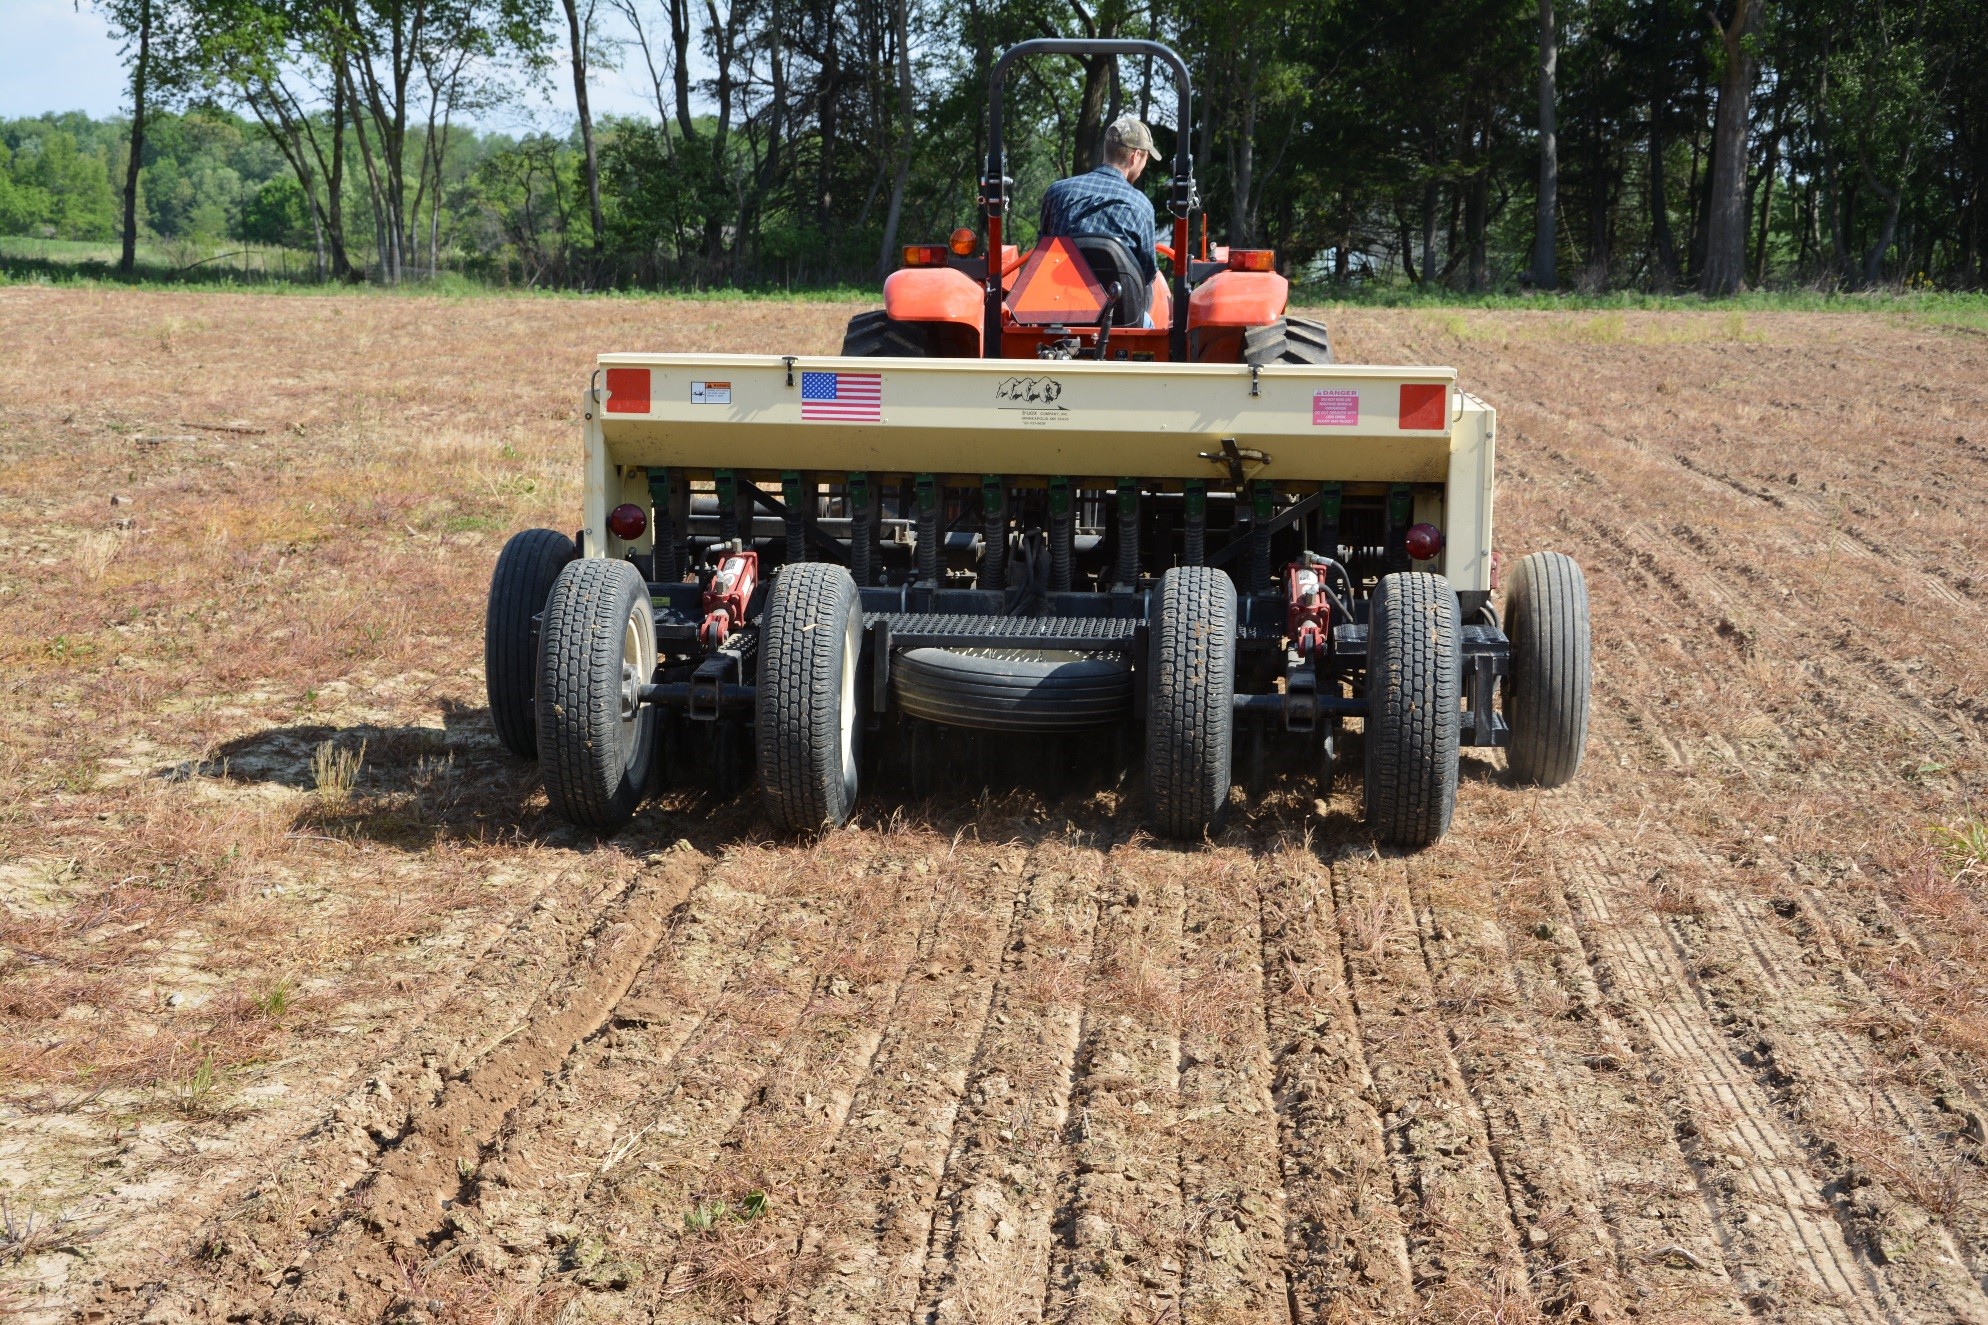
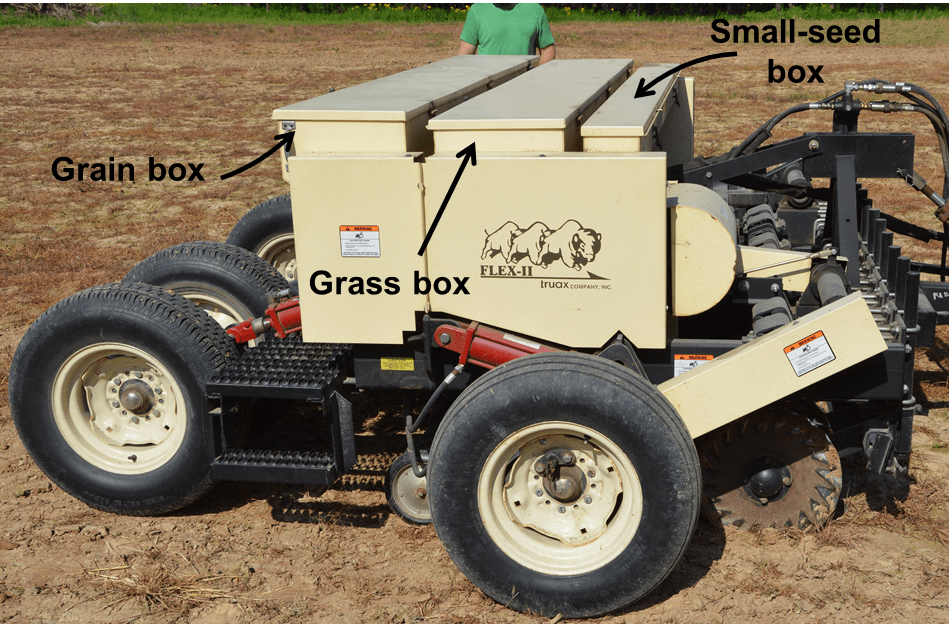
Planting native grass and forb mixtures with a no-till drill is the most common establishment method for NWSG plantings. It may be difficult to achieve the correct seeding rate with a no-till drill because of the combination of reduced bulk weight of dechaffed seed and reduced seeding rates of common mixtures. Fillers can be used to increase the bulk weight of native grass and forb seed if a drill cannot achieve the recommended seeding rate. Traditionally, native grass and forbs have been planted separately using the grass or fluffy-seed box for the native grass seed and the small-seed box for the forbs. However, if the seed has been cleaned and dechaffed it is common for seed companies to mix the seed and recommend it be planted together using the fluffy or grain box on a no-till drill. Fillers can be used when planting native grasses and forbs separately or when planting native grass and forb mixtures. Refer to the chart below for recommended fillers for the different seed boxes of a no-till drill.
Example:
We are planting a 10-acre field to a native warm-season grass and forb mixture using a no-till drill. The recommended seeding rate is 6 lbs/acre. The seed will be planted with the grain box of the drill, but the drill will only plant a minimum of 10 lbs/acre of our seed mixture.
10 acre field * 6 lbs/acre bulk seeding rate = 60 lbs of the seed mixture
Minimum seeding rate for the no-till drill is 10 lbs/acre = 10 lbs/acre * 10 acres = 100 lbs
We need to add a filler to increase the bulk weight of the seed mixture to be able to plant at the correct seeding rate. We added a 1:1 ratio (by weight) of cracked corn to our seed mixture:
60 lbs of seed + 60 lbs of cracked corn = 120 lbs of bulk weight for 10 acres
We now need to adjust our bulk seeding rate to account for the added crack corn.
120 lbs of bulk weight for 10 acres = 12 lbs/acre
We need to calibrate our drill to plant 12 lbs/acre in order to plant 6 lbs/ac of our initial seed mixture.
Generally, you should use a 1:1 ratio (by weight) of filler-to-seed, but in some cases you may need to use a higher ratio (e.g., 2:1, 3:1, or 4:1 filler-to-ratio) to achieve the correct seeding rate.
Using carriers when broadcasting native warm-season grass and forb mixtures
Broadcasting native warm-season grass and forbs mixtures is most commonly accomplished with a cyclone fertilizer spreader. These spreaders may have issues broadcasting the native grass and forb seed. The 2 main issues are: (1) the seed is not heavy enough to flow through the spreader and (2) the seeds of various size will settle and will not be spread evenly across the field. Carriers will add more bulk weight to the native grass seed and will help ensure the seed stays mixed across the field. Common carriers that are used with native grasses are cracked corn, pelletized lime, wheat, or oats. The recommended rates of common carriers are in the table below:
Pelletized lime
Wheat
Oats
Cracked corn
200 lbs/acre
40 lbs/acre
32 lbs/acre
1:1 ratio of seed-to-cracked corn by weight
Table adapted from the publication Warm season grass establishment,
Indiana Department of Natural Resources, 2006.
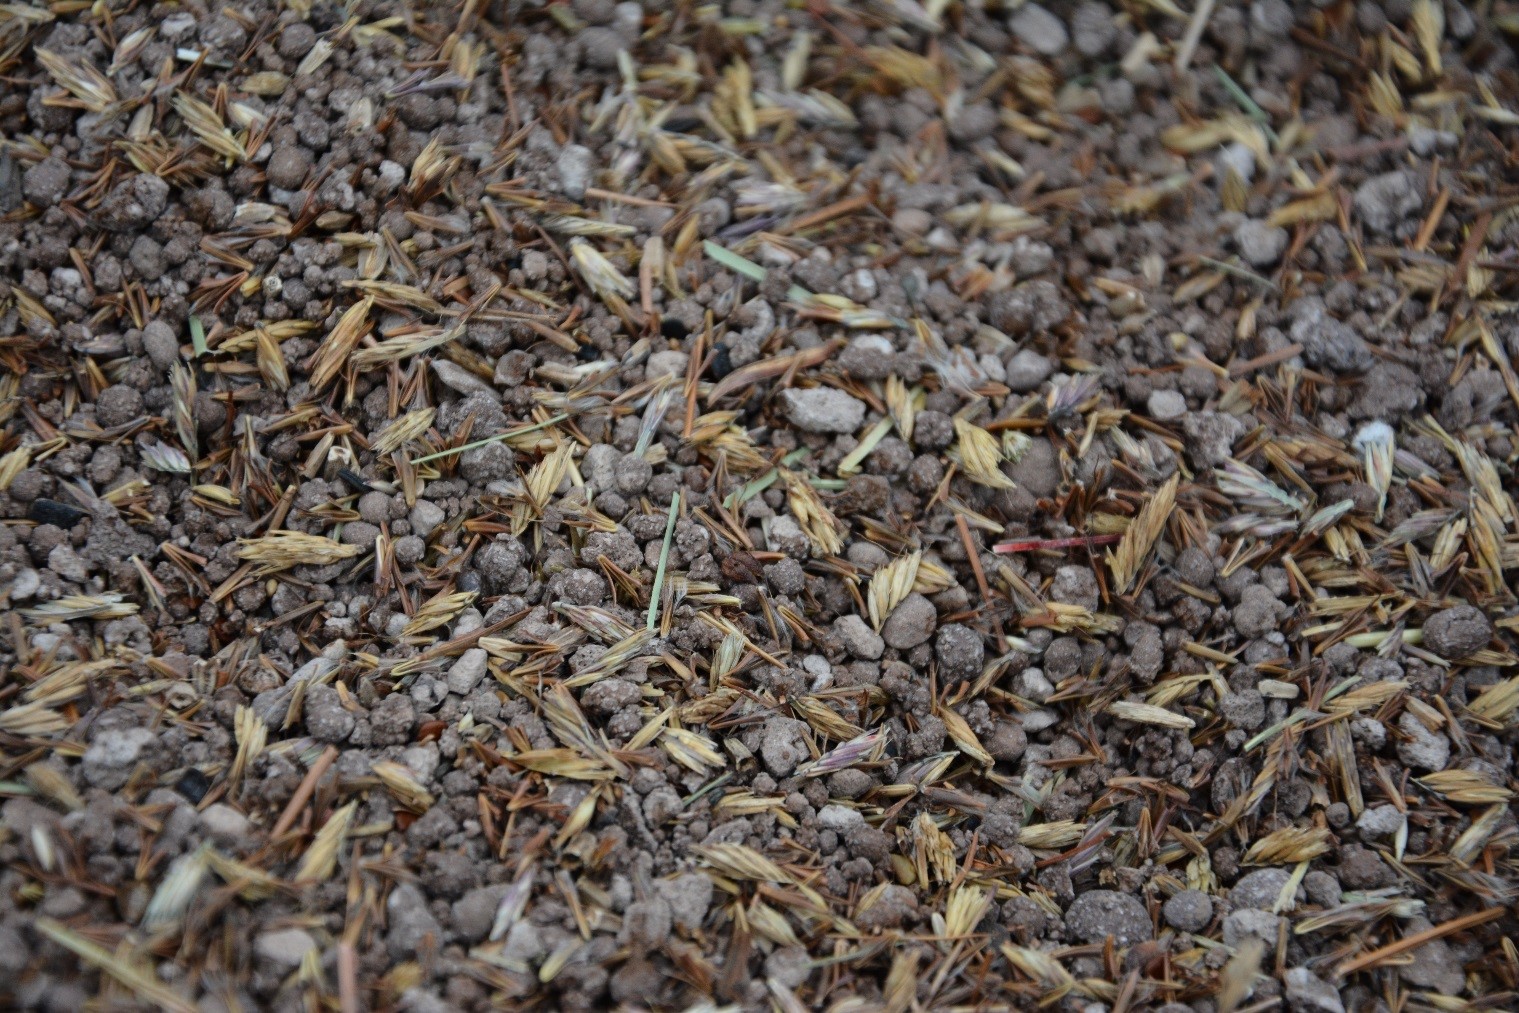
Pelletized lime mixed with native grass and forb seed prior to broadcasting.
Example:
We plan to broadcast a native grass and forb mixture on a 10-acre field. The recommended bulk seeding rate is 6 lbs/acre.
10 acre field * 6 lbs/acre bulk seeding rate = 60 lbs of the seed mixture
We need to add a carrier to the mixture to increase the bulk weight of the seed mixture. We plan to add 200 lbs of pelletized lime per acre:
200 lbs/ac of lime * 10 acres = 2000 lbs of lime
60 lbs of seed + 2000 lbs of pelletized lime = 2060 lbs of bulk weight for 10 acres
We now need to adjust our bulk seeding rate to account for the added pelletized lime.
2060 lbs of bulk weight for 10 acres = 206 lbs/acre
We need to calibrate the spreader to broadcast 206 lbs/acre in order to plant 6 lbs/acre of our seed mixture.
Conclusions
Planting native warm-season grass and forb mixtures at the correct rate is a critical step in ensuring a successful planting. Using fillers and carriers when establishing native warm-season grasses and forbs can help ensure the mixtures are planted at the proper rates, flow correctly through the seeding equipment, and ensure the seed is spread evenly across the field.
Other Resources:
Pure Live Seed: Calculations and Considerations for Wildlife Food Plots, Detailed Resource, Purdue Extension-FNR
Renovating Native Warm-Season Grass Stands for Wildlife: A Land Manager’s Guide, free pdf download
Calibrating a No-Till: FNR 556-WV, free pdf download
VIDEO: Calibrating a No-Till Drill for Conservation Plantings and Wildlife Food Plots
VIDEO: Frost Seeding to Establish Wildlife Food Plots & Native Grass and Forb Plantings
Printable Version:
PDF available for print: Seed Fillers and Carriers for Planting Native Warm-Season Grasses and Forbs (pdf 771.45) detail resource.
Moriah Boggess, Purdue Extension Wildlife Intern
Jarred Brooke, Purdue Extension Wildlife Specialist
Have you heard the old adage “proper planning prevents poor performance?” This adage applies perfectly to establishing food plots for wildlife; you just have to adjust the words, “Proper planting prevents poor food plot performance”.
When we talk about planting we include planting method, timing, depth, and planter calibration (see video), but we also include seeding rate. While there are many steps prior to planting to ensure a successful food plot, including taking a soil test, adjusting the soil fertility, and proper site preparation, determining the proper seeding rate based on pure live seed rather than bulk weight may be one aspect that people skip or ignore.
All agronomic seeds have a recommended seeding rate. This is the rate that maximizes forage or grain production and minimizes seed costs. Planting food plot seed too heavily is often a waste of money, because it increases your seed cost, but does not necessarily increase you forage or grain production. Planting food plots too lightly is an inefficient use of field space, opening areas up for weeds to overtake your planting, and could result in failure because of overbrowsing.
Seeding rate also varies by planting method and it’s important to make sure to follow the recommended seeding rate for the planting method you will be using. This rate is greater when broadcasting rather than when drilling or planting seed (broadcast rate: 75-100 lbs/ac vs. drilling rate: 50 lbs/ac for iron-clay cowpeas).
It is important to recognize the difference in how seed is sold (bulk weight) and how seeding rates are recommended (pure live seed [PLS]). When you buy seed from a supplier you are buying it in the form of bulk weight. Bulk weight is the total weight inside the bag, including the food plot seed, as well as the weight of the seed coating and other material (other crop seed and weed seed).
While seed is sold by bulk weight, seeding recommendations are commonly given as PLS rates. This distinction is important. For example, all the recommendations in A Guide to Wildlife Food Plots and Early Successional Plants by Dr. Craig Harper, University of Tennessee Extension are given in PLS rates. Pure live seed is the living seed of the intended crop that will germinate from a seed bag and accounts for the weight of the bag made up of impurities, weed seed, and other crop seed.
Percent PLS in a seed bag varies, depending on the amount of pure seed in the bag as well as the germination rate of that seed. It is important to know the difference between PLS and bulk weight so that you can calculate the amount of bulk weight you need to achieve the recommended PLS seeding rate.
Keep the distinction between bulk weight and PLS weight in mind when buying seed to ensure you purchase enough seed to cover the entire area of your food plot. In this article we will explain how to calculate PLS based on information given to you when you purchase seed.
Dissecting a seed tag – know what you’re getting before you purchase
Before we get too far into calculating PLS, it is important to understand what information you get when purchasing seed. Regardless of whether you buy a seed mix or a single species from a co-op, feed store, or sporting goods store, all agricultural seed sold in Indiana must come with a label – commonly called a seed tag. By law, that seed tag must contain these 12 items: 1) commonly accepted name (species) and variety, 2) lot number, 3) origin of seed, 4) company who labeled the seed, 5) percentage of pure seed (>5% of weight), 6) percentage of other crop seeds, 7) percentage of inert matter, 8) percentage of weed seed, 9) species and amount of any noxious weeds (if present), 10) germination rate, 11) hard seed, and 12) calendar month and year the bag was tested.
Important items to look for when purchasing seed are explained below.
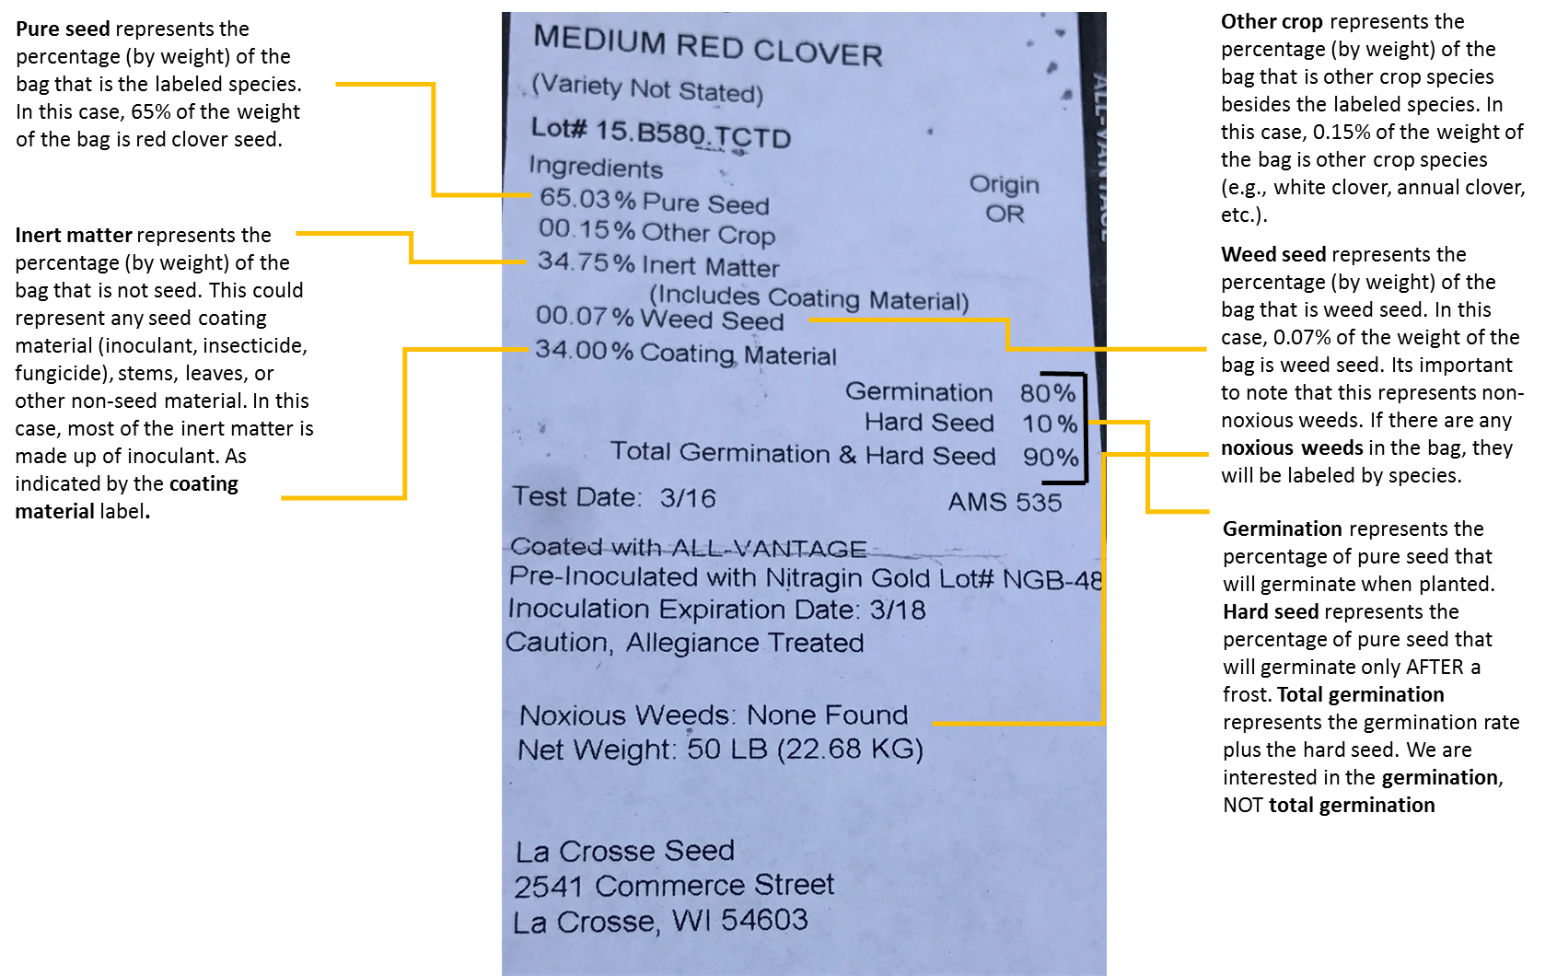
As we can see from this red clover seed tag above, only 65% (32.5 lbs) of the 50 lb bag is actually red clover (Pure Seed). Most of the other weight is the inoculant (Coating Material; 34% or 17 lbs). Of the 32.5 lbs of red clover seed, 80% will germinate after planting (Germination). So, if you planted 15 lbs (bulk weight) from this bag (recommended PLS rate) you would actually be planting 9.75 lbs of pure seed, of which only 7.8 lbs would germinate. Meaning you would be planting a little over half the recommended rate. See why PLS is so important now?
Clover seed: bag half empty or half full?
It may seem odd to buy a 10 lb clover seed bag only to expect 5 lbs to actually grow, but in the case of legumes – like clovers – the 5 lbs in the bag that isn’t seed may actually save you money in the long run. Having as little as 50% PLS in a bag of clover is not uncommon, as much of the weight is made up of the seed coating, which is typically an inoculant. The inoculant on clover, soybeans, alfalfa, or other legumes is living bacteria that help fix nitrogen from the air and make it usable to plants. Planting inoculated seed – whether you inoculate it yourself or purchase pre-inoculated seed – reduces the amount of nitrogen fertilizer needed, ultimately saving you money on fertilizer application. The benefit of buying pre-inoculated seed is that it saves you the hassle of inoculating the seed yourself.
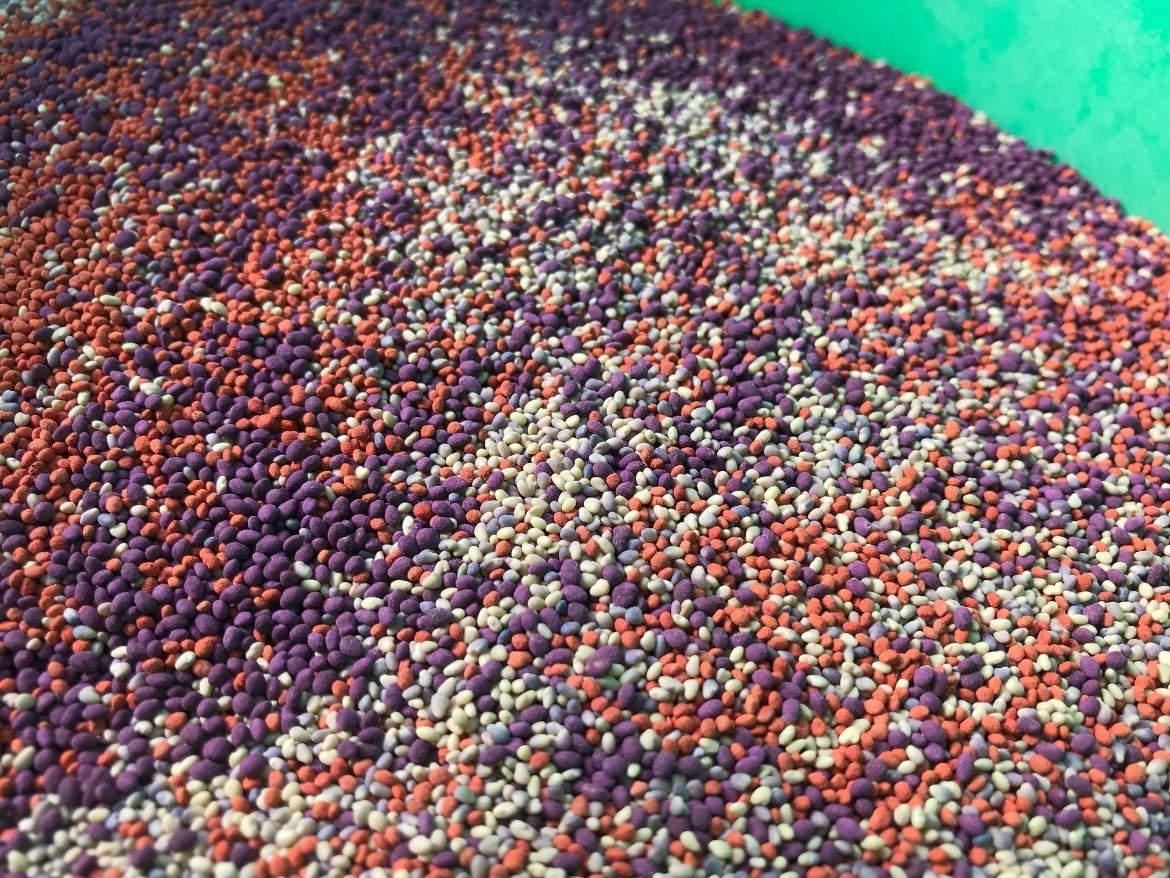
Most pre-inoculated clover seed will have a colored seed coating (purple and orange seed), which helps distinguish it from uninoculated seed (tan seed in this mix).
Calculating pure live seed (PLS)
Now that you know the importance of reading the seed tag before purchasing seed, you can now think about calculating PLS. All the information you need is right there on the tag. Using the example seed tag below locate the two items labeled “PURE SEED” and “GERMINATION”.
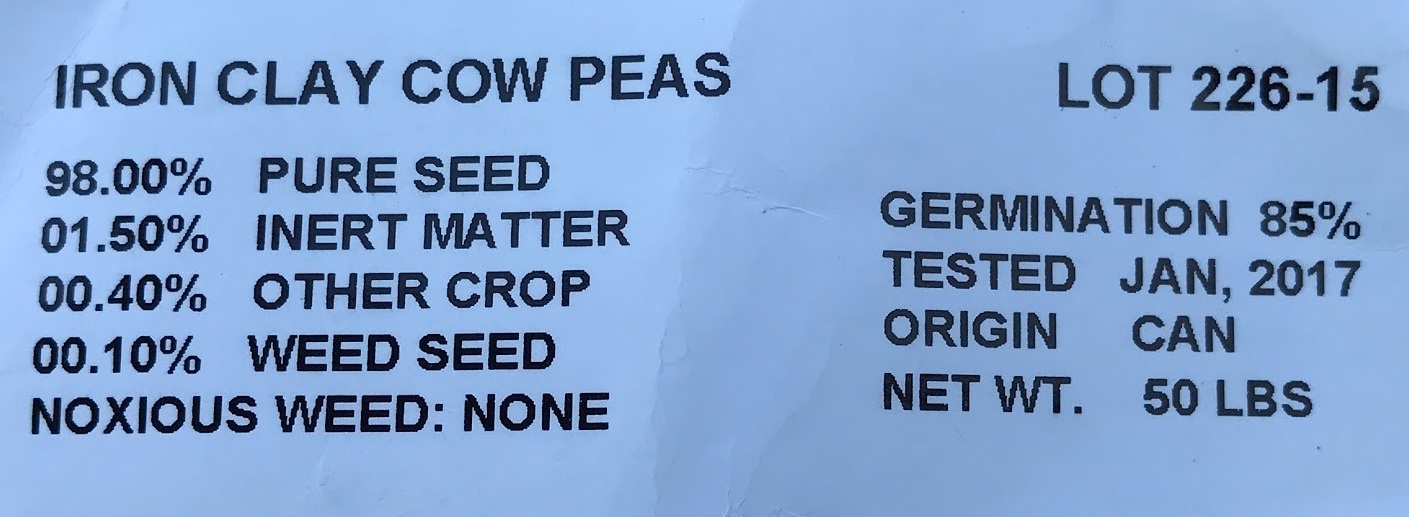
Our example is 98% pure seed, meaning in a 10 lb bag there are 9.8 pounds of pure iron-clay cowpea seed. The next number we will need is the germination rate; this will also be indicated as a percentage. Our example has an 85% germination rate.
To calculate percent PLS for this seed, multiply pure seed and germination and then multiply by 100 (example below). The result is the percentage of pure live seed for this bag of seed.
98% pure seed
85% germination
(0.98 x 0.85) x 100 = 83% (Percent PLS)
We now know that 83% of our bag is iron-clay cowpeas capable of germinating. Now that we have the PLS of our seed we can calculate the amount (lbs) of pure live seed in our bag. To do this, multiply the bulk seed weight by the percent PLS.
50 lb bag x 0.83 (Percent PLS) = 42 lbs PLS
For example, a 50 lb bag would equal 42 lbs of iron-clay cowpea seed that will germinate.
Determining bulk seed rate
Using the percent PLS information we can also find the amount of bulk seed necessary to plant at a recommended seeding rate. To do this, take the recommended seeding rate for your planting method and divide it by the percent PLS of the seed you are using (example below). The result is the bulk weight that you will need to plant per acre to achieve the recommended seeding rate.
50 lbs/acre = recommended seeding rate for iron-clay cowpeas when drilling
0.83 = percent PLS of seed being planted (from example above)
50/0.83 = 60 lbs/acre
In order to plant a cowpea food plot at the recommended rate of 50 lbs/acre, we will need to plant 60 lbs/acre from this particular seed bag.
Another benefit of calculating pure live seed? Comparing seed prices
Not all seeds are of the same quality. Some have lower pure seed and germination rates than others. For this reason, it is not always most cost effective to buy the cheapest bag of seed on the shelf. If you wish to compare pure live seed prices between seed bags, first divide the price of the bag by the weight of the bag. This will give you the price per pound of bulk seed (example below). Now divide this price per pound by the percent PLS of the seed. The result is the price per pound of PLS.
Seed Manufacturer X 10lbs
Pure seed 97%
Germination 92%
Price $33
PLS (0.97 x 0.92) x 100 = 89%
$/lb (bulk) 33/10 = $3.30/lb
$/lb (PLS) 3.3/0.89 = $3.70/lb
Seed Manufacturer Y 10lbs
Pure seed 91%
Germination 82%
Price $30
PLS (0.91 x 0.82) x 100 = 74.%
$/lb (bulk) 30/10 = $3/lb
$/lb (PLS) 3.0/0.74 = $4.05/lb
According to these calculations, seed manufacturer X is actually a better value than Y. Using this process, especially when purchasing seed in bulk, you can be a practical money saver.
Let’s Plant
Now that you know what all those numbers on the seed tag of your favorite food plot seed mean and you know how to calculate PLS, you will be able to plant your food plots at the most effective rate possible. Remember, regardless of whether you are planting acres of soybeans with a no-till drill or frost seeding a ½-acre clover patch, knowing how to calculate PLS will allow you to be more successful and save money when planting food plots.
Other Resources:
Seed Fillers and Carriers for Planting Native Warm-Season Grasses and Forbs, Detailed Resource, Purdue Extension-FNR
Renovating Native Warm-Season Grass Stands for Wildlife: A Land Manager’s Guide, free pdf download
VIDEO: Calibrating a No-Till Drill for Conservation Plantings and Wildlife Food Plots
VIDEO: Frost Seeding to Establish Wildlife Food Plots & Native Grass and Forb Plantings
Printable Version:
PDF available for print: Pure Live Seed: Calculations and Considerations for Wildlife Food Plots (pdf 636.75) detail resource.
Moriah Boggess, Purdue Extension Wildlife Intern
Jarred Brooke, Purdue Extension Wildlife Specialist
 Outbreaks of bovine tuberculosis have occurred sporadically around the world since the 1900s. In Bovine Tuberculosis in Wild White-tailed Deer, Bovine tuberculosis transmission, hosts, current status in Indiana, clinical signs, effects on deer populations, effect on white-tailed deer meat, management, and monitoring is extensively covered. If you’re a hunter or cattle producer, the information provided within this free publication would greatly benefit you!
Resources:
Bovine Tuberculosis in wild white-tailed deer, Got Nature?, Purdue Extension-FNR
Jarred Brooke, Extension Wildlife Specialist
Purdue Department of Forestry and Natural Resources
It’s that time of year again. The desperate rush to find the ‘perfect’ tree for your annual year-end celebration is very real. Unfortunately, you chose a tree last year that died within a month and was disappointingly dull. This year, you are going to do your homework to find the best tree available.
Home preparations:
- Tree Location: Select an area out of direct sunlight and away from the heating vents in your house for the tree. Excessive sunlight and heat will cause your tree to fade and dry out more quickly.
- Ceiling height: Measure your ceiling heights and take into account the height of your tree stand and the tree topper or you’ll have to make excessive cuts in your tree to adjust for the differences. Write down these measurements.
- Tree shape: Visualize the shape of the tree that best fits the space you have available (tall and thin, short and broad) and keep that in mind. Certain tree types are more expensive therefore knowing your budget will help ensure you purchase the perfect tree for your household. Measure the width of the space and write down these measurements.
- Tree stand: Anticipate needing to support your tree stand and acquire a piece of plywood that you can bolt the stand to keep it level. Measure the inside diameter of the tree stand and write down the measurements.
Choosing a tree farm:
- Buy from a local farm if at all possible. These trees are bred to be hardy and to remain fresh longer.
Bring to the farm:
- List of required measurements for your perfect tree.
- A large unbreakable ornament to view branch spacing (ensures your ornaments will hang straight).
- Measuring tape to measure prospective trees before getting them home.
- Thick gloves for handling your tree as the needles may be sharp and the bark rough on your bare hands.
- An old blanket that can cover the truck bed or car roof to protect it from sap.
- Rope, twine, bungee cords, and twist ties to secure the tree to the car if these items are not provided by the tree farm.
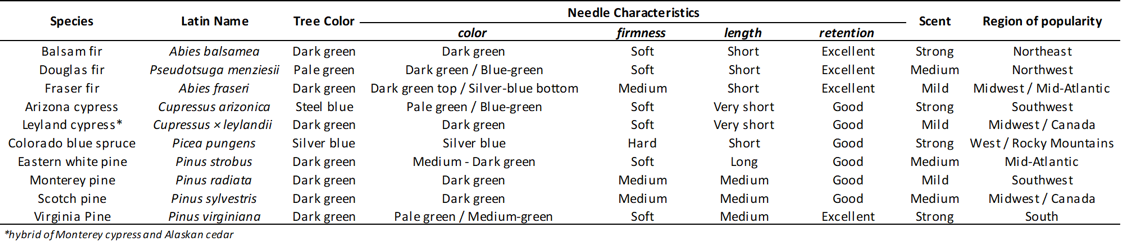
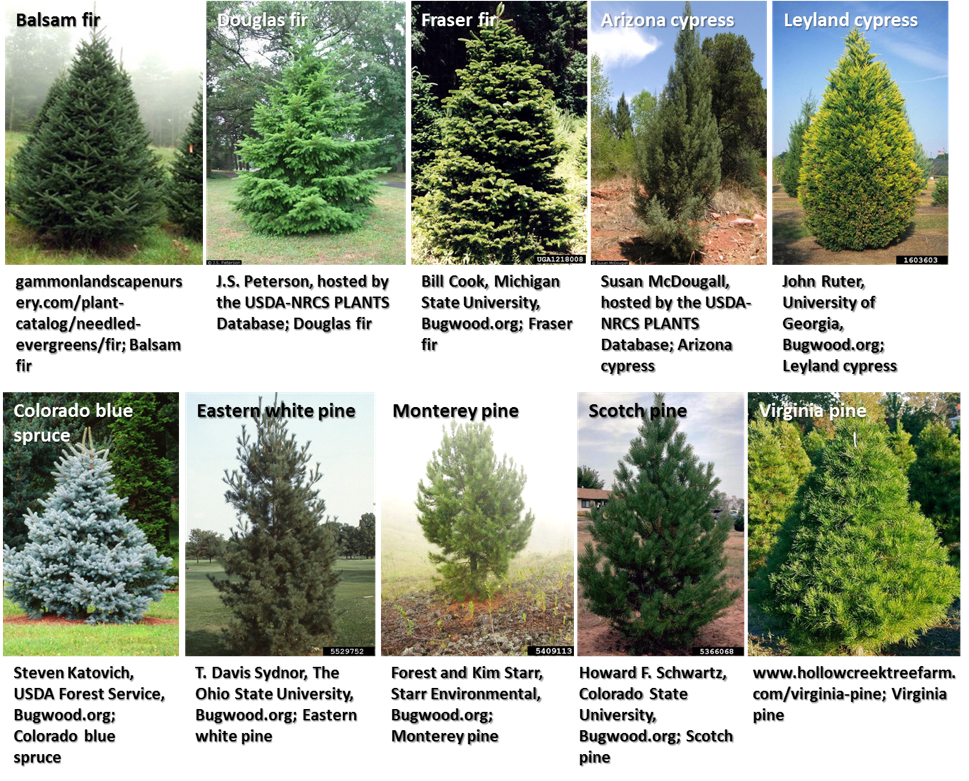
Species selection:
- Each tree species is different so careful selection is important: Soft needle species (pines, firs) are best for homes with small children while hard needle species (spruce) are the adult choice.
- Firs often have shorter needles, strong stems, and well-spaced branches making it easier to hang lights and decorations.
 *click image to enlarge
At the tree farm:
- Check freshness: Bend a needle with your fingers (firs snap, pines ben).
- Gentle run your hand over the branch from inside to out or if possible, gently bounce the tree on the cut end. If a few interior needles come off, it is probably fresh; if many exterior needles fall off, choose a different tree.
- Remove and crush a few needles in your hand, if there is little scent choose another tree.
- The tree should have even coloration 360° around and needles should be fresh (shiny, green) and not old (dried out, brown).
When you and your tree get home:
- Protect Your Floor– Place a plastic or other waterproof covering on the floor where your tree will stand so you don’t ruin the carpet or get watermarks on hardwood flooring.
- Put down waterproof coverings or plastic sheeting under the tree skirt to prevent ruining the carpet or hardwood floor if water is spilled.
- Make a fresh cut at the base of the tree, take off ½” from the base so that tree can absorb more water (slows needle drop and helps maintain tree color) and immediately place the tree upright in the stand with lukewarm water.
- Trim any low-hanging branches that hit furniture or are too thin for ornaments parallel to the floor. Keep them in a bucket of water before using as decorations.
- Secure your tree to the wall or heavy furniture if you have pets and children that could knock it over or heavy ornaments that may sway the tree.
- Ensure that your tree stand always has water in it.
- Take a photo of your tree when set up and secured as a reminder for the following year.
After the holidays:
- Recycle your tree through your local waste management company.
- Trees can also be chipped for mulch. Never burn your tree because of the likelihood of starting a fire.
Examples of holiday tree types:
 *click image to enlarge
Resources:
Which Real Indiana Christmas Tree Will You Select? – Got Nature?, Purdue FNR-Extension
Living Christmas Trees For The Holidays and Beyond, The Education Store
Tips for First-Time Buyers of Real Christmas Trees, The Education Store
Growing Christmas Trees, The Education Store
Shaneka Lawson, USDA Forest Service/HTIRC Research Plant Physiologist/Adjunct Assistant Professor
Purdue University Department of Forestry and Natural Resources

Red maple tree with leaves turning red in fall. Photo by: Lenny Farlee
The calendar flipping over to October is a reminder the annual Autumn leaf color display is on its way. The perennial question is “how will the color be this year?” Predicting the quality of the fall display requires weighing several factors that may vary over time and across the landscape. In general, Indiana started the growing season wet and is ending it dry. The good growing conditions early this year have produced abundant leaf area on many trees. As we have dried out late in the season, some trees are experiencing stress that may cause leaves to turn color and drop early, or to simply turn brown. Drought may also delay the color change by a week or more in some cases. Leaves that were attacked by insects or disease may also drop early or provide very little color. I noticed Japanese beetles seemed to be more active than normal this year, skeletonizing leaves on preferred plants like linden and Virginia creeper. Local weather patterns can also influence color intensity in a positive way. Sunny days and cool nights late in the summer and early fall can enhance the production of anthocyanin – a pigment produced in some trees that provides bright red, maroon and purple tones to the fall color palate.

Hop hornbeam tree with yellow fall leaves. Photo by: Lenny Farlee.
This brings us to another variable: different species of trees may produce different colors, timing, and duration of fall color. Some species like sassafras, sumac, black and sweet gum, and sugar and red maple are famous for bright fall color. Some species like elms, buckeye and walnut may simply turn brown or drop early with little color display. Different individual trees may also vary due to genetic differences, growing conditions and tree health. For example, some sugar maple located in open areas or on the edge of a woodlot, receiving lots of sunlight, may regularly produce vibrant oranges and reds, while nearby sugar maple in the shade of the forest will turn a subdued yellow, lacking the sugar reserves produced by their neighbors in the sun.
Leaf color change is also the result of a very predictable process based on the longer night period as summer slips into fall. The production of green chlorophyll pigments slows and finally stops as the nights become longer and cooler, exposing the yellows and oranges of carotenoids and reds and maroons of anthocyanins. This process also starts forming a zone of separation between the leaf and branch that ultimately brings the leaves to the ground, often with the help of wind and rain.
My best answer to those asking for a fall color prediction is another set of questions: how was your weather, what species of trees do you have, and how much sunlight do they receive?
Resources:
Why Leaves Change Color, The Education Store, Purdue Extension
Why Leaves Change Color, USDA Forest Service, Northeastern Area
Fifty Common Trees of Indiana
An Introduction to Trees of Indiana
Native Trees of the Midwest, The Education Store
Shrubs of Indiana CD: Their Identification and Uses, The Education Store
Shrubs and Woody Vines of Indiana and the Midwest, The Education Store
Trees of Indiana CD, The Education Store
Lenny Farlee, Sustaining Hardwood Extension Specialist
Purdue Department of Forestry and Natural Resources
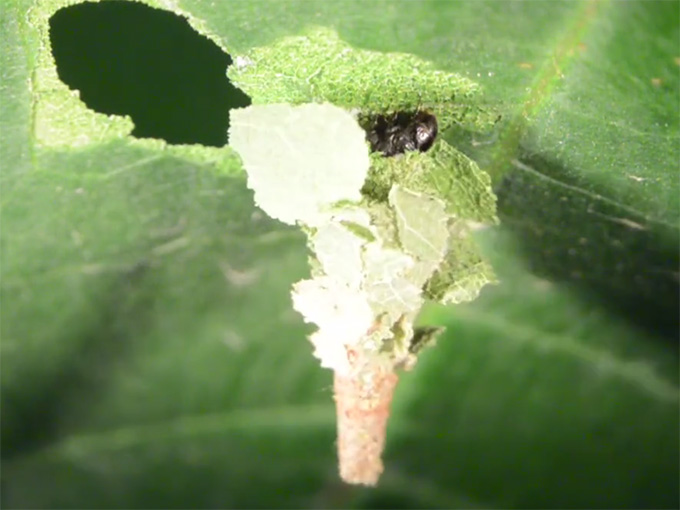 The evergreen bagworm, as its name implies, is well known for its ability to defoliate evergreen trees and shrubs like spruce, arborvitae, fir, junipers and pine. When given a chance, it will also feed on deciduous trees like maples, honeylocust, and crabapples. In late May and early June bagworms hatch from eggs that overwinter in the bag of their mother. When young bagworms begin feeding on broadleaved plants the caterpillars are too small to feed all the way through, so they leave circular patterns of skeletonization. Bagworms can be easily controlled with a spray application of spinosad (Conserve, or Fertilome borer and bagworm killer), or Bacillus thuringiensis (Dipel). More control options are available on the Purdue Tree Doctor App, purdueplantdoctor.com.
View this video located on the Purdue Plant Doctor App Suite Facebook page to watch a young bagworm caterpillar poke its head out of its silken bag to feed on a maple leaf. The young caterpillar scrapes the leaf surface to feed, and cuts bits of green tissue and glues it on its back. At the end of the video it sticks out its legs and flips the entire bag over to hide from the lights.
Resources:
Purdue Plant Doctor App Suite, Purdue Extension-Entomology
Landscape & Ornamentals: Bagworms, The Education Store
Upcoming Workshops, Purdue Extension-Forestry & Natural Resources
Ask An Expert, Purdue Extension-Forestry & Natural Resources
FNR contacts:
Lindsey Purcell, Urban Forestry Specialist
Purdue University, Department of Forestry and Natural Resources
Lenny D Farlee, Sustaining Hardwood Extension Specialist
Purdue University Department of Forestry and Natural Resources
Author:
Cliff Sadof, Professor
Purdue University Department of Entomology
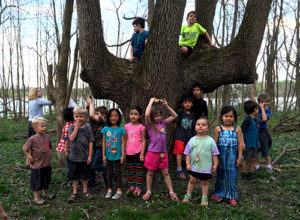
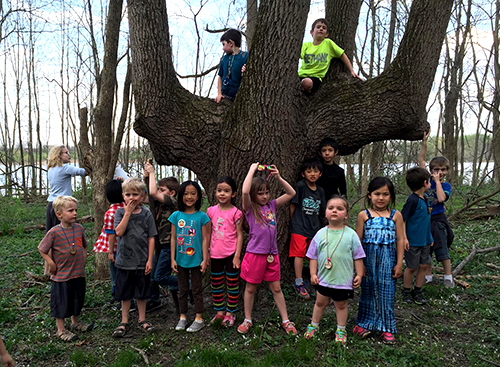
Students in Forestry and Natural Resources (FNR) continue to volunteer for Hands of the Future, Inc., a non-profit program whose mission is to help educate children about the outdoors and natural resources. As this program continues to grow, one of their dreams has been to find woods to create a children’s forest. To have a natural site that has been embellished upon with children’s needs in mind and to encourage outdoor play and adventures.
The students plan on transforming 18.8 acres of idle woods into Zonda’s Children’s Forest. The children’s forest will be composed of six main areas:
- A children’s garden, equipped with a greenhouse and kitchen, that’ll allow children to learn how to properly grow and cook food.
- An enclosed area dedicated to allowing children having fun and safe adventures.
- A viewing area for butterflies, birds and other organisms of the wild, allowing children to easily enjoy the life of the forest.
- A maze designed by sunflowers, where children can have fun and do problem-solving, while close to nature.
- A walk dedicated to viewing the owls and other organisms composing the forest.
- Another enclosed area of the woods for adventures; However, it’ll also contain tree houses, bridges and other fun additions for the children.
Donations:
Donations to help make Zonda’s Children’s Forest a reality can be made here. They have six months to raise $235,000 in order to purchase the woods.
Volunteers & Interns:
Older students and adults can apply to be a volunteer. Volunteers are always appreciated, no past experience necessary. If you love nature and kids you will enjoy this program. Internships are available for college students, contact Zonda Bryant.
Resources:
Family Nature Clubs in Indiana – Indiana Children and Nature Network
Zonda Bryant, Director
765.366.9126
director@hands-future.org
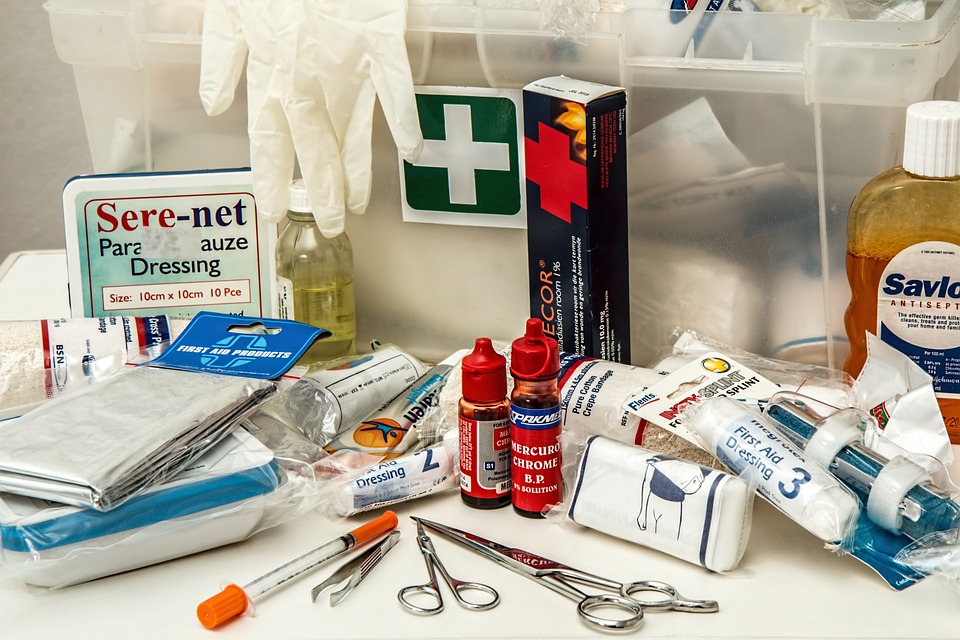
The end of the school year represents not only the beginning of summer but also the start of field season. Time spent out in the field can be fun, informative, and an opportunity to gather important data. Field data can also be difficult to gather as outdoor conditions are often unpredictable. Anyone expecting to do work out in the field must be prepared for anything. In addition to the likelihood of heat stress and the threat of diseases carried by insect assailants (i.e. ticks, mosquitoes), those in the field must prepare for events that come naturally with doing research outside of a controlled environment.
Packing an emergency bag before venturing into the field is one way to ensure that negative ramifications of any accidents are kept to a minimum or eliminated completely. Standard emergency supplies should accompany field researchers on every trip. The nature of the outing should also be considered since additional, more specialized, equipment may be needed in some areas. Typical emergency equipment needed for each foray into the wild includes:
- Charged cell phone with an extra battery and a charger (stored in plastic bag with some petty cash)
- Fully stocked first aid kit (large size with an array of bandages and wound wrapping materials) with specialized field supplies (fish hook removers, seasickness tablets, flare gun, mosquito net, etc.) and general forest supplies (sunscreen, poison ivy/oak/sumac cream, insect repellent)
- Vehicle emergency kit (with vehicle operator’s manual and emergency blankets)
- Non-perishable, easy to open food stuffs (i.e. peanut butter, beef jerky, granola bars)
- Water (minimum of 1 gal / person / day of the trip plus an additional 3 days) and water purification tablets or filter devices
- Plastic Ziploc bags for personal hygiene products (toilet paper, sanitizing wipes, feminine products), extra clothes including a brimmed hat, and electronic devices
- Local guidebook and ability to identify hazardous plant and native wildlife species in the traversed field region
- Flashlight (with extra batteries)
- Two-way radio (if necessary to work alone in an isolated or dangerous area and check in regularly) and handheld weather station
- Personal protective equipment (safety glasses/goggles, gloves, hard hat, sturdy boots, etc.)
- Identification (photocopy of driver’s license, medical prescriptions and coverage information, and emergency contact information) for everyone in the field
- Maps, compass, and GPS unit
Following this list is the first start to a safe and successful field season! Best of luck!
Resources:
Nature of Teaching-Health and Wellness, Purdue Extension
Benefits of Connecting with Nature, The Education Store
Orphaned Wildlife, Got Nature?, Purdue Extension-FNR
Shaneka Lawson, USDA Forest Service/HTIRC Research Plant Physiologist/Adjunct Assistant Professor
Purdue University Department of Forestry and Natural Resources
Lenny Farlee, Sustaining Hardwood Extension Specialist
Purdue Department of Forestry and Natural Resources
 Frogs and Toads of Indiana is the latest and final addition to Purdue Extension’s line of field guides focused on the reptiles and amphibians of Indiana. Readers of this guide will not only learn how to ID the Anuran species of Indiana but will also learn about their distribution throughout the state along with their habits and behaviors. The guide is richly illustrated, filled with interesting facts, and has been peer-reviewed by expert herpetologists.
As many herpetologists and recreational herpers can attest, seeing what you are hearing is not always possible. With this in mind, we developed a website The Frogs and Toads of Indiana for users that wish to learn the calls of Indiana Anuran species.
The Frogs and Toads of Indiana, FNR-516, can be purchased from the The Education Store for $10.00.
Resources, The Education Store-Purdue Extension resource center:
Salamanders of Indiana
Snakes and Lizards of Indiana
Snakes of the Central and Northeastern United States
Turtles of Indiana
Additional resources:
The Nature of Teaching, Lesson Plans K-12, Purdue Extension
Nick Burgmeier, Research Biologist and Extension Wildlife Specialist
Purdue Department of Forestry and Natural Resources
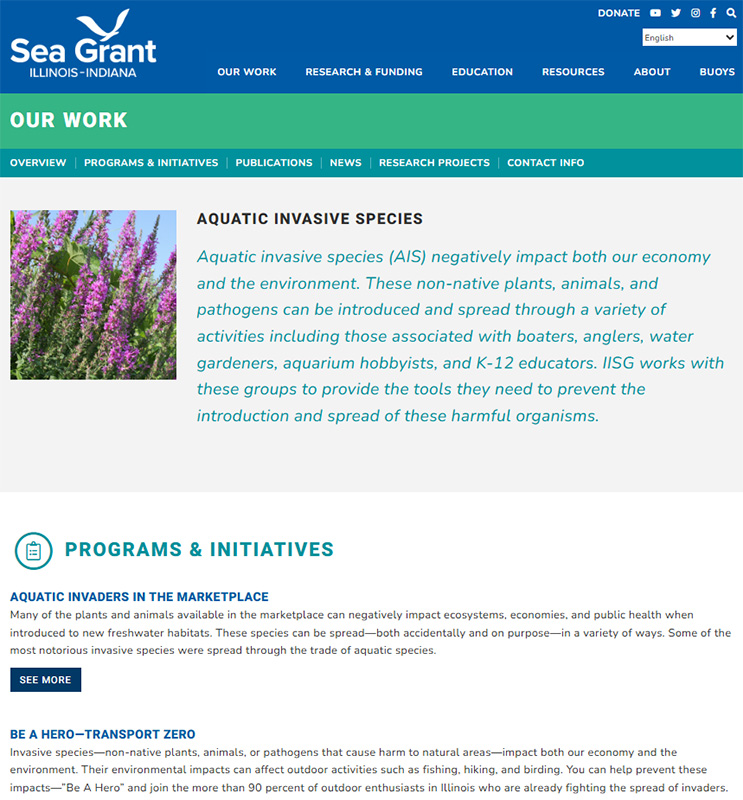
Once aquatic invasive species (AIS) are established in a new environment, typically, they are difficult or impossible to remove. Even if they are removed, their impacts are often irreversible. It is much more environmentally and economically sound to prevent the introduction of new AIS through thoughtful purchasing and proper care of organisms. Check out Illinois-Indiana Sea Grant’s web page the Aquatic Invasive Species and find resources for teachers, water garden hobbyists, aquatic landscaping designers and to aquatic enthusiasts. The video titled Beauty Contained: Preventing Invasive Species from Escaping Water Gardens is also available which contains guidelines that were adopted from the Pet Industry Joint Advisory Council and the Aquatic Nuisance Species Task Force along with addressing the care and selection of plants and animals for water gardens.
Resources:
Aquatic Invaders in the Marketplace, Illinois-Indiana Sea Grant (IISG)
Great Lakes Sea Grant Network (GLERL), NOAA – Great Lakes Environmental Research Laboratory
Indiana Bans 28 Invasive Aquatic Plants, Illinois-Indiana Sea Grant (IISG), Newsroom
A Field Guide to Fish Invaders of the Great Lake Regions, Illinois-Indiana Sea Grant (IISG)
Purdue Researchers Get to the Bottom of Another Quagga Mussel Impact, Illinois-Indiana Sea Grant (IISG)
Protect Your Waters, U.S. Fish and Wildlife Service & U.S. Coast Guard
Clean Boat Programs, Illinois-Indiana Sea Grant
Illinois-Indiana Sea Grant (IISG)
University of Illinois Extension and Purdue University Extension
Recent Posts
- Purdue Extension: Empowering Indiana Through Innovation, Education and Community Impact
Posted: January 28, 2026 in Community Development, How To, Invasive Insects, Invasive Plant Species, Natural Resource Planning, Woodlands - Forest Landowners: Share Your Experience with Regeneration and Restoration
Posted: January 27, 2026 in Forestry, How To, Timber Marketing, Woodlands - It’s Not Too Late to Order Trees for Spring Planting
Posted: January 13, 2026 in Forestry, How To, Plants - Now Is The Time To Control Non-Native Bush Honeysuckle
Posted: October 30, 2025 in Forestry, How To, Invasive Plant Species, Woodlands - October Is Firewood Month: Protect Indiana’s Forests by Making Smart Choices
Posted: October 13, 2025 in Forestry, Forests and Street Trees, How To, Invasive Insects, Urban Forestry - ID That Tree: Smooth Sumac
Posted: October 2, 2025 in Forestry, How To, Wildlife - ID That Tree: Wild Grape Vine
Posted: August 12, 2025 in Forestry, How To, Urban Forestry, Wildlife - Publication – Sericea Lespedeza Control
Posted: July 7, 2025 in Forestry, How To, Invasive Plant Species, Wildlife - How to ID Asian Jumping Worms, Purdue Landscape Report
Posted: July 2, 2025 in How To, Invasive Insects, Wildlife - Alert – Water Your Trees, Watch Video
Posted: June 20, 2025 in Alert, Drought, Forests and Street Trees, How To, Urban Forestry, Wildlife, Woodlands
Archives
Categories
- Alert
- Aquaculture/Fish
- Aquatic/Aquaculture Resources
- Ask the Expert
- Christmas Trees
- Community Development
- Disease
- Drought
- Forestry
- Forests and Street Trees
- Gardening
- Got Nature for Kids
- Great Lakes
- How To
- Invasive Animal Species
- Invasive Insects
- Invasive Plant Species
- Land Use
- Natural Resource Planning
- Nature of Teaching
- Plants
- Podcasts
- Ponds
- Publication
- Safety
- Spiders
- Timber Marketing
- Uncategorized
- Urban Forestry
- Webinar
- Wildlife
- Wood Products/Manufacturing
- Woodland Management Moment
- Woodlands