 Purdue University - Extension - Forestry and Natural Resources
Got Nature? Blog
Frost seeding is a great way to establish native grasses and forbs for soil and water conservation and to create habitat for various wildlife and pollinators. You can use multiple tools for frost seeding, such as a tractor or ATV and broadcast spreader or a hand “whirlybird” seed spreader. But one innovative way to broadcast the seed is with a drone – or Unmanned Aerial Vehicle (UAV).
A drone is the tool we used to frost seed native grasses and forbs as part of a project on the Ivy Tech Community College-Lafayette Campus.
The Project
 Faculty and staff within the Agriculture Program at Ivy Tech Community College received a grant from the Wabash River Enhancement Corporation (WREC) to plant native grasses and forbs on their property for educational and demonstration opportunities.
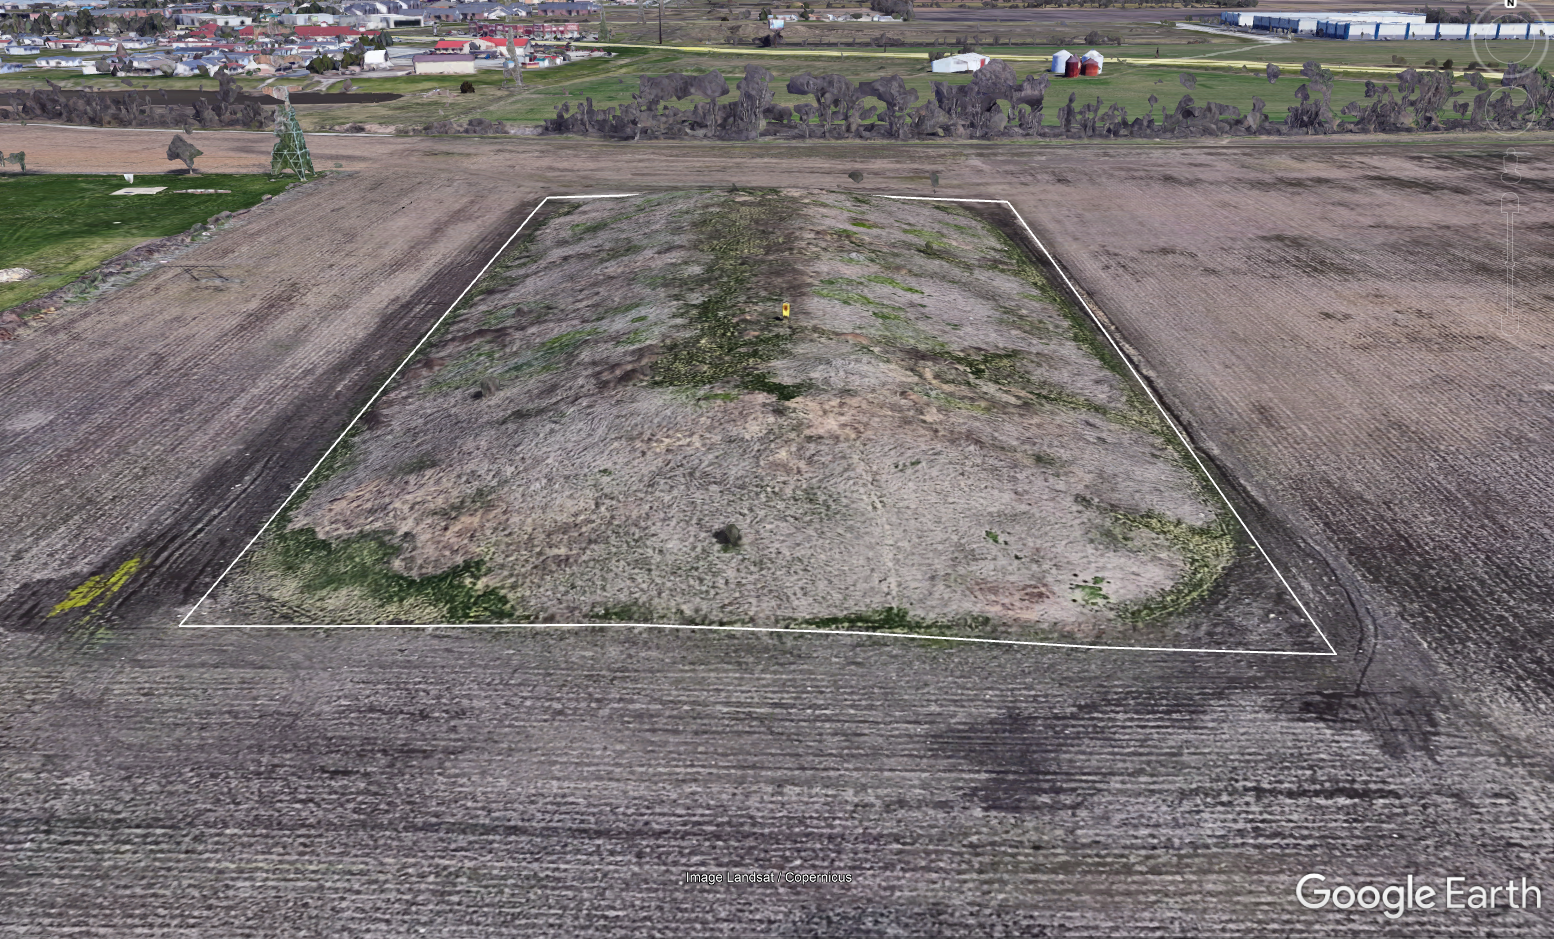
We planted a 4-acre mound created from soil leftover after digging a nearby retention pond. The topography and slopes of the mound made using traditional planting equipment like a tractor and no-till drill a challenge. And since the Ivy Tech staff was already familiar with using drones to plant cover crops, they decided it would be the best option to seed the mound.
The Indiana Natural Resources Conservation Service State Biologist created the seed mix we used. The mix included a diverse blend of native warm-season grasses and forbs.
 Purdue Extension and Purdue Forestry and Natural Resources assisted in the project by supplying, calibrating, and flying the drone, sharing previous experiences with frost seeding native grasses and forbs, and adjusting the seed mix by adding a carrier to improve seed flow through the drone seed spreader.
The Drone Set-up
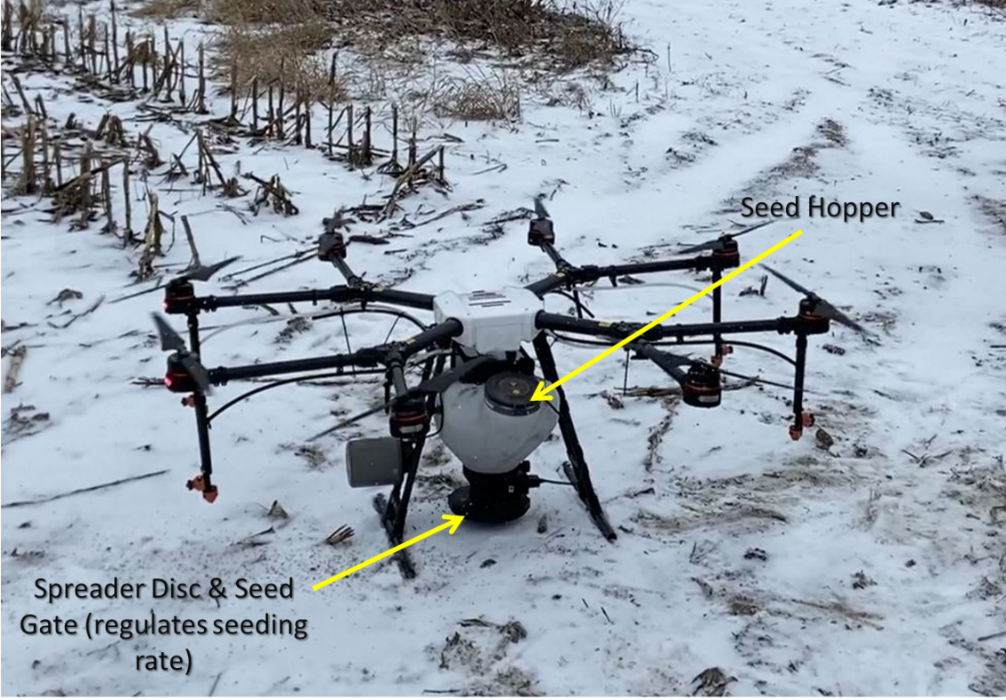
We used a DJI Agras MG-1P drone fitted with a seed hopper that could be filled with up to 22 pounds of seed. Once filled, the drone spreads the seed at a specific rate (pounds per acre) by flying a consistent speed and height across the field along a predetermined path. A hand-held controller allows you to change the drone’s flight path, speed, and height. The controller also allows you to turn the broadcast spreader on or off, adjust the seed gate opening (% open), and the revolutions/minute of the disc to change the rate of the spreader.
The Process
Mixing the seed
The first step was to ensure the seed would flow through the seed hopper. This drone is set up to spread cover crops, which are usually large, heavy seeds like cereal rye or smaller (but still relatively heavy) seeds like clovers.
Native grasses and forbs are often much smaller and lower in weight by volume than cover crops. The grasses are also “fluffy” or have extra seed parts (chaff or awns), making them prone to clogging. These qualities of native grasses and forbs can present a challenge when trying to broadcast them without specialized equipment. We often add a carrier, like pelletized lime, to add more weight to the seed mix and allow the seed to flow more easily through the spreader. We added 40 pounds of pelletized lime per acre to the seed mix.
Calibrating the drone
We needed to calibrate the drone to spread the right amount of seed per acre. Calibrating a drone is similar to calibrating any broadcasting equipment. We needed to know:
- How wide the spreader spreads the seed (swath width)
- How fast the drone is flying
- How much seed (lbs) is being spread over a specific area
Check out this video for more information about frost seeding and calibrating a broadcast spreader.
Creating the map and programming the drone
After finishing the calibration, we went to the field to create the map for the project and program the drone. The initial step with the drone is to create a boundary layer in the mapping software. We did this by physically taking the controller to the four corners of the mound and setting a GPS point. When the accuracy showed 5 feet or less, we dropped a pin and used that as a corner. Once the corners were marked, the mapping software created the boundaries of the mound and created an automated path for the drone to fly.
Once we completed the map, we filled the drone with seed and set the flight parameters. Our calibration figures showed that we needed a 90% hopper opening with a speed of 2 mph, and we had a swath width of 18 feet from 10 feet above the ground (drone height). The disc speed was set to 900 revolutions per minute.
Spreading the Seed
Once the seed was mixed and the drone was calibrated and programmed, we started spreading the seed. With the drone, this is as easy as filling the seed hopper, starting the drone, and allowing it to fly the planned and automated mission. Once the seed hopper is empty, the drone automatically remembers where it stopped and returns home to be refilled. Once refilled, the drone will return to where it stopped and restarts spreading the seed. This process repeats until the drone has covered the entire field.
The Challenges
Fluffy seeds and seed flow
One of the biggest challenges we encountered was the flow of the native grass seed through the seed hopper. The seed was too fluffy (not enough weight per volume) to flow correctly through the seed hopper. The seed would flow and spread correctly for a few minutes, then the seed would get clogged, and the drone would stop. Because the fluffy seed was getting stuck at the top of the hopper and not flowing correctly, the sensor on the drone’s seed hopper was telling us the seed hopper was empty. However, at least 5-10 pounds of seed was still in the hopper. This would cause the drone to fly back to be refilled. Each time this happened, it cost us time and battery life on the drone.
We were able to free the seed in the hopper and get it to flow correctly by rocking the drone or flying the drone back and forth quickly until the seed worked itself loose. If you were using traditional equipment like a tractor and fertilizer spreader, the bouncing of the tractor over rough terrain would have naturally agitated the seed and allowed it to flow. But, with a drone flying in the air, the seed was not agitated. We would have needed to add more carrier to the seed mix to increase its weight and improve the seed flow.
Broadcast spreaders designed to spread fluffy seeds like native grasses often have an agitator in the hopper to stop the seed from clogging and improve seed flow. The native grass seed would have flowed better through a drone seed spreader explicitly designed for this type of seed, like this aerial spreader.
Batteries and Battery Life
Some of the challenges with drones, in general, are batteries and battery life. We had to change batteries frequently while spreading and recharge the batteries not in use to ensure we had enough battery life to complete the seeding. The challenges we had with the seed flow exacerbated our challenges with batteries because each time we had to check the seed hopper or free the seed, it cost us battery life.
It was helpful that we had six batteries. This allowed us to rotate between using batteries and charging them and meant we didn’t have to stop spreading to wait on batteries to be charged.
Flight speed
Because we added extra weight to the seed mix by using a carrier, we needed to fly the drone at a slow speed to spread at the correct rate per acre. Keeping the drone at a lower speed (2 mph) was challenging. Often the drone flew at around 3 mph. This is likely due to the physical properties of the electric motors turning the propellers to keep the drone aloft.
Drone malfunction
Another challenge we faced was a malfunction on the UAV where the spreader gate was opening and closing on its own, or not opening at all, and had an error showing on the controller screen that the gate was blocked. We noticed this error and worked on the UAV during the calibration phase and thought it was repaired. We had to stop and take the spreader apart again to identify the problem.
On the day we seeded, we finally decided to open the hopper to 90% opening and physically stop the gears from opening and closing. This left the hopper open constantly, but we could still turn the spreader on and off. After finishing the seeding, we determined the issue was either a faulty servo motor or control board. These parts are inexpensive and can be replaced, but they are specialized parts that require ordering and cannot be picked up from a local hardware store.
Cost of the drone
 The DJI Agras MG-1P is an older model (older, not outdated), so the cost has decreased. Initially this model cost around $19,000, but it is now about $8,000. This includes both attachments for spraying and spreading. Additional batteries are around $700 each. Cost for the newer models of this type of drone range from $18,000 to ~$30,000, depending on the size and payload.
The Results
Despite the challenges we faced, the drone worked well for spreading the native grass and forb seed for this project. We applied the correct amount of seed required for the area. When the seed flowed correctly, it was spread evenly on the site. However, we will need to come back to the site during the next few summers to see how well native grasses and forbs are established.
A drone may not be effective for large-scale conservation plantings because of the time and batteries required, the small hopper size, and the need to refill the seed hopper. But for smaller plantings or those plantings in areas inaccessible by traditional equipment (in wetlands, on steep slopes, woodlands, etc.), drones could be an effective tool to establish native grasses and forbs.
Resources:
Frost Seeding to Establish Wildlife Food Plots & Native Grass and Forb Plantings, video, The Education Store, Purdue Extension Resource Center
Calibrating a No-Till Drill for Conservation Plantings and Wildlife Food Plots, video, The Education Store
Renovating native warm-season grass stands for wildlife: a land manager’s guide, The Education Store
Creating a Wildlife Habitat Management Plan for Landowners, The Education Store
Purdue Extension Pond and Wildlife Management Website, Purdue Extension
Jarred Brooke, Wildlife Extension Specialist
Purdue Forestry and Natural Resources
Join Purdue Extension wildlife specialist Jarred Brooke as he talks about all things regarding planting wildlife food plots. This includes a step by step guide from planning to planting, explanation of types of food plots, types of seed, seed mixes and more.
If you have any questions regarding wildlife, trees, forest management, wood products, natural resource planning or other natural resource topics, feel free to contact us by using our Ask an Expert web page.
Resources
Calibrating a No-Till Drill for Conservation Plantings and Wildlife Food Plots, video, Purdue Extension
Frost Seeding to Establish Wildlife Food Plots and Native Grass and Forb Plantings, video, Purdue Extension
Now is the time to sow native grass and forbs seeds. Here’s why. Got Nature? Blog, Purdue Extension – Forestry and Natural Resources
Habitat Help LIVE Q&A – Native Grasses and Forbs for Wildlife, Video, Purdue Extension – Forestry and Natural Resources Youtube channel
Jarred Brooke, Wildlife Extension Specialist
Purdue Department of Forestry and Natural Resources
In a previous job, I helped landowners enroll in and implement private land conservation programs like the Conservation Reserve Program. Much of my job centered around talking with landowners about how to establish and manage native grass and forb (wildflower) plantings for wildlife. Even in my job today, I provide educational opportunities including seminars, field days, and workshops centered on this topic.
One of the most common emails, phone calls, and questions I get when talking about establishing these plantings revolves around evaluating the planting during the first year.
Typically, the inquires go like this “I planted native grasses and wildflowers for wildlife this spring, and now I just have a field of weeds! Did the planting fail?” or “Nothing I planted this spring is growing!”
Following these flustered phone calls and frantic emails, I usually do a site visit with the landowner to help them evaluate their planting. Below are the four things I look for when evaluating a new native grass and wildflower planting.
Before we get into the things I look for during an evaluation, it’s important to note that native grass and wildflower plantings for wildlife typically take 2-3 years to establish. So, what you see in year one, may not be what you get in year two, three, or four. But, there are a few signs you can use to monitor your planting’s progress.

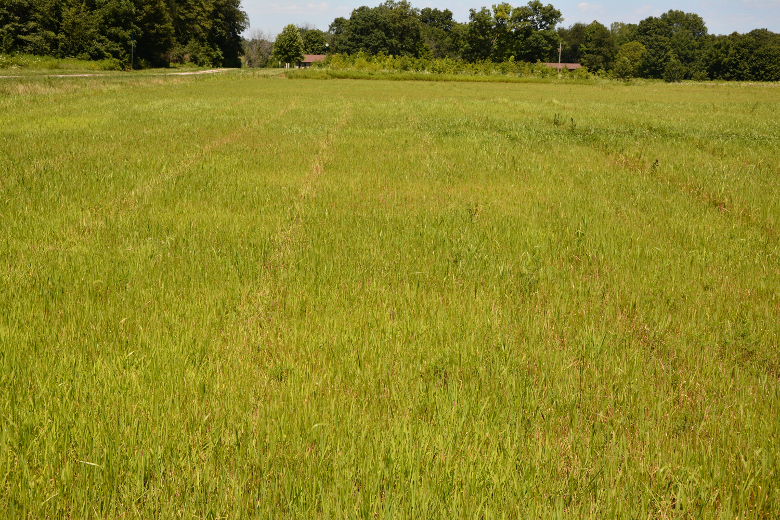
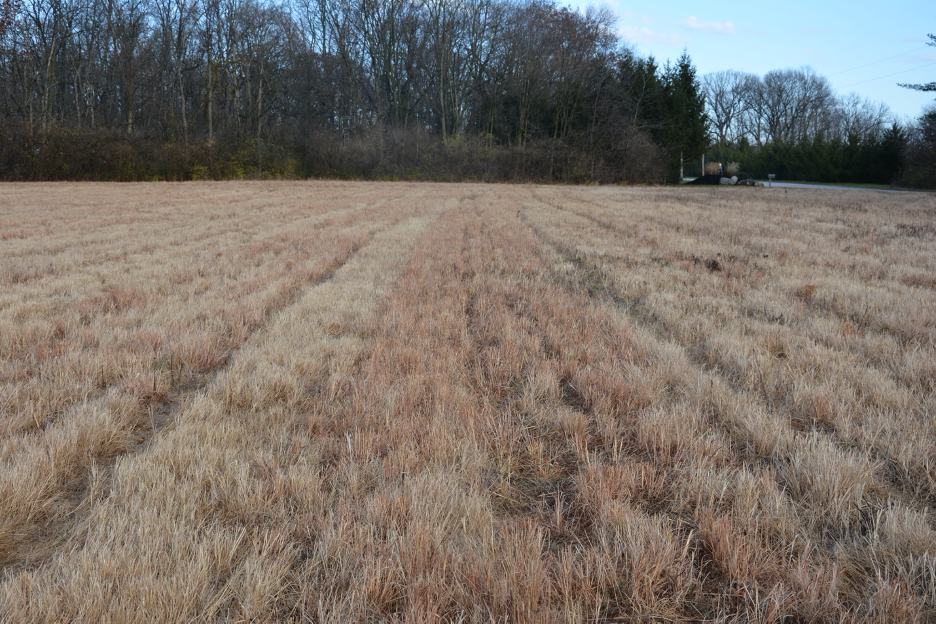
This planting was full of “weeds” in year 1, but by year 2 planted wildflowers were abundant on the site.
1. Weed pressure
Inevitably when you plant these diverse mixes of native grasses and wildflowers you will get weeds. Even if you control weeds before planting (which you should), some weeds will still show up, especially annual weeds like foxtail, ragweed, and horseweed. In the past, we used herbicides like imazapic (Plateau) to help control weeds during the first growing season after planting – which is still an option in native grass only stands or with certain wildflowers. But, with more diverse plantings we do not have any herbicide options to control weeds without harming what we planted. Therefore, weeds may be more of an issue in diverse plantings like pollinator plantings.
Controlling these weeds may require mowing during the growing season before they produce seed, which can help planting success. But this mowing can come at a cost. Many of these weeds like common ragweed, provide cover and food for wildlife. Mowing the field may temporarily reduce its value to many wildlife species. When evaluating weed pressure, we need to decide if weeds are dense or thick enough to reduce the germination and growth of what we planted. Generally, if the weed pressure in the field is high and it is shading out the ground, you should think about mowing to control weeds. If weed pressure is not high and sunlight is still reaching the ground, you may want to consider skipping or delaying the mowing until later in the summer.
This field that was planting to native grasses and wildflowers is now dominated by foxtail. This would be a situation where mowing may improve the establishment of the what you planted.
2. Look for rows or drill marks
If you plant the field with a no-till drill, you may see rows of plants appear during the first growing season. This is a sure indication that what you planted has germinated and is growing. However, if you frost seeded the field by broadcasting the seed on top of the ground, you will not see rows. Sometimes the rows of plants will not be obvious at first, but will be very obvious later on.
See the bronzish/orange grass in rows? That’s little bluestem. This landowner thought they had a failed planting, but it wasn’t until the following winter when the drilled rows of little bluestem were obvious.
3. Identify indicator plants
One the best ways I could calm the nerves of a landowner who thought they had a failed planting was by identifying species of wildflowers or grasses that they did indeed plant. Some of the annual or biennial wildflowers such as black-eyed susan or partridge pea will germinate quickly and may even flower during the first growing season. Learning how to identify some of the species you planted will help you determine if what you planted is indeed germinating and growing.
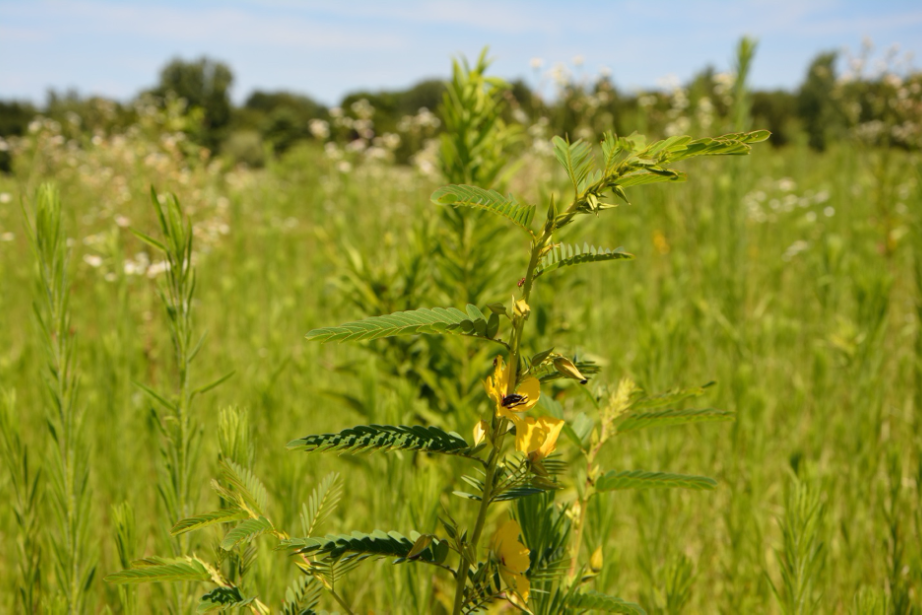
Partridge pea is a commonly planted species that grows and flowers during the first summer after planting. Their yellow flowers and compound leaves make them easy to identify.
4. Scout for invasives
Another topic of discussion on a site visit is invasive plants. It is important to catch invasive early in a planting so they do not cause problems later on. Some of the common invasive plants that show up early in the life of native grass and wildflower planting are Canada thistle, sericea lespedeza, and johnsongrass. Control of these species often requires herbicide. Catching them early when they can be spot-sprayed will save you time, money, and headaches.
Looking for these four signs when evaluating your newly established planting can help you determine if it’s on the right track and help you keep it there. But, many of the species you planted are perennials, and will not be very obvious the first growing season. They are putting most of their energy towards below ground (roots), not above ground (stems) growth. So, if you don’t see them during the first growing season, it doesn’t mean they are not there. Establishing a native grass and wildflower planting for wildlife takes a bit of patience and persistence.
Video: Tips for Evaluating a First Year Native Grass and Forb Planting expands even further regarding the tips on how to evaluate your first-year planting.
Resources
Purdue Extension Pond and Wildlife Management Website
Renovating Native Warm-Season Grass Stands for Wildlife: A Land Manager’s Guide, The Education Store, Purdue Extension resource center
Calibrating a No-Till Drill for Conservation Plantings and Wildlife Food Plots, Video
Habitat Help LIVE Q&A – Native Grasses and Forbs for Wildlife, Video, Purdue Extension – Forestry and Natural Resources Youtube channel
Jarred Brooke, Wildlife Extension Specialist
Purdue Department of Forestry and Natural Resources

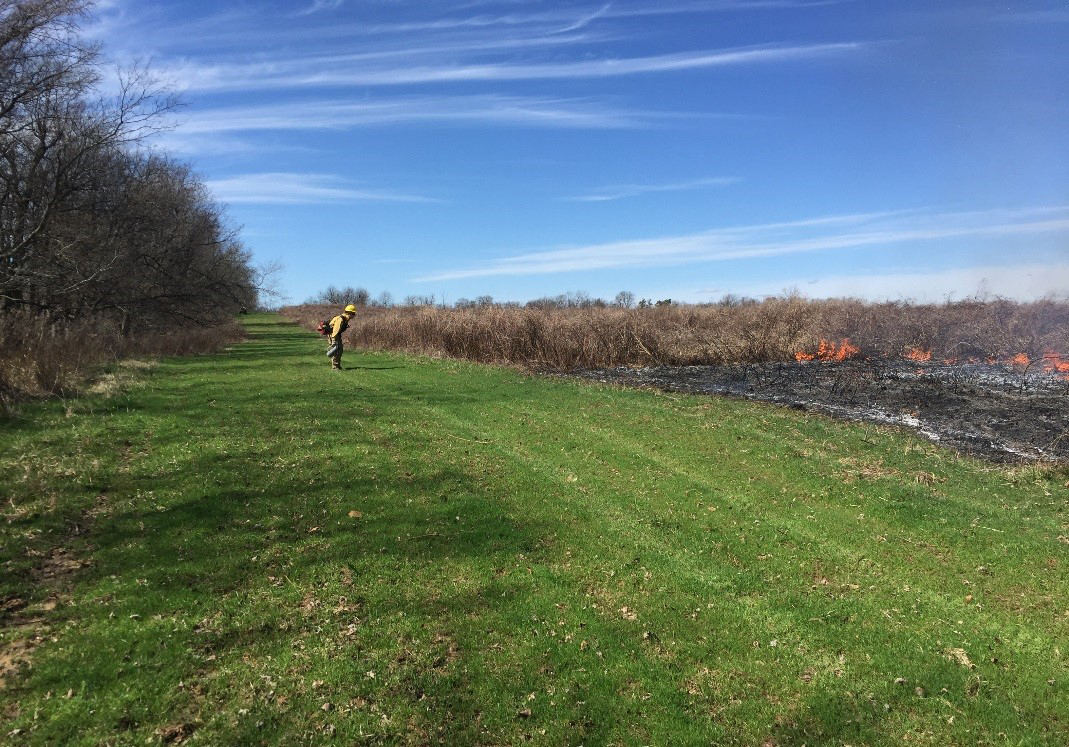
Fire can creep through or spot in cool-season grass firebreaks where thatch has accumulated potentially leading to an escaped fire.
Prescribed fire is an important and effective wildlife habitat management and forestry tool. When used correctly, fire can improve habitat for a variety of wildlife species, forage for cattle, and conditions for oak regeneration among other things. Here are 6 things to consider before you light a prescribed fire in order to ensure it is conducted safely and effectively.
(1) What are your management objectives?
The management objectives you hope to accomplish with prescribed fire need to be outlined in your burn plan. Determining your management objectives will dictate how, when, and how often you burn. For example, you may not burn at the same frequency, in the same season, or with the same firing techniques if you were managing a field of native grasses for grassland songbirds vs. managing your woods for white-tailed deer. For grassland songbirds, you may burn a native-grass field with strip-heading fire during the dormant season every 1-2 years, whereas for white-tailed deer you should burn the woods with a low-intensity backing fire during the dormant or late-growing season every 3-5 years.
(2) Do you have a burn plan?
A well-written burn plan should address all relevant components of the prescribed fire and will answer all the other questions listed below. The plan should include management objectives, the weather prescriptions for the burn, the fuel type(s) (native grass, leaf litter, etc.) being burned, location and make-up of the firebreaks (bare soil, road, creek, etc.), equipment and personnel needed, who to contact before and after the burn, smoke sensitive areas (schools, hospitals, roads), proposed firing techniques, safety considerations, and contingency plan. The burn plan should also include a map of the burn unit and surrounding area. This will help to identify potential hazards or areas where the fire might escape.
Green growing vegetation with no thatch such as wheat and clover (top picture) and disked or tilled areas (bottom picture) make ideal firebreaks. Wheat or clover firebreaks also double as food plots for various wildlife species and disked firebreaks are attractive to turkeys and bobwhite for brooding areas.
(3) Are your firebreaks in place?
Inadequate firebreaks are a common safety hazard when conducting a prescribed fire and a very likely place for an escape! The firebreak width and composition necessary to conduct your prescribed fire safely should be outlined in your burn plan and firebreaks should be inspected the day of the burn. DO NOT ignite a fire with inadequate firebreaks or if all firebreaks have not been inspected.Mowed cool-season grasses are not ideal firebreaks but they can be used. Dead plant material (thatch) can accumulate in cool-season grass firebreaks following mowing, and this could allow the fire to creep through the firebreak. If you do have mowed cool-season grass firebreaks, make sure thatch has not accumulated and watch them closely during the fire to ensure fire doesn’t creep through the break. You should also consider using water to create a “wet-line” firebreak to contain the fire.Bare soil creates the best man-made firebreak.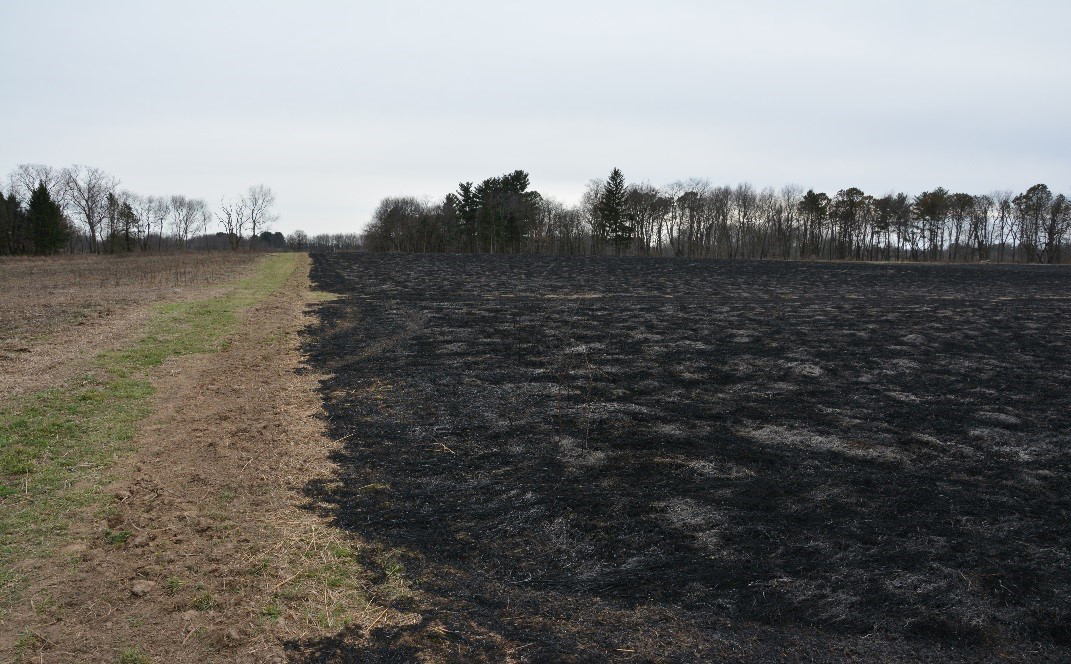 Bare soil firebreaks can be created by disking, tilling, or bulldozing. Empty crop fields, green growing vegetation with no thatch (clover, wheat, alfalfa in the spring), paved, dirt, or gravel roads, and streams, creeks, or rivers also make great firebreaks. In the woods, a leaf blower can be used to remove leaf litter and expose bare mineral soil. Firebreaks should be at least 3 times the width of the adjacent vegetation. In fields of native grasses, firebreaks should be 15-50 feet. By mowing the grasses directly adjacent (10-20 feet) to a firebreak, you can reduce the necessary firebreak width. In the woods, firebreaks only need to be 3-10 feet in width, especially when using only backing fire.
(4) Have you notified the right people about the burn?
Your burn plan should outline who you need to call before and after a prescribed fire. Important people you should call before ignition are the county emergency dispatch (call the non-emergency number), local fire department, and adjacent landowners. You should also call the county dispatch after the fire is complete and extinguished.Calling the county dispatch and local fire department will make them aware of the prescribed fire and sometimes the local fire department might even be willing to lend a hand! Calling dispatch is important because they will likely receive calls from concerned citizens during the fire. Letting them know ahead of time that it is a “prescribed fire” and is being monitored will reduce the number of unnecessary trips by the local fire department.
(5) What are you going to do if the fire escapes?
Escapes do happen and you need to know what to do if your fire escapes. This is called a contingency or escaped fire plan and should be outlined in your burn plan. This plan outlines the roles each person plays if the fire escapes and determines at what point additional resources – fire department or others – should be called to assist in the suppression of the fire.
(6) Have you done your safety briefing?
The last step before ignition of a prescribed fire is the safety briefing. The safety briefing will familiarize personnel with the area, conditions of the firebreaks, weather conditions, radio communication, safety zones and escape routes, contingency plan, and other relevant information. This ensures all the personnel are on the same page when it comes to safely completing the prescribed fire!
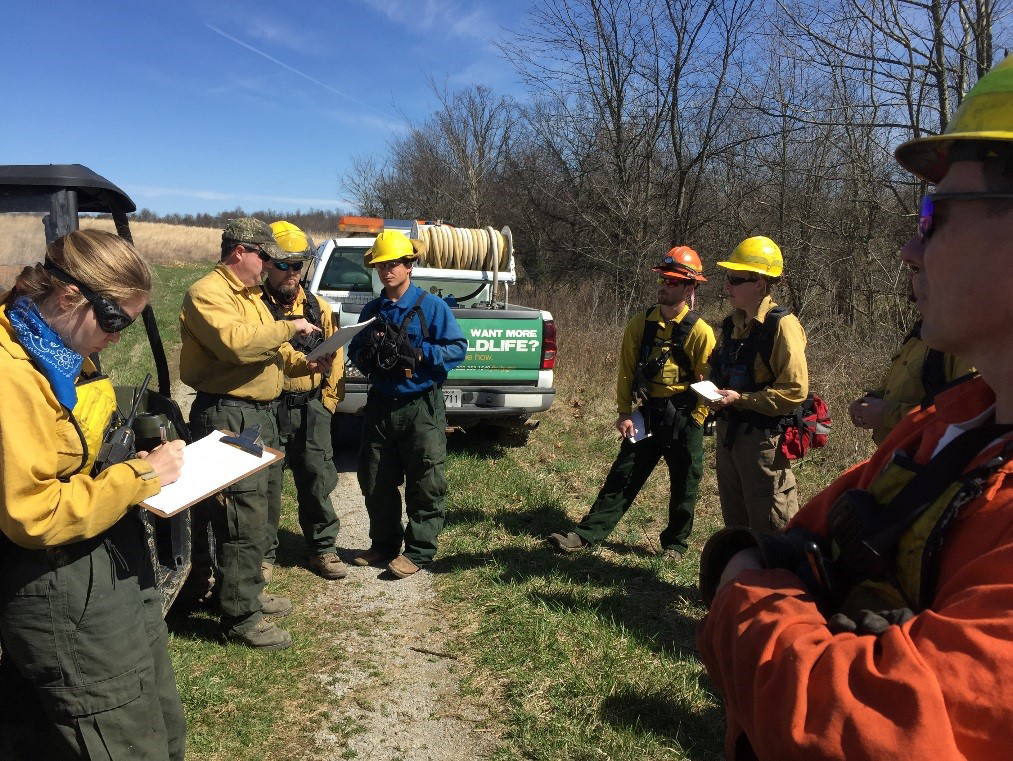
Safety briefings before ignition help familiarize personnel to the area, weather conditions, and potential hazards and help to ensure the fire is conducted safely.
Prescribed fire is an effective management tool, but is only effective if conducted safely! Safety on a prescribed fire is paramount and fires should only be conducted by experienced individuals. If you are interested in learning more about how and why to use prescribed fire on your property, contact your local IN-DNR wildlife biologist.
Additional Resources
Indiana DNR Prescribed Fire Factsheet (pdf), Indiana Department of Natural Resources (IDNR)
Indiana DNR State Parks Prescribed Fire, Indiana Department of Natural Resources (IDNR)
Indiana Woodland Steward Fire and Woodlands, Indiana Woodland Steward
Native Grasses, It’s Time for Management, Got Nature? blog, Purdue Extension-FNR
Jarred Brooke, Extension Wildlife Specialist;
Purdue University Department of Forestry and Natural Resources

Recent Posts
- Restoring Roots to Save the Salamanders, USDA – Natural Resources Conservation Service
Posted: May 6, 2026 in Aquaculture/Fish, Forestry, Wildlife - Spring Storms Are Coming: How to Reduce Tree Damage and Risk
Posted: May 1, 2026 in How To, Urban Forestry, Wildlife, Woodlands - Cryptocline Leaf Spot (Anthracnose) of Elm, Purdue Landscape Report
Posted: April 30, 2026 in Disease, Forestry, Woodlands - Mechanical Damage to Trees: Mowing and Maintenance Equipment
Posted: April 24, 2026 in Forestry, Forests and Street Trees, Urban Forestry - A Woodland Management Moment: Growing Quality Black Walnut in Openings
Posted: April 20, 2026 in Urban Forestry, Woodland Management Moment, Woodlands - Spring Into Bloom With ID That Tree
Posted: in Forests and Street Trees, Urban Forestry, Woodlands - Question: Have Whippoorwill Birds Declined in Numbers?
Posted: in Ask the Expert, Wildlife - Invasive Species in Eastern Forests, Webinar Series
Posted: in Invasive Insects, Invasive Plant Species, Urban Forestry, Wildlife - Tree Risk Management: What Every Property Owner Needs to Know
Posted: April 17, 2026 in Forests and Street Trees, Wildlife, Woodlands - As the spring wildflowers emerge, so do the woodland invaders
Posted: April 16, 2026 in Forestry, Forests and Street Trees, Invasive Plant Species
Archives
Categories
- Alert
- Aquaculture/Fish
- Aquatic/Aquaculture Resources
- Ask the Expert
- Christmas Trees
- Community Development
- Disease
- Drought
- Forestry
- Forests and Street Trees
- Gardening
- Got Nature for Kids
- Great Lakes
- How To
- Invasive Animal Species
- Invasive Insects
- Invasive Plant Species
- Land Use
- Natural Resource Planning
- Nature of Teaching
- Plants
- Podcasts
- Ponds
- Publication
- Safety
- Spiders
- Timber Marketing
- Urban Forestry
- Webinar
- Wildlife
- Wood Products/Manufacturing
- Woodland Management Moment
- Woodlands