K-12 STEM Open Conference 2021 Session 5
Go back to the conference page
Teaching Coding and Doing Research Projects in the Classroom
Strand: Teaching Computer Science/Coding in the Classroom
Teaching Coding with Phil
This series of sessions by Phil Sands takes us through a number of different coding options.
Introduction to teaching coding: Are you new to teaching coding, or just thinking about starting to teach it? In this session, Phil Sands takes us through how to get started and offers advice that he has learned.
Making an Ultrasonic range finder using an Arduino: In this session, Phil takes us, step by step in making an Ultrasonic range finder using an Arduino. He uses an online platform to write and test the code.
Programming Visual Art and Simulations: OpenProcessing can be used to create visual art, simulations, and animations. Phil shows us how to use it to make a simple simulation of a ball dropping at the rate of gravity.
Programming with Python for Teachers: Phil is back to take us through some sites that help us with Python Programming. He shows us how to do some programming for math, writing to files, and counting DNA Nucleotides. This is a number of short sessions that have been combined into one video.
Using Scratch to teach Machine Learning: In this session, Phil walks us through programming to understand Machine Learning. Using a web site, we can have our students go through Scratch programming to do various actions that will help them understand machine learning.
Introduction to teaching coding (Phil Sands)
Are you new to teaching coding, or just thinking about starting to teach it? In this session, Phil Sands takes us through how to get started and offers advice that he has learned. YouTube video
Making an Ultrasonic range finder using an Arduino (Phil Sands)
In this session, Phil takes us, step by step in making an Ultrasonic range finder using an Arduino. He uses an online platform to write and test the code. YouTube video
Links to resources:
Activity walkthrough:
- Assemble the circuit
- Connect the rangefinder (SEN136B5B) to the Arduino.
- Connect the ground wire of the range finder to the GND pin of the Arduino.
- Connect the signal wire of the range finder to pin 7 of the Arduino.
- Connect the voltage wire of the range finder to the +5V pin of the Arduino.
- Connect the rangefinder (SEN136B5B) to the Arduino.

- Open up a development environment for Arduino.
- Add a constant above the setup function.
const int pingPin = 7;- In the setup function, add a call to the begin function so that the serial monitor will be started when the program begins.
void setup() {
Serial.begin(9600);
}
- Create new variables to use to keep track of the time and distance. Declare these inside the loop function.
long duration, cm;
- Below the new variables, use the built-in functions to set the pin mode and write a series of low and high signals from the range finder in accordance with the specifications for the range finder operation.
pinMode(pingPin, OUTPUT);
digitalWrite(pingPin, LOW);
delayMicroseconds(2);
digitalWrite(pingPin, HIGH);
delayMicroseconds(5);
digitalWrite(pingPin, LOW);
- Collect the ultrasonic echo and measure the duration of the burst. Store the result in the duration variable.
pinMode(pingPin, INPUT);
duration = pulseIn(pingPin, HIGH);
- Write a function to convert microseconds to centimeters. Use the conversion of 29 microseconds per centimeter, and account for the bouncing of the ultrasonic signal and subsequent travel back to the rangefinder which doubles the distance. This should be placed below the setup function definition.
long microsecondsToCentimeters(long microseconds) {
return microseconds / 29 / 2;
}
- Call the function written in step 8 using the duration collected in step 7. Store the result in the cm variable.
cm = microsecondsToCentimeters(duration);
- Print the results to the serial monitor.
Serial.print(cm);
Serial.print("cm");
Serial.println();
- Add a delay so that this measurement and printing to the serial monitor occurs only 10 times per second.
delay(100);
- Save and compile the code, correcting any syntax errors reported. Download the code to the Arduino. Test the range finder by measuring the distance from the rangefinder to an object placed a known distance away.
Range-finder code:
/*
The circuit:
- +V connection of the PING))) attached to +5V
- GND connection of the PING))) attached to ground
- SIG connection of the PING))) attached to digital pin 7
*/
const int pingPin = 7;
void setup() {
Serial.begin(9600);
}
void loop() {
long duration, cm;
pinMode(pingPin, OUTPUT);
digitalWrite(pingPin, LOW);
delayMicroseconds(2);
digitalWrite(pingPin, HIGH);
delayMicroseconds(5);
digitalWrite(pingPin, LOW);
pinMode(pingPin, INPUT);
duration = pulseIn(pingPin, HIGH);
cm = microsecondsToCentimeters(duration);
Serial.print(cm);
Serial.print("cm");
Serial.println();
delay(100);
}
long microsecondsToCentimeters(long microseconds) {
return microseconds / 29 / 2;
}
Programing Visual Art and Simulations (Phil Sands)
OpenProcessing can be used to create visual art, simulations, and animations. Phil shows us how to use it to make a simple simulation of a ball dropping at the rate of gravity. YouTube video
Links to resources:
Activity walkthrough:
- Open up a new sketch on the OpenProcessing website. Make sure that you are ready to write code by clicking on the “</>” button at the top of the screen.
- Add code to setup the background of the sketch in the setup function. This should include the size of the sketch, the color of the sketch, and the line representing the ground.
createCanvas(windowWidth, windowHeight);
background(108,140,114);
fill(0);
line(0,windowHeight-50,windowWidth,windowHeight-50);
- Considering the physics equations associated with the motion of a ball (y = y0 + v0t – 1/2at2; vx = v0 - at), create new variables to represent the unknown quantities. Place these variable declarations in the setup function. Add an additional variable to keep track of whether the user has clicked on the screen, which will control whether the ball has been released.
vx=0;
a=-9.8;
t=0;
x=0;
y=0;
released=false;
- In the draw function, write a conditional to react to the action of the ball being dropped. If the user has clicked the screen, the ball will be dropped and the simulation will commence. Otherwise, the ball should follow the mouse around the screen.
if (released==true) {
} else {
}
- Write a new function to update the screen. This function should take the current x and y positions of the ball and re-draw the entire canvas to show the movement of the ball.
function updateScreen(x,y) {
background(108,140,114);
fill(0);
line(0,windowHeight-50,windowWidth,windowHeight-50);
ellipse(x,y,20,20);
}
- Add the function call to the new function in the body of the draw function, below the conditional statement.
updateScreen(x,y);
- Update the conditional to include the code that allows the ball to follow the mouse in the circumstance where the user has yet to click on the screen (i.e., the else block). Run the code to make sure the ball is following the mouse.
x = mouseX;
y = mouseY;
- Update the conditional to include the code that updates the y position of the ball and the velocity of the ball (i.e. inside the if block). This should include a statement setting the frame rate (10 updates per second) and an update to the time variable to add 1/10 of a second per loop.
frameRate(10);
y = y0 + v0*t - 0.5*a*t*t;
vx = v0 - a*t;
t = t + 0.1;
- Write a new function that changes the value of the released variable when the user clicks on the screen and sets the starting y position. Run the code and click on the screen to make sure the ball is updating as expected.
function mouseClicked() {
released=true;
y0 = mouseY;
v0 = 0;
}
- Add a second conditional to account for the bouncing of the ball against the line representing the ground. Run the code and click on the screen to make sure the ball is updating as expected.
if (y > windowHeight-60) {
v0 = vx * -1;
t = 0;
y0 = windowHeight-60;
}
- Update the function for updating the screen by adding code to report on the values of the variables in the system.
if (released==true) {
s = "t: " + str(round(t,1)) + "s\n";
s = s + "v: " + str(round(vx,1)) + "m/s\n";
s = s + "a: " + str(round(a,1)) + "m/s^2\n";
textSize(20);
text(s,windowWidth-200,50);
}
- Run and test the code at multiple positions on the screen. Change the frame rate as needed to speed up or slow down the simulation.
Ball drop code:
function setup() {
createCanvas(windowWidth, windowHeight);
background(108,140,114);
fill(0);
line(0,windowHeight-50,windowWidth,windowHeight-50);
released = false;
vx=0;
a=-9.8;
t=0;
x=0;
y=0;
}
function draw() {
if (released==true) {
frameRate(10);
y = y0 + v0*t - 0.5*a*t*t;
vx = v0 - a*t;
t = t + 0.1;
if (y > windowHeight-60) {
v0 = vx * -1;
t = 0;
y0 = windowHeight-60;
}
} else {
x = mouseX;
y = mouseY;
}
updateScreen(x,y);
}
function mouseClicked() {
released=true;
y0 = mouseY;
v0 = 0;
}
function updateScreen(x,y) {
background(108,140,114);
fill(0);
line(0,windowHeight-50,windowWidth,windowHeight-50);
ellipse(x,y,20,20);
// if the ball has been released, report stats
if (released==true) {
s = "t: " + str(round(t,1)) + "s\n";
s = s + "v: " + str(round(vx,1)) + "m/s\n";
s = s + "a: " + str(round(a,1)) + "m/s^2\n";
textSize(20);
text(s,windowWidth-200,50);
}
}
Programming with Python for Teachers (Phil Sands)
Phil is back to take us through some sites that help us with Python Programming. He shows us how to do some programming for math, writing to files, and counting DNA Nucleotides. This is a number of short sessions that have been combined into one video. https://youtu.be/gx_t0QCfFHY
Links to resources:
Activity walkthrough:
- Download Python 3 and the IDLE development environment from the Python website.
- Visit the Project Rosalind website and make a new account.
- Click on the Problems section of Project Rosalind and select Python Village. Afterwards, choose the “Variables and Some Arithmetic” problem.
- Open up a new file in IDLE. Write a comment at the top using the # symbol and save the file. Please note in the walkthrough that some of the code provided is indented. The indentation in Python is important and conveys meaning. Indented code represents a block, which groups lines of code together. Indented lines below are not typos.
- Add a new function definition for the first problem and call it hypotenuse. The function should be able to take two inputs, a and b, and will return one output. Make sure that lines beneath this line are indented to represent the block of code for the function definition.
def hypotenuse(a,b):
- Write a statement that computes the Pythagorean theorem and stores the result in a new variable representing the value of c squared. Return the result to the user.
c_sq = a*a + b*b
return c_sq
- Save and run the Python script and test it by calling the function from the IDLE shell. Try several values and check your results.
- Click the button that says download dataset on the Project Rosalind site. Open the file and note the two inputs provided. Run your hypotenuse function with those values and copy and paste the results into the text box available for solutions on Project Rosalind.
- Once you have achieved the correct result on Project Rosalind, try the next problem entitled “Working with Files”.
- Write a new function definition in your Python file called evenLines. This function should take a filename as input and return nothing.
def evenLines(fn):
- Write a statement to open a file for reading.
fr = open(fn,'r')
- Write a statement to open/create a file called output.txt for writing.
fw = open('output.txt','w')
- Add the statements to close both files at the end of the function definition.
fw.close()
fr.close()
- Create a for loop that iterates over all lines of the input file.
for line in fr:
- Add a statement to write a line from the input file to the output file.
fw.write(line)
- Update the for loop to include a conditional that only writes the output to the file for even numbered lines. To do so, we will do a modular division (using the percent sign) and divide by 2. If the results is 0, this means the number is even. To keep count of lines, the program requires an additional variable placed above the for loop. This variable should be updated at the end of (and outside of) the for loop. The fully updated code for the loop is shown below.
i = 1
for line in fr:
if i % 2 == 0:
fw.write(line)
i += 1
- Save and run the Python script. Using the dataset provided by Project Rosalind, call the function and supply the name of the file. Make sure that the file that has been downloaded is placed in the same directory as the Python file. Test the function with this data and submit the output file to Project Rosalind. When you have finished this satisfactorily, return to the Problems page on Project Rosalind.
- From the Problems page on Project Rosalind, select the Bioinformatics Stronghold section. Then choose the “Counting DNA Nucleotides” problem.
- Create a new function definition in your Python file called countNTs. This function should take a string of characters, s, as input and return one string as output representing the number of A, C, G, and T characters from the input string.
def countNTs(s):
- Create new variables to count each of the nucleotides: A, C, G, T.
a = 0
c = 0
g = 0
t = 0
- Create a loop that iterates over the entire input string, s. Use the len function to get the length of the input string, s.
for i in range(0,len(s)):
- Inside the loop, include a conditional that checks if the current character is an “A” and update the corresponding variable if so.
if s[i] == 'A':
a += 1
- Repeat step 22 for the other nucleotides using elif statements. These should immediately follow the code from step 22.
elif s[i] == 'C':
c += 1
elif s[i] == 'G':
g += 1
elif s[i] == 'T':
t += 1
- Build a string that includes all of the nucleotide counts and return it.
s = str(a) + ‘ ‘ + str(c) + ‘ ‘ + str(g) + ‘ ‘ + str(t)
return s
- Download the data from Project Rosalind and test your function using the IDLE shell. Once it works as expected, submit the final output in the corresponding spot on Project Rosalind.
Using Scratch to teach Machine Learning (Phil Sands)
In this session, Phil walks us through programming to understand Machine Learning. Using a web site, we can have our students go through Scratch programming to do various actions that will help them understand machine learning. https://youtu.be/8VPpHagNuE4
Links to resources:
Activity walkthrough:
- Go to the Machine Learning for Kids website and register an account. Make a decision on whether you wish to set this up yourself or to let the administrators set it up for you.
- Click to create a new project and call it “chameleon”.
- Click on “Train” and have students add in images.
- Make sure students understand that it learns by the dominant color in the image. You can find images using a Google search, but you should make sure that the largest percentage of the image is the color label that you are addressing.
- Students should have 20 examples of each. You can improve the effectiveness of the training if all students are working with the same model (i.e., all students send their training data to be used together with the data from their peers).
- Click on “Learn & Test” to see how the model performs. This step takes time. If you are doing this as a group, you could transition to the next step while this occurs. This page will not update when it is completed. You need to refresh it and check. You should keep it in an open browser window so you can keep an eye on its progress.
- Before you can run your program, you will need to test your model. When it is done, you can run some tests by uploading new images to see how they are labeled. Add more images and retrain if needed.
- Click on “Make” to build the Scratch program for the Chameleon using “Scratch 3”. You can do it with other tools if you prefer, although I have found the Python program less satisfying.
- Once you have opened Scratch, open up the template for “Chameleon”.
- Click the Chameleon sprite and then the tab that says “Costumes”. Make three copies of the outline. Color each copy to match your possible labels (blue, gold, black). Make sure that each costume is named to match the labels specifically.
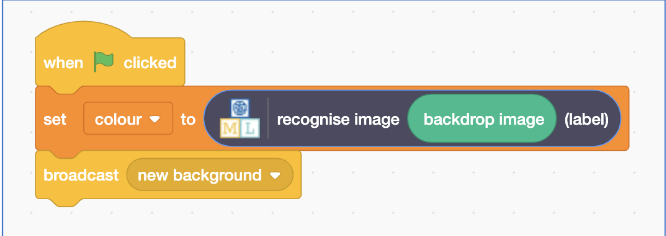
- Select the background image and change the code under the flag so that it attempts to recognize the background image and label it. This label will be stored in a variable called “colour” which is then used by the Chameleon sprite to update.
- Run and test your code, making changes if needed.
Scratch background image code:
Free Arduino Kit
Are you doing a research project that includes coding with Arduino? If so, you may be able to receive a free kit that includes an Arduino and supplies. These kits are supplied through funding from the Halliburton Foundation. Fill out this form to request a kit. Kits available to qualifying students while supplies last.
Collaborators:
We would like to thank the following organizations for collaborating to create this open conference for you.- Purdue University College of Science
- The GLOBE Program
- WestEd/UC Berkeley GLOBE partnership - Tracy Ostrom
- University of Toledo - Kevin Czajkowski
- SUNY at Fredonia - Michael Jabot
- Nova77 STEM Workshop - Ping Wang
- Duke University - Susan Rodger
Funders:
- Halliburton Foundation
- Purdue University College of Science
- American Chemical Society
Steven Smith (mrsmith @purdue.edu), K-12 Outreach Coordinator in Department of Earth, Atmospheric, and Planetary Sciences at Purdue University
Sarah Nern (snern @purdue.edu), K-12 Outreach Coordinator in Department of Chemistry at Purdue University
Superheroes of Science
Superheroes of Science is a Purdue University College of Science program that highlights STEM content, provides professional development opportunities for science teachers, and delivers learning experiences for students
YouTube Channel: Purdue University Superheroes of Science
Like us on Facebook ![]()