Email Guidelines
Follow these Enrollment Management guidelines to help you create effective, timely and approvable emails for prospective, admitted and current students.
Content Guidelines:
Content
Subject Line and Structure
- Use a clear, attention-grabbing subject line that tells readers exactly what the message is about.
- Prioritize key information at the top, and weave important details throughout the body.
Audience-Centered Writing
- Write with your audience in mind—consider their interests, behaviors, and mindset from a college or career interest perspective.
- Keep the tone aligned with Purdue’s brand voice and tone.
Clarity & Brevity
- Keep emails concise—ideally under 300 words.
- Focus the message around one core takeaway and one clear call-to-action to improve engagement and tracking.
Content Strategy
- Avoid overwhelming the reader with excessive information or lists.
- Do not overuse bullet-pointed lists of links—keep it narrative and purposeful.
- Be intentional: Tell a compelling story that shows how your area creates opportunities for students, not just a list of facts.
Style and Compliance Notes
- Avoid hashtags in the body content. Only use them if prompting the student to share on social media (e.g., “Tag your post with #OnlyPurdue”).
- Don’t include “Purdue University” in your signature; the context is already clear from the sender, logo, and footer.
- For new admitted student mailings after March 1, avoid congratulatory phrases unless it’s part of an already-running campaign.
Final Touches
- Proofread carefully. Check spelling, grammar, and confirm all links are correct before sending.
Variable Data
- Make sure you have the Sender, Recipient, CC, and Subject fields populated before submitting an Email Campaign request.
- Sender field: “Your Preferred Sender Display Name“ <Sender Email Address> (example: “Enrollment Management at Purdue University” <admscrm@purdue.edu>)
- Recipient field: {{Email}} or {{Parent-1-Email-Address}}, {{Parent-2-Email-Address}}, {{Legal-Guardian-Email-Address}}
- CC field: usually variable fields for Parents if applicable (see above)
- Subject: populate with your desired subject line.
- If using the student’s name in your message, make sure you’re using the correct variable field: {{First-Name}}
Design Guidelines
Purdue Brand
- Fonts: The Email Builder tool is set to Georgia, 16pt font.
- If you copy and paste anything into the Slate mailing WYSIWYG, please make sure you clear formatting on the text so font codes stay uniform.
- If you copy and paste anything into the Slate mailing WYSIWYG, please make sure you clear formatting on the text so font codes stay uniform.
- Bold and Gold your hyperlinks.
- If you add hyperlinks in the Slate mailing WYSIWYG, make sure you adjust the hyperlink color to Aged Gold or another AA Compliant Purdue brand font color.
- Do not leave the hyperlinks as the default black color.
- If you do, when you do a test send of that mailing, you’ll see that those links come through as the blue default hyperlink color.
Images and Video
- If you have an image in the body of the email, make sure it is sized intrinsically to fit the template and center aligned in the mailing.
- For images the intrinsic size is the size that an image would be displayed if no CSS was applied to change the rendering.
- The following Email Builder tool templates require the following Top Hero Banner Image sizes:
- Basic, Advanced, or Profile Email template: 600px wide maximum
- Newsletter: 480px wide maximum
- At the bottom of this page, you’ll find steps on how to resize an image in either Photoshop or Canva.
- You are welcome to upload your graphics/images to the Slate library – but once your image is loaded in and used in a Completed (Sent) message, you cannot move that image.
- Images require alt text to be accessible. If you change an image, you’ll need to update the alt text.
- Ensure the image relates to what’s being shared in your message.
How to resize an image for your email
How to resize an image using Photoshop
Have the image/graphic you’d like to export open in Photoshop
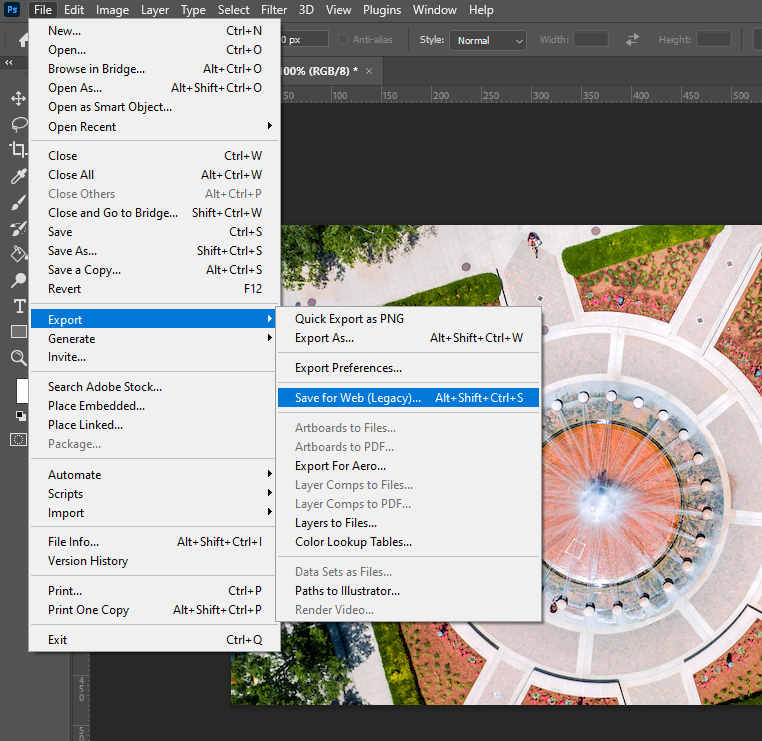
Click on File in the upper left-hand corner. Scroll down to Export. Select Save for Web (Legacy)
Under Image Size, set the width to 600 (px). If you have the chain icon ‘linked’, the image will resize automatically, retaining your image’s proportions. We recommend keeping this chain icon linked so as to avoid stretching/squishing your images.
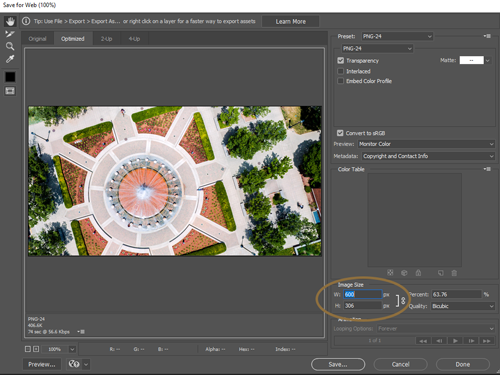
Click Save…
Adjust the File name field if necessary and navigate to the file location you’d like this image saved to. When ready, click Save
You’ll now find your resized image/graphic at your desired file location, ready for your use
How to resize a photo using Canva
- Log in to Canva
- Go to Create Design in the upper right-hand corner and hit the Custom size button
- Type 600 into the width box and between 300-500 into the height box (Email Builder images are all 300px tall)
- Make sure PX is selected in the drop-down menu next to the width and height boxes
- Select the create new design button
- Select Uploads in the left-hand navigation bar
- Select the Upload Media button to upload your image
- Drag and drop the image from your upload library onto the blank canvas
- Resize the image to fill the entire canvas area
- Once your image fills up the space to your liking, go to the top right-hand corner to download
- Select PNG from the drop-down menu then hit the download button
- Once the image is downloaded, it is ready to be used