Deploy Tool Manual
Web Services’ Deploy Tool allows developers of web sites hosted by Web Services to move their content from the development tier to the quality assurance (qa) and production tiers in a safe, controlled, and secure manner. It is a web-based tool that is available 24 hours a day, 7 days a week, 365 days a year. In addition to providing for secure access to the qa and production tiers, it also ensures that all destination nodes in a tier have consistent copies of the web site’s files. When a site or sub-site is Deployed, only the files that have been added, changed, or deleted will be affected and the results will be a destination that is exactly the same as the source.
Selection Page
The first page of the Deploy Tool (after logging in) allows for the selection of the target site or sub-site to Deploy. Optionally, it may also allow the selection of individual files or folders if the Advanced Options interface is active (see Advanced Option Features below).
Common Features
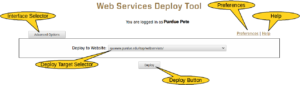
Interface Selector
The Interface Selector allows you to switch between the Simple Options and the Advanced Options for the current Deploy session only! If you wish to make a permanent change, please use the Preferences tool to change your default.
The Simple Options format is the default for new users and requires minimal interaction to Deploy your site. You simply select the site to Deploy and then click the Deploy button. The Advanced Options format includes a file browser/selector component described below.
Preferences
This link will take you to the Deploy Tool’s Preferences page. Four preferences are currently configurable:
- Default Object – This is the Deploy Target that will be selected by default when you enter the Deploy Tool or return to the Selection Page after Deploying or Cancelling. We recommend that you set it to the QA target that you work on the most or that is your current primary project as this can save you some time.
- Email Format – This sets the format the Deploy Tool uses to send a report when it completes a Deployment. You can choose to have the report be included Inline in the body of the message or as an Attachment. The Attachment option is ideal if you wish to save the report to a file.
- Interface – This sets the default interface (Simple or Advanced) for the Deploy Tool. This is only the default and you can always override it on an as-needed basis using the Interface Selector.
- Verbose – This sets how verbose the Test Results and Final Results are. In Verbose mode, a detailed output from each node (in a multi-node target) will be presented in the browser. Regardless of this setting, the report emailed to the user is always in Verbose mode.
After making changes, press the Update button to apply them followed by the Return button to return to the Selection Page. If you Return before pressing Update, the changes are not saved. Finally, the Reset button will restore the settings to what they were before you changed them but only if you have not pressed Update!
Help
This link takes you to this manual.
Deploy To Website Selector
The Deploy to Website selector allows you to select the target (destination) site or sub-site for this Deploy. For example, if you want to Deploy from your development site to your qa site, you select the qa URL from the drop down. Later, when you are ready to Deploy from your qa site to your production site, you select the production URL. If your site does not have a qa tier (very rare), then you select the production URL to Deploy from development to production.
Targets in the drop down are based on what sites/sub-sites you have been granted rights to. Some targets may have a prefix indicating the type of target. Those that do not have any prefix are your regular web content (HTML, CSS, JavaScript, etc.)
The most common prefixes are:
- (DATA) – This is your site/sub-site’s private DATA directory, usually containing database connection strings, some control files for security, etc.
- (CGI) – This is your site/sub-site’s CGI directory. Very few sites have one of these. Use this target to Deploy the scripts located here to qa or production.
- (WP-FILES) – This is the set of files on a WordPress site that forms the code part of WordPress, both the core and any plugins and themes. You will normally use this to Deploy a newly installed or updated plugin or theme from development to qa and then to production. Please note that we do not recommend Deploying the Entire Site using this. Nothing bad should happen, but due to the way that WordPress updates are managed, this will generally result in Deploying thousands of files forward unnecessarily.
- (WP-DB) – This is the target for Deploying your WordPress site content (all of your pages, settings, and uploads) forward from development to qa and then to production. Note that this does not allow any selective Deployment — it is an all or nothing affair and any content in the target that is not in the source will be lost!
- (R-WP-DB) – This is the target for Deploying your WordPress site content (all of your pages, settings, and uploads) backward from production to qa and then to development. This is often used to allow for testing, troubleshooting, or site redesign. Note that this does not allow any selective Deployment — it is an all or nothing affair and any content in the target that is not in the source will be lost!
If you have targets with prefixes not in the above list and do not know what they are, please contact Web Services and we will be happy to explain.
Deploy Button
Once you have made your selection of the Deploy Target (and optionally any specific files/folders), press this button to move to the Test Results and Confirmation Page.
Advanced Option Features
When the Advanced Options interface is selected, a file browser/selector will appear between the Deploy Target Selector and the Deploy Button. This allows fine-grained control over what files/folders will or won’t be Deployed.
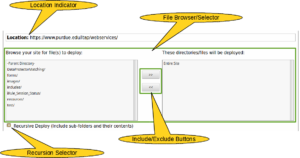
Location Indicator
The Location Indicator is dynamically updated as you navigate through the site/sub-site’s folders. Remember that it is always showing you the destination for the Deploy.
File Browser/Selector
The File Browser/Selector should be readily understood by anyone who has worked with similar tools. You can select one or more files or folders in the left panel and move them to the right panel using the Include/Exclude buttons. Multiple selections can be made by clicking and dragging, by holding the Shift key while clicking the first and last items in the list, or by holding the Control key (or the Command key on a Mac) while clicking on multiple disjoint selections. Double clicking on a folder will open that folder to allow selecting files/folders within it, while double clicking on a file will move it to or from the right panel. Finally, double clicking on the -Parent Directory- entry will move you up on level in the folder hierarchy. By default, if no files or folders are moved to the right panel, the entire site or sub-site will be Deployed exactly as if the Simple Options interface were used.
Recursion Selector
The Recursion Selector tells Deploy if you want it to include all of the sub-folders and their contents of the selected folders. It is enabled by default and normally should be left alone, but some times, it can be useful not to include recursive content. In a few cases where recursive deployment does not make sense, this checkbox may be disabled.
Test Results and Confirmation Page
After pressing the Deploy button on the Selection Page, the Deploy Tool will examine your request and determine what actions it needs to take. This will consist of transferring some files (those that are added or changed) and deleting others. A report of its planned activities will be presented and you will be given a chance to Confirm or Cancel.
Common Features
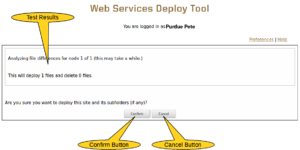
Test Results
After analyzing your request, the Deploy Tool will present a brief summary for each node (if the destination is multiple nodes) telling you how many files will be deployed and how many will be deleted. Please note that for a very large site, this analysis may take a few seconds for each node.
Confirm Button
If you like what you see is going to happen, click the Confirm button and the Deploy Tool will proceed. Please note that once you click the Confirm button, there is no way to stop the tool, even if you closed your browser.
Cancel Button
If for any reason the analysis leaves you unsure (perhaps it is deploying more files than you expected or, more critically, planning to delete files you weren’t expecting) you can click the Cancel button and be taken back to the Selection Page to start over.
Verbose Features
If you have the Verbose preference set to Verbose, you will also be presented with a detailed node-by-node report of what the Deploy Tool plans to do.
Node-by-Node Details
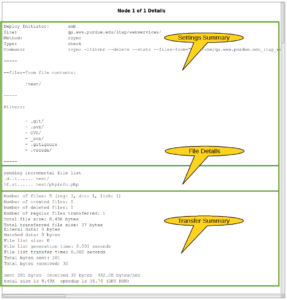
Each node (if there are multiple destination nodes) is presented separately. Unless something has previously gone terribly wrong, all of the reports for each node will be the same, but you should at least look them all over to be sure.
The top part of the report is the Settings Summary. It includes information about the Deploy activities and is useful when reviewing a saved report later (the same format is used for emailed results). It tells you (and us) who requested what, and with what settings.
The File Details section provides a detailed accounting of all activities that are planned (or, for the final results, what happened). This is straight unfiltered output from the rsync command and is not quite as cryptic as it looks. One exception to the “unfiltered” aspect of the output, however, is that the Deploy Tool will highlight any files/folders to be deleted or any errors reported so that they stand out.
Entries in the details indicate actions, reasons for the action, and the affected file or directory as follows:
- The first character indicates the action to be taken. These are most commonly:
- . – no content is changing, but some attributes (such as a timestamp) may be
- > – the file will be transferred to the destination
- c – the directory will be created on the destination
- * – the rest of the line contains a message, such as “deleting”
- The second character indicates the type of the file. It will typically be one of:
- d – the file is a directory (folder)
- f – the file is a regular file
- The rest of the characters indicate various tests that were made to determine if the file should be updated. If the character is a ‘-‘, then the attribute did not figure into the decision to update. If it is a ‘+’, the attribute did not figure into the decision because the file or directory was completely new so there was nothing to compare against. The remaining indicators are again, most commonly:
- s – the size of the file was different — the file will be transferred
- t – the timestamp of the file was different — the file will be transferred and the timestamp will be updated
The report then ends with a Transfer Summary that includes information about how fast the operations were performed.
Final Results Page
After pressing the Confirm button on the Test Results and Confirmation Page, the Deploy Tool will proceed with your request. Control will not return to your browser until the operation is complete so you won’t have to guess when it actually completed. You will be presented with a final report of activity, including any indications of errors. If you have Verbose reporting enabled, a detailed node-by-node report will be presented (it will be emailed to you regardless).
Common Features
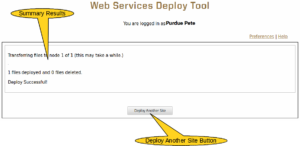
Summary Results
As with the Test Results, the Deploy Tool will present a brief summary for each node (if the destination is multiple nodes) telling you how many files were deployed and how many were deleted along with an indication of any errors encountered. Please note that for a very large site, this may take several seconds for each node.
Deploy Another Site
Finally, if you wish to deploy another site, you may press the Deploy Another Site button to return to the Selection Page.
Verbose Features
Node-by-Node Details
If you have enabled Verbose reporting, just as with the Test Results, you will receive a node-by-node detailed report of the activity of the Deploy Tool. The only difference between this output and the Test Results is that where the Test Results details were a “what will I do” report, these results are a “what I did” report. Please see Test Results above for help interpreting this report.