New Plants From Cuttings (HO-37-W)
Purdue Extension Publication
Plants can be propagated, or multiplied, in several different ways. Most people are familiar with growing new plants from seeds, but new plants can also be created by cutting off a portion of an established plant. This “cutting” is placed in an environment that encourages it to produce new roots and/or stems, thus forming a new, independent plant.
There are several advantages to propagating plants using cuttings:
- The new plant will be identical to the parent plant. For example, if the parent plant has variegated (multi-colored) foliage, the new plant grown from the cutting will have the same foliage. If the parent plant is female (as a holly or ginkgo might be), the new plant will also be female. Propagating a plant by cuttings will allow you to keep the special characteristics of that plant. Plants grown from seed will often be different from the parent plant and from each other.
- Propagating a new plant via cuttings avoids the difficulties of propagating by seed. For example, by using cuttings you could propagate a young tree that has not yet flowered (and thus has not yet produced seed), a male tree, or a sterile plant such as a navel orange. Additionally, some seeds are difficult to germinate, taking two to three years for the seedling to appear.
- A new plant grown from a cutting will frequently mature faster and flower sooner than a plant grown from a seed.
Types of Cuttings
Cuttings can be made from any part of the plant. Most frequently, however, either a stem or leaf is used. A stem cutting includes a piece of stem plus any attached leaves or buds. Thus, the stem cutting only needs to form new roots to be a complete, independent plant. A leaf cutting uses just the leaf, so both new roots and new stems must be formed to create a new plant.
Stem Cuttings
Stem cuttings can be taken from both herbaceous plants (e.g., garden flowers and houseplants) and woody trees and shrubs. Because the new growth of trees and shrubs hardens as the summer progresses, cuttings taken at different times of the year vary in their ability to form roots. Softwood and herbaceous cuttings are the most likely to develop roots and become independent plants, hardwood cuttings the least likely.
Herbaceous
Stem cuttings from herbaceous plants can be taken any time the plant is actively growing.
Softwood
Softwood cuttings are prepared from soft, succulent new growth of woody plants just as it begins to harden (typically May through July). Shoots at the softwood stage will snap easily when bent. The youngest leaves have not yet reached their mature size.
Semi-hardwood
Semi-hardwood cuttings are taken from the current season’s growth after the wood has matured. The wood is firm and all leaves are full size. This occurs in mid-July to early fall for most plants. Many broadleaf evergreens (e.g., boxwood, holly, rhododendron) can be propagated by semi-hardwood cuttings.
Hardwood
Hardwood cuttings are prepared from shoots that grew the previous summer. They are cut in winter or early spring while the plant is still dormant. The wood is firm and does not bend easily. Some deciduous shrubs and needled evergreens will root from hardwood cuttings.
Leaf Cuttings
Leaf cuttings are prepared by taking a single leaf from the plant. This leaf must generate not only new roots, but new shoots as well. The leaf used for propagation usually does not become part of the new plant, but disintegrates after the new plant is formed. Only a limited number of plants have the ability to produce new roots and shoots from just a leaf.
Root Cuttings
Cuttings taken from roots may also be used but only a few species can be propagated this way. Cuttings are taken when the plant is dormant and the roots contain the most stored energy. Each root produces two to three new stems and each stem then produces its own roots. The original root cutting disintegrates.
Propagation Basics
To successfully propagate plants from cuttings, a number of challenges must be overcome. Once a cutting is severed from the parent plant, it can no longer take up water, and excessive water loss will result in death. The wound from the cut makes it susceptible to diseases. New roots must be formed as rapidly as possible if the new plant is to survive.
Decreasing Water Loss
Start with cuttings that contain as much water as possible. Water the plant well the day before and take the cutting before the heat of the day reduces water content.
Once the cutting is harvested, excessive water loss must be prevented. To minimize water loss:
1. Process the cutting immediately. If this is not possible, stand the cut end in water or place the cutting in a plastic bag with a damp paper towel and store out of direct sun. If the plant is frost-tolerant, store the bagged cutting in the refrigerator.
2. For a stem cutting, remove some of the leaves. Most of the water will be lost through the leaves, so by decreasing the leaf surface you also decrease the amount of water loss. A general rule of thumb is to remove 1/2 to 2/3 of the leaves. Cut remaining leaves in half if they are large.
3. Once the cutting has been prepared and placed in the rooting mix, enclose the pot in a plastic bag. Insert straws or wooden sticks around the edge of the pot to hold the bag away from the cutting. Place the pot in a bright area, but out of direct sunlight, so the leaves will receive the light they need but the plant will not get overly hot. The plastic bag insures that humidity around the leaves remains high, which slows the rate of water loss.
Preventing Disease
Take cuttings only from healthy plants. To prevent the spread of disease, use clean tools and pots (clean with 10% bleach, rinse, and let dry thoroughly). Use fresh soilless potting mix since garden soil can harbor plant diseases.
Encouraging Root Formation
Just like leaves, the roots of plants need air to live. Rooting mix that is continuously waterlogged is devoid of air and cuttings will rot rather than form roots. A mixture of 50% vermiculite/50% perlite holds sufficient air and water to support good root growth, but any well-drained soilless potting mix is acceptable. If your cuttings frequently rot before they root, you know the mix is staying too wet. Add vermiculite or perlite to increase its air- holding capacity.
Cuttings use energy to form new roots. If the cutting has leaves, most of the energy comes from photosynthesis. Expose these cuttings to bright light, but not direct sunlight, during the rooting period. If you use hardwood cuttings that have no leaves, the energy will come from reserves stored in the woody stem. For best results, select shoots that are robust for the species. Since you want all the energy to go into the new roots, make sure you cut off any flowers or fruits that would compete for energy.
Auxin, a naturally occurring plant hormone, stimulates root formation. Several synthetic forms of auxin are sold as “rooting hormone.” Though some plants will root readily without treatment, application of rooting hormone to the base of the cutting will often improve your chance for success. Two synthetic auxins, IBA (indolebutyric acid) and NAA (naphthaleneacetic acid) are most frequently used. They are available in several concentrations and in both liquid and powder form. 1,000 ppm (0.1%) is used most often for herbaceous and softwood cuttings; 3,000 ppm (0.3%) and 8,000 ppm (0.8%) are used for semi-hardwood and hardwood cuttings. Liquid formulations can be used at low or high concentration for softwood or hardwood cuttings, respectively. To determine the appropriate concentration for your cutting, follow the instructions on the product label and the general guidelines just given, or consult the references listed at the end of this publication.
To use rooting hormone, place the amount needed in a separate container. Any material that remains after treating the cuttings should be discarded, not returned to the original container. These precautions will prevent contamination of the entire bottle of rooting hormone.
Cuttings will root more quickly and reliably in warm rooting mix. Keep your cuttings between 65°F and 75°F, avoiding excessive heat. If your area is too cold, consider a heating mat or cable especially designed for this purpose.
How to Make Herbaceous and Softwood Stem Cuttings
Many houseplants, annuals, perennials, and woody plants can be propagated by stem cuttings when they are in active growth and the stems are soft.
-
- Cut off a piece of stem, 2-6 inches long. There should be at least three sets of leaves on the cutting.
- Trim the cutting in the following way:
- Make the bottom cut just below a node (a node is where the leaf and/or the bud joins the stem) (Figure 1).
- Remove 1/2 to 2/3 of the leaves, starting from the bottom of the cutting. Cut large leaves in half (Figure 2).
- Remove all flowers, flower buds, and fruit.
- (optional) Dip the lower inch of the cutting in rooting hormone.
- In a pot of damp, but drained, rooting mix, make a hole for the cutting using a pencil. Put the cutting in the hole and firm the rooting mix around it. If any leaves are touching the surface of the mix, trim them back. Several cuttings can be placed in the same pot as long as their leaves do not touch.
- Enclose the pot in a plastic bag, making sure the bag does not touch the leaves.
- Place the pot in a warm, bright spot but out of direct sunlight. Every few days, check the rooting mix to make sure it is damp, and water as necessary. Discard any water that collects in the bottom of the bag.
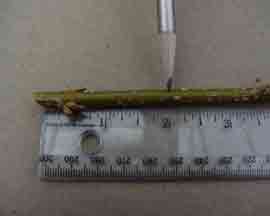
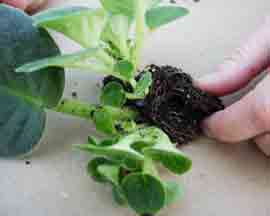
- After two or three weeks, check to see if roots have formed by working your hand under the cutting and gently lifting (Figure 3). If no roots have formed, or if they are very small, firm the cutting back into the mix, rebag, and check for roots again in one to two weeks.
- Once roots have formed, slowly decrease the humidity around the plant by untying the plastic bag and then opening it a little more each day. When it is growing well without a plastic bag, pot in a good quality potting mix and move to its permanent location.
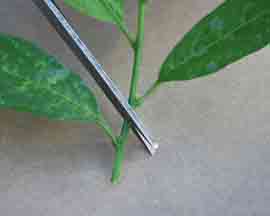
Figure 1: Herbaceous and softwood: cutting below a node 
Figure 2: Herbaceous and softwood: trimmed shoot tip 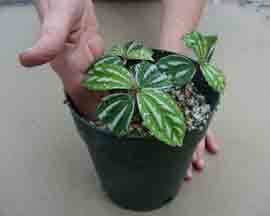
Figure 3: Herbaceous and softwood: checking for roots
How to Make Semi-hardwood Cuttings
Follow the same steps as described for herbaceous cuttings. Semi-hardwood cuttings may need a higher level of rooting hormone and may take longer to form roots. Wounding the base of the cutting sometimes stimulates root initiation (see Step 5 in “How to Make a Hardwood Cutting” below).
How to Make Hardwood Cuttings
Take hardwood cuttings in winter or early spring. Deciduous plants (those that lose their leaves every winter) have no leaves at this time. Thus, water loss is not a serious problems with these cuttings, unless the buds open. Hardwood cuttings are more difficult to root than softwood cuttings, and it may take two to four months for roots to form. The technique does work well with some shrubs such as forsythia, privet, and willow. Needled evergreens can also be propagated using hardwood cuttings, but care must be taken to reduce water loss.
Preparing Deciduous Hardwood Cuttings
- Select a robust stem.
- Cut off a length of stem that was formed over the past summer (depending on species, it may be 1-2 feet long).
- Trim the cutting in the following way:
- Working from the base of the stem, cut just below a node (Figure 4).
- With a pencil, gently make a line 2 inches above this cut. The portion of the stem between the cut and the line will be in the rooting mix (Figure 5).
- Make a second cut 2-6 inches above the line, making sure that this segment contains at least two buds.
- Remove buds from the bottom 2 inches of the stem so they will not grow during the rooting period.
- Wound the cutting by removing two 1-inch slices of bark from opposite sides of the base of the stem. Cut deeply enough to expose the green layer under the bark, but not so deeply that the stem is cut in half (Figure 6).
- Apply rooting hormone to the lowest 1 inch of stem and place it into damp rooting mix up to the pencil line. Firm the rooting mix around it.
- It may be possible to get two to five cuttings from each stem. Repeat steps three through six if the remaining stem is long enough. Make sure you keep track of which end of the cutting is the base and which is the top. The base of the cutting, not the top, should always be the end placed in the rooting mix.
- There are now two options, depending on the facilities and equipment available.
- If you have a cold garage and a heating system to warm the rooting mix, place the pot on the heating system in the cold garage. The cold air will keep the buds from opening and forming leaves, and the heater will keep the mix warm enough for roots to form (65 to 75°F). It is acceptable for the air temperature to go below freezing as long as the heater can keep the rooting mix between 65°F and 75°F. For information on constructing heated beds, refer to HO-53: Hot Beds and Cold Frames (http://www.hort.purdue.edu/hort/ext/Pubs/HO/HO_053.pdf).
- If you do not have a cold garage with a heating system, place the pot in a plastic bag as you would for herbaceous cuttings, and place in a warm room. In two or three weeks the buds will open, but the plastic bag should keep humidity around the leaves high and prevent excess water loss. Make sure the pot is in a bright spot, that it does not overheat, and that the rooting mix is moist but not waterlogged.
- Check for roots every two to three weeks.
- Acclimate rooted cuttings to warmer, less humid conditions as described for softwood cuttings (Step #8).


Preparing Needled Evergreen Cuttings
Needled evergreens are often propagated as hardwood cuttings. Because they still have leaves (needles), these cuttings are handled in a different manner than hardwood cuttings of deciduous plants.
- Use shoot tips only, making the cutting 6-8 inches long.
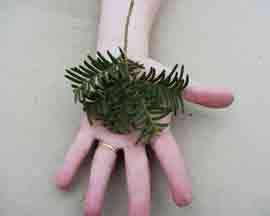
- Remove the needles from the bottom 3-4 inches of the cutting. To reduce water loss, trim the remaining needles so that they just cover the palm of your hand (Figure 7).
- Wound the base of the cutting by drawing a knife point down the lower inch of stem on two sides (Figure 8). Cut into the stem but do not split it. Apply rooting hormone to the lower inch of the stem and place about 2 inches of the stem into the rooting mix, making sure that no needles touch the surface of the mix. Firm the mix around it.

The potted cuttings may be placed in an unheated area with a heating element to warm the rooting mix if the area is well lit. If not, cover the pot and cuttings with a plastic bag and place in a warm, brightly lit room, as with deciduous hardwood cuttings. Providing light is essential for successful rooting of these cuttings. Check for roots once a month. It may take three or four months for roots to develop. Acclimate rooted cuttings as described above.
How to Make Specialized Stem Cuttings
Some houseplants can be propagated most easily using these variations of stem cuttings.
Cane
Cane cuttings are used for Dieffenbachia, Dracaena (including corn plant), and other plants with thick stems. The stem, or cane, is cut into segments and placed into rooting mix. New shoots emerge from the buds that are on the cane; roots grow from the portion of the cane in the rooting mix (Figure 9). The initial absence of leaves reduces water loss.
- Cut the cane into segments that contain several buds (usually 2-3 inches in length).
- Select a healthy bud and place the cane horizontally into the rooting mix so that this bud points up and only the bottom half of the cane is in the rooting mix. The portion of the cane placed in the rooting mix may be treated with rooting hormone.
- Alternately, the end of the cane closest to the base of the plant can be treated with rooting hormone. The cutting is then placed into the rooting mix vertically, about 1/2-inch deep (Figure 10).

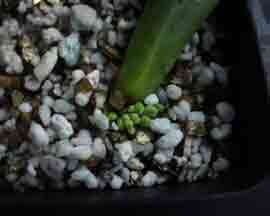
Figure 9: Cane: Dieffenbachia bud and roots 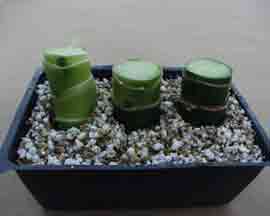
Figure 10: Cane: Dieffenbachia segments placed vertically
Leaf-bud
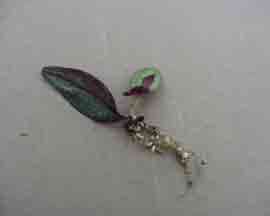
Leaf-bud cuttings use just a small portion of the stem (up to 1 1/2 inches) that contains a single bud and single leaf. The stem portion produces roots, and a new shoot develops from the bud (Figure 11). Treat the stem with rooting hormone, then place in rooting mix so that the bud is below the surface and the leaf is exposed to light. This method is used with grape ivy, geranium, philodendron, English ivy, and the fleshy-leaved peperomias.
Since both types of specialized stem cuttings will lose water easily, place the pot in a plastic bag until roots form.
How to Make Leaf Cuttings
Some plants can be propagated from just a single leaf. Many of these plants have compressed stems, making it impossible to take stem cuttings. These include African violets, bush-type peperomias, and Sansevieria. Some succulents, such as jade plant and jelly bean plant, can also be propagated from a single leaf.
Leaf Petiole
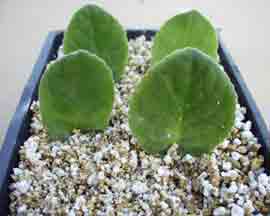
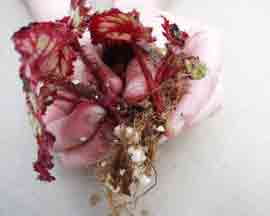
African violets and bush-type peperomias are propagated from the whole leaf, that is, the blade (the flat part of the leaf) plus the petiole (the leaf stalk). Break off a robust leaf, trim the petiole so it is no more than an inch long, apply rooting hormone, and sink the petiole into the rooting mix. The base of the leaf blade should just touch the mix (Figure 12). Place the pot in a plastic bag in a bright spot. In a few weeks roots will form and new plantlets will develop from these roots. When they are large enough to handle, gently divide them, making sure each plantlet has roots, and plant in individual containers. A single leaf will give rise to several small plantlets (Figure 13).
Leaf Blade
Some succulent plants (for example, jade plant and jelly bean plant) have leaves that lack petioles (Figure 14). These leaves can simply be broken off the stem, the broken end dipped in rooting hormone, and the leaf inserted about 1/3 of its length into rooting mix. Since these plants are very sensitive to excess water, make sure the rooting mix stays damp but DO NOT enclose the pot in a plastic bag. Roots and then new shoots will develop at the base of the leaf and can be separated into individual plantlets (Figure 15). If the leaves rot instead of root, start over with fresh cuttings and media, add vermiculite or perlite to your rooting mix, and water only when the upper 1/4 inch of mix has dried.

Although not a succulent, Rex begonias can also be propagated from just the leaf blade. Two techniques can be used.
Method 1:
With a knife cut the major veins on the underside of the leaf (Figure 16). Dust with rooting hormone. Place the leaf flat onto a bed of rooting mix, underside down. Use small wire hairpins or bent paperclips to hold the leaf firmly against the rooting mix (Figure 17).
Method 2:
Roll up the leaf blade, dip the base in rooting hormone, and insert about 1/3 of the roll into the rooting mix. Place extra mix into the center of the leaf roll to hold it in place (Figure 18). Rolling should break some of the veins, so cutting is not required.
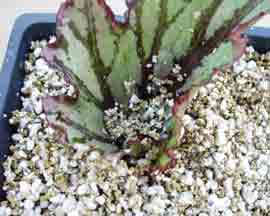
Figure 18: Leaf blade: Rex begonia leaf rolled and stuck in medium
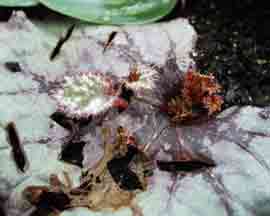
For both methods, enclose the pot in a plastic bag as with softwood cuttings. Check the pot frequently to make sure the veins are in contact with the rooting mix. If the leaf pulls away from the mix, no roots or plantlets will form. Each wound in a major vein will give rise to roots and small plantlets (Figure 19). Transplant each plantlet into a separate pot when large enough to handle (Figure 20).
Leaf Section
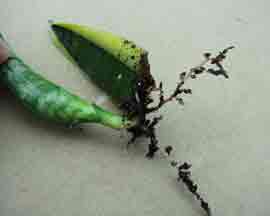
Sansevieria, or mother-in-law’s tongue, has long, sword-like leaves attached to a compressed stem. Cut off one of the leaves at its base, then cut it into 2-4 inch segments. Dip the basal end (the end of the segment that was closest to the base of the plant) of each segment in rooting hormone and then insert 1-2 inches into the rooting mix. If the segments are put into the mix upside down, no roots will form. Put the pot in a plastic bag and place in a bright spot. After several weeks, first roots, then shoots, will develop at the base of the cutting (Figure 21). Each new shoot with roots can become a separate plant.
How to Make Root Cuttings
Though very few plants can be propagated from root cuttings (for example, oriental poppy, phlox, and horseradish), the technique is simple and should be tried if you wish to propagate these species. When the plant is dormant, dig it up and cut off robust segments of the root, 2-3 inches long (replant the parent plant). If the roots are thin, lay them horizontally on the rooting mix and cover with 1/2 inch of the damp mix. If the roots are thick, lay them horizontally or place them vertically into the rooting mix, covering them completely. If placing the root vertically, make sure the end of the cutting that was nearest the crown of the plant points up. Put the pot in a plastic bag and place in a bright spot. In several weeks, shoots should emerge from the rooting mix. Keep the pot in the plastic bag until new roots have formed on the shoots.
References:
General:
Hartman, H.T. et al (1997) Plant Propagation: Principles and Practices, Sixth Edition, Prentice Hall, New Jersey.
Toogood, Alan, (1999), American Horticulture Society Plant Propagation: The Fully Illustrated Plant-by-Plant Manual of Practical Techniques, AHS.
Heuser, Charles W. (Editor), Richard Bird, Mike Honour, Clive Innes, Jim Arbury (Contributing Authors), (1997) The Complete Book of Plant Propagation, Taunton Press.
Woody plants:
Dirr, M.A. and C.W. Heuser (1987) The Reference Manual of Woody Plant Propagation, Varsity Press, Inc. Athens GA.
Perennials:
Jim Nau, (1996), Ball Perennial Manual; Propagation and Production, Ball Publishing.
Houseplants:
Heuser, Charles W. (Editor), Richard Bird, Mike Honour, Clive Innes, Jim Arbury (Contributing Authors), (1997) The Complete Book of Plant Propagation, Taunton Press.
Jantra, I. and Kruger, U. (1997), The Houseplant Encyclopedia, Firefly Books, Inc. Buffalo, New York.
Related extension bulletins from other states:
North Carolina:
Plant Propagation by Leaf, Cane, and Root Cuttings: Instructions for the Home Gardener
http://www.ces.ncsu.edu/depts/hort/hil/hil-8700.html
Plant Propagation by Stem Cuttings: Instructions for the Home Gardener
http://www.ces.ncsu.edu/depts/hort/hil/hil-8702.html
Nebraska:
Propagating House Plants
http://www.ianr.unl.edu/pubs/horticulture/g337.htm
Arizona:
Plant Propagation: Asexual Propagation
http://ag.arizona.edu/pubs/garden/mg/propagation/asexual.html
Kentucky:
Propagating Plants in and around the Home
http://www.ca.uky.edu/agc/pubs/ho/ho67/ho67.pdf
*Janie Nordstrom Griffiths assisted in the preparation of this publication.
For more information on the subject discussed in this publication, consult your local office of the Purdue University Cooperative Extension Service.
Note: Due to the large size of this publication when graphics are included, it is available in two different formats. A PDF version, which is more printer-friendly, can be found at HO-37 (TEXT) and HO-37 (graphic figures). This html version incorporates the figures into the text, but is not as printer-friendly.