Learning Objectives
From reading and studying this chapter, you should be able to:
- Define the types of nursery stock commonly found in the landscape industry
- Understand proper timing for planting
- Describe general and specific planting techniques to maximize plant establishment success
- Understand the reasons for and techniques of certain post-planting operations
- Understand proper timing of fertilizer application for landscape plants
- Describe fertilizer application techniques for routine and specialized situations
- Understand the reasons for pruning
- Dispel common myths about pruning
- Understand proper timing for pruning and describe appropriate tools
Introductory Comments
This chapter presents the concepts and techniques involved in the establishment and management of woody landscape plants. It covers planting, fertilizing and pruning. Other aspects of plant health management, such as disease control, are discussed in later chapters. The methods presented here (especially those for plant installation) are what might be called best management practices, or BMP’s. They are based on knowledge of plant physiology, research, and observation. By following the best management practices in this chapter, most plants will have success when transplanted. However, they are not the only methods which can result in success. Differences in soil conditions, in degree of care in plant handling and transporting, as well as follow-up management, means many variations on these techniques may succeed. Experienced landscape horticulturists often develop methods specific to their areas which work for them and their customers.
Installing Landscape Plants
Types of Nursery Stock
Once you know what kind of plant you will install, you must decide if you intend to plant a bare root, balled and burlapped, or containerized plant. How you treat the tree or shrub at planting time will partially depend upon how the roots were prepared for planting.
Bare root — These are usually the least expensive nursery plants and are generally limited to deciduous plants only. They are dug when they’re dormant and stored in a cooler until shipping. You must protect the roots from drying out and from mechanical damage. You should plant them only while they are dormant (Figure 1).
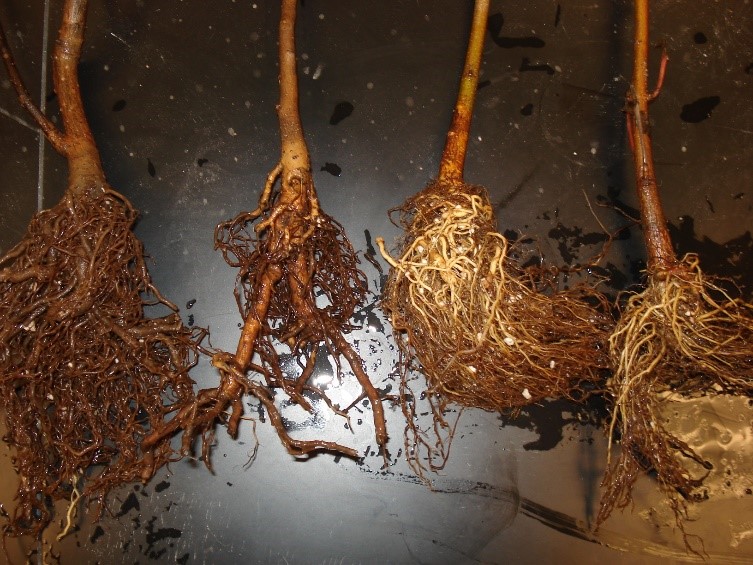
Figure 1. Bare root.
Balled and burlapped (B&B) — These plants are dug from a production field with an undisturbed ball of soil around the roots. Digging is done while plants are dormant or just beginning to come out of dormancy in the spring when the ground thaws, or just as they go into dormancy (or later) in the fall until the ground freezes. However, many Conifers and other evergreens can be successfully dug between “flushes” of growth or after buds have matured. Digging of larger stock is done by machine (Figure 2). On smaller material, workers wrap the soil in burlap, bind it with twine or wire and pin it together with nails. Machine-dug plants are placed into a burlap-lined wire basket. Once tied with twine, the wire basket is crimped for tightness (Figure 3).
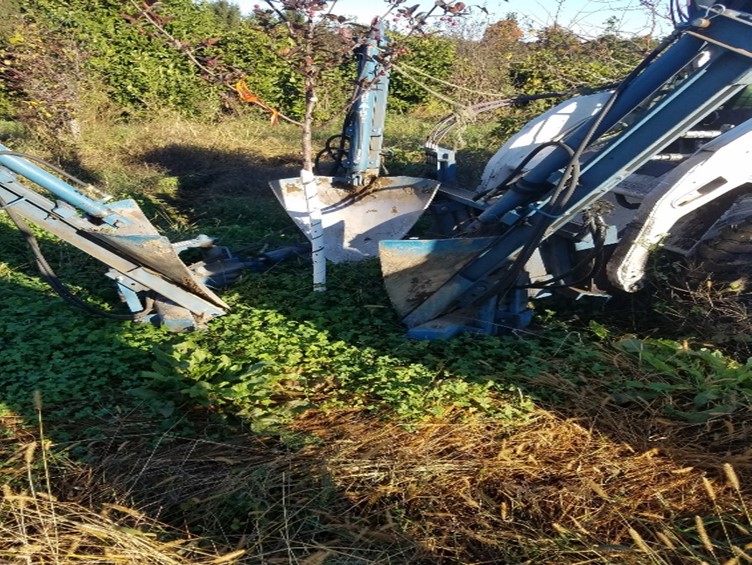
Figure 2. Machine dug B&B plant.
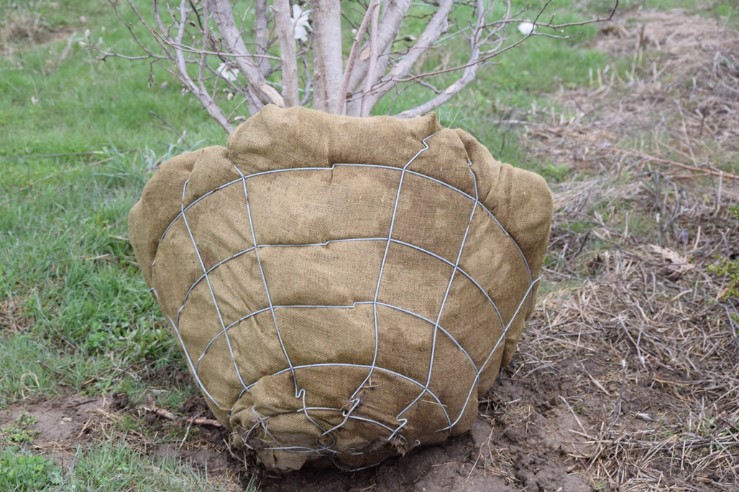
Figure 3. Balled and burlapped with wire basket.
Containerized plants — Plants in pots may come from several different production backgrounds. They may have grown in the container for a growing season or more (Container Grown) (Figure 4); they may have been dug bare-root and planted in the pot earlier that same year (Potted); or they may have been field-grown, dug with a soil ball, and placed into the container (Field Potted).

Figure 4. Container grown.
Both balled & burlapped and containerized plants usually cost more than bare root plants. However, since you move soil with the roots, such plants are much more likely to survive. Additionally, most nurseries don’t sell bare root plants to landscape contractors.
Containerized plants that have grown in the container for at least one full growing season have the added advantage of fully intact root systems at planting. A portion of the root system is cut off B&B stock and some field grown containerized plants at the time of digging. Though the root system is intact in containerized plants, there’s been an increasing concern about the long-term effects of circling and girdling roots. Many nurseries have responded to the concerns of these effects by implementing up-shifting best management practices or utilizing air-pruning, copper treated pots, or fabric containers. These types of containers greatly reduce the amount of circling and girdling roots by desiccating the root tips, thus increasing the number of fibrous roots in the root system. Treatment of containerized plants at transplanting will be discussed later.
Handle balled and burlapped and containerized plants only by the soil ball or pot. Never lift them by the trunk or crown. If you don’t plant them immediately, put them in a cool, sheltered area, preferably in shade. Water them to keep the ball or container soil moist (usually once a day), but don’t stand the root ball or the container in water.
Try to acquire nursery stock just before you intend to put it in the ground. You can hold bare- root plants for several days in a cool, sheltered location by covering the roots with a mulch such as sawdust, wood chips, or shredded bark. Long-term storage in these materials will result in root burn, so transplant as soon as possible. Water them daily, but don’t let roots stand in water.

Figure 5. Heel in of bare-root stock at L.E. Cooke. For stock that you plan to hold for some time before planting in a permanent location, heeling in is necessary to prevent desiccation of the roots.
If you plan to hold bare-root or B&B stock without planting for more than a week, “heel in” or temporarily plant it in a sheltered spot. To heel in bare-root stock, dig a trench with one sloping side deep enough to accommodate roots (Figure 5). Spread the roots in the trench; rest the trunk against the sloping side. Mulch the roots and the lower stem with soil, sand, sawdust, or sphagnum moss. Keep the mulch moist until you move the plants to a permanent location. To heel in B&B stock, simply mound mulch over the soil balls creating a temporary, mini-planting berm. Most organic material can become hot enough to burn roots through the composting process, so don’t leave plants in material longer than required.
For containerized nursery stock, until it is planted, you’ll need to keep the containers watered and protected from physical damage, desiccation and overheating. Black pots can burn roots, so shade is an important consideration when holding containerized stock. Avoid storing containerized plants on hot surfaces, such as asphalt.
All nursery stock should be protected from wind and dryness in transit. A covered box truck is best, but a heavy tarp is commonly used. This is especially true for plants with expanded foliage being held for later planting. Periodic misting to reduce moisture stress is beneficial. Excess handling of B&B stock results in more stress at transplanting, so try to avoid over-handling/moving than is necessary.
Timing of Planting
Climatic conditions determine the appropriate timing for the planting of nursery stock. Only the deepest cold of winter, when the soil cannot be satisfactorily worked, should be completely avoided.
Climatic conditions in spring are usually moist and cool, with warming soil temperatures. Woody plants naturally have a burst of root growth in the spring. This is generally agreed to be the most favorable time to plant all nursery stock. It is the only realistic time to plant bare- root plants, due to the need for bare-root stock to be planted while still dormant.
In summer, high temperatures can cause extreme moisture stress on all plants. Newly planted stock is stressed at this time more than established plants. Thus, compared to the spring, this is a less favorable planting time. However, summer can be a satisfactory planting time. Dependable supplemental irrigation can relieve some of the moisture stress. B&B plants, dug properly in spring prior to leafing out, have a good chance of success in summer due to their already adjusted leaf area. And most container plants have a fully intact root system. Summer planting is stressful, but manageable with care.
Fall can be a very good time for planting. Air temperatures are moderate while soil temperatures are warm, favoring root growth. Due to lengthening nights, woody plants go through a “hardening” process in the fall with little or no above-ground growth. Roots may continue to grow, however, and as long as there are leaves, photosynthesis can occur helping to “feed” new root development. Container plants and evergreen B&B stock make excellent fall planting candidates. Deciduous B&B plants should only be newly dug and replanted in late fall, once leaves have dropped.
Certain trees, considered difficult to transplant, should generally not be planted in fall. They are plants that re-grow roots quite slowly, or have great difficulty re-initiating root growth in the spring following digging operations or other disruptions accompanying planting. Table 1 presents a list of such trees. While not impossible to successfully transplant in the fall, a “best management practice” to maximize success with these species is to only plant them in the spring.
| Scientific Name | Common Name |
| Acer rubrum | Red Maple |
| Amelanchier | Serviceberry |
| Betula spp. | Birches |
| Cercis canadensis | Redbud |
| Chamaecyparis nootkatensis | Nootka False Cypress |
| Cornus florida | Flowering Dogwood |
| Crataegus spp. | Hawthorns |
| Gymnocladus | KY Coffeetree |
| Koelreuteria paniculata | Goldenraintree |
| Liriodendron tulipifera | Tulip Tree, Tulip-poplar |
| Magnolia spp. | Magnolias |
| Nyssa sylvatica | Black Gum |
| Populus spp. | Poplars |
| Prunus spp. | Stone Fruits (Peach, Cherry, etc.) |
| Quercus alba | White Oak |
| Quercus coccinea | Scarlet Oak |
| Quercus macrocarpa | Bur Oak |
| Quercus phellos | Willow Oak |
| Quercus robur | English Oak |
| Quercus rubra | Red Oak |
| Salix spp. | Willows |
| Tilia tomentosa | Silver Linden |
| Zelkova serrata | Japanese Zelkova |
Planting Methods
Reminder: the techniques discussed here should be considered as “best management practices” but not the only methods that can lead to success in landscape plant installation.
Techniques Common to All Root Types
In loose, well-drained soil, dig the hole two times the width of the root spread, soil ball, or container size of the plant (see planting techniques for less ideal sites in “Planting in Heavy or Compacted Soil” below). Dig as deep as the root system, but not much deeper. The width of the hole is quite important, since newly developing roots expand outward from the plant’s original root system.
When you have finished planting, the tree or shrub should be just as deep in the new location as in the old. Flatten the bottom of the hole and tamp it to firm the soil. This will prevent the plant from settling in deeper later. If your plant is bare-root, create a small mound in the planting hole so the bottom of the hole fits the shape of the root system.
In most cases, use the same soil that came out of the hole as backfill. Mix all soil dug from the hole together and break up clods. A common practice is to add small amounts of sphagnum peat moss or composted manure to the backfill and in some landscape situations, this can be beneficial, especially around new construction where subsoil from basement excavation has been used to establish grades around the structure.
However, research suggests such amended backfill mix is of no particular benefit to plant survival if regular watering is provided to the newly planted stock. On poorly drained sites, though, backfill amending is often harmful (see “Planting in Heavy or Compacted Soil” below) and should be avoided. For amending very light soils, see “Planting in Excessively Sandy or Light Soil” below.
To avoid burning roots, do not add dry granular fertilizers or fresh manure to the backfill mix. Composted manure is acceptable.
Once the hole is dug, planting instructions vary according to the root condition of your nursery stock.
Planting Bare-Root Stock
Carefully remove the moist packing material from bare-root stock and examine the roots. Cut off damaged roots with sharp pruners. Soak plant roots in water for several minutes immediately before planting, but don’t let roots stand in water for more than an hour.
Always protect the plant’s roots from excessive drying. Even while you’re digging the hole, keep roots covered with damp burlap, moist sphagnum moss, or other material to avoid exposing roots to sun and air.
For both bare-root and container grown plants, be sure the plant sits at exactly the same level in the new hole as it did where it grew before. Place it in the center of the hole and carefully backfill with soil. Work the soil in and around the roots, then firm it with your hand. Continue filling the hole until it is three-fourths full. Gently tamp the soil with your feet, but don’t pack the soil or break roots. After the hole is about three-fourths full, fill it full of water and let the water drain. This settles the soil and eliminates air pockets around the roots. Do not pack the soil after it is watered. Straighten the plant if it’s crooked, and finish filling the hole.
To catch rain water and to make watering easier, form a 2- to 3-inch rim of soil in a circle a bit larger than the diameter of the hole (Figure 6). Prepare a fertilizer solution with a water-soluble fertilizer (20-20-20 or similar analysis) at the label recommended rate. Fill the basin with the fertilizer solution. Additional fertilizer may be applied as pellets or granulated controlled-release fertilizer in the planting hole. Additional water may be applied.
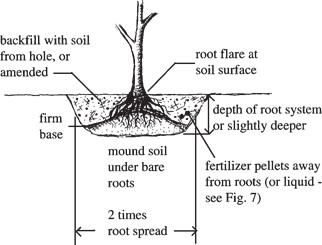
Figure 6. Surface conditions to complete planting operation.
After watering, add 2- to 3-inches of bark mulch or other coarse material over the entire watering basin. Keep all mulch away from the trunk of the tree and the stems of shrubs. For the first growing season, maintain the soil rim around the basin to catch rain or irrigation water.
Planting Balled and Burlapped Stock
Always handle balled and burlapped stock by the soil ball. Lifting by the trunk or crown of the plant tends to loosen the roots in the soil ball. It can damage fine roots, those that are most re- sponsible for water and mineral uptake.
Stand the plant in the prepared hole of proper depth so that the top of the soil ball is level with the surrounding soil surface, never deeper (Figure 7). For trees, be sure the root flare (the point where the tree trunk begins to widen out into the root spread) is level with the surrounding soil surface. With current nursery production practices, sometimes trees come from a nursery already too deep in the soil ball (Figure 8). You should find the root flare by carefully investigating the top of the soil ball, taking care not to destroy the ball in the process. Then, if the root flare is somewhat buried in the soil ball, establish correct planting depth based on the root flare position, not the top of the soil ball. The soil ball may appear to be planted “high,” but this is a much better situation for long-term tree health than if the soil ball is lower, with the tree itself is too deep. A tree planted too deeply can actually suffocate from lack of oxygen in the soil.
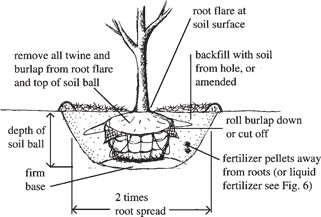
Figure 7. Balled and burlapped planting in well- drained soil.
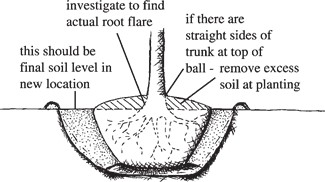
Figure 8. Procedure if tree is too deep in soil ball.
There are many recommendations, almost exclusively based on anecdotal evidence, from Green Industry professionals regarding the proper way to treat balled-in-burlap plants. These recommendations range from leaving everything intact, to removing all of the packaging material.
Wire baskets are an indispensable product for the Green Industry. The introduction of wire baskets allowed larger trees to be handled and planted successfully with much less transplant shock compared to previous methods.
By removing the wire and burlap, most of the root ball will become loose or break apart. This situation is the equivalent of planting a bare root plant, which typically will have a significant amount of transplant shock and require multiple seasons of staking and watering. This also significantly increases time to install (Koeser, et.al., 2015).
On the other hand, by leaving the wire and burlap will increase transplant success and minimize staking. The concern for leaving the packaging material intact is the potential restriction of roots as the plant grows out of the original root ball.
All parties agree that removing all twine around the trunk and root ball is necessary. Many times twine is synthetic, thus doesn’t break down in an acceptable amount of time. The same is true for synthetic or treated burlap, but these aren’t used as much currently.
The debate between leaving the wire basket intact vs. removing is essentially a debate between successful transplanting (leaving on the wire) vs. long-term health (removing the wire). This debate is most common between nurseries/installers and arborists, which can create a negative view from the arborists of the installers/nurseries (Appleton and Floyd, 2004).
There has been a limited amount of data on this issue due to the long-term nature of the research, and the difficulty in elucidating stress/death from the wire basket or some other factor (i.e. planting depth, soil conditions, etc.). Traditionally the thought was for initial transplant success that leaving the wire basket and burlap, at least partially, is the best method. A recent study by Koeser, et.al. (2015) on Norway maple and honeylocust indicated no difference on early growth between wire intact vs. wire removal. There was a significant difference in root ball condition and time for installation two to three years after planting. Since this trial was conducted with nursery soil, there might be differences when planted into the built environment.
The research on the long-term success of plants with wire baskets left intact is mixed. This is most likely due to species and site differences. Many plant species (especially faster growing), will envelope the wire in the roots as the roots increase caliper. The most recent work related to long-term (9 years) effects of wire baskets demonstrated marginal differences between removal of wire and burlap, removal of burlap and string, and removing all packaging materials (Klein, et.al., 2019). This study concludes by suggesting removal of wire baskets is not as important as site factors and post-planting care (i.e. watering). (Appleton and Floyd 2004) summarized the recommendations from major arboricultural references.
| Reference | Author | Publication Date | Recommendation |
| Arboriculture | Harris, Clark, and Matheny | 2004 (4th edition) | “Removing the wire from the top 200-300 mm (8-12 inches) of the root ball (depending on size) would be wise for most landscape trees”. “Remove the wire from the top of the root ball”. |
| Arborist’s Certification Study Guide | Lilly | 2001 | “Although it may be impractical to remove the entire basket, it is preferable to cut away as much of the wire as possible, once the tree is in the planting pit and the tree is stabilized”. |
| Pirone’s Tree Maintenance | Hartman, Pirone, and Sall | 2000 (7th edition) | “Wire baskets, essential to lowering the tree into the hole, are no longer needed and wire strands should be cut with a bolt cutter as far down the sides as possible”. |
| Principles and Practices of Planting Trees and Shrubs | Watson and Himelick | 1997 | “All potentially damaging portions of the wire baskets should be removed at planting time.” “To prevent future problems, cut off the top half of the basket before backfilling”. |
| Trees for Urban and Suburban Landscapes | Gilman | 1997 | “Remove the top portion of the wire basket once the root ball is in place”. |
Current, science-based steps to planting a balled-in-burlap plant after in the planting hole:
- Remove and discard all twine around the base of the tree and the basket.
- Pull back burlap from the top of the root ball.
- Remove soil from the top of the root ball to find the trunk flare. If no flare is present (common on conifers), remove the soil to the top most root.
- Remove the top one-third of the wire basket.
- Pull back or remove burlap in the top one-third of the basket.
- Backfill, filling in all air pockets.
- Stake (only if necessary).
Planting Containerized Stock
Dig the hole before you remove the container. Also, thoroughly water the containerized plant.
You must remove metal or plastic containers completely. Plants likely have been in those containers for a full growing season (usually CG plants) and have a dense root ball. Turn the container upside-down and give the rim a sharp tap on a hard edge. The root ball should fall out in one piece. If it does not, it may be necessary to cut the sides of the container to allow plant removal.

Figure 9. Prune one inch around the entire root ball prior to transplanting container plants.
Before you put the root ball in the prepared hole, prune one inch around the root ball or make 4-5 vertical slits, 1″ deep, in the sides of the rootball to remove circling and girdling roots (Figure 9). This will allow you to place backfill soil directly around those roots. Finish planting, mulching, and fertilizing as described for B&B stock.
The root ball of plants in plant-based containers or other degradable containers (usually Potted or FP plants) will be loose, because the plant has been in the pot for less than a full growing season. The soil probably will fall away from the roots if you take them out of the pot.

Figure 10. Degradable container planting.
Instead, position the pot in the prepared hole at the correct depth that extends above the final soil line. Use a sharp utility knife to slash the pot vertically from bottom to top in five or six places (Figure 10). This will allow water to penetrate into the fibers of the pot wall and begin its breakdown. Backfill immediately while the form of the pot and soil ball are undisturbed. Complete the job by mulching, fertilizing and watering as described previously.
Planting in Heavy or Compacted Soil
If you want plants to survive in heavy clay soil or soil that is hard and compacted from construction activities, you must select plants that can tolerate poor drainage conditions. You won’t have as many plant species to choose from, but if you choose well-adapted plants they will have a much greater likelihood of survival. Some plants are notoriously intolerant of poorly drained soils and should be completely avoided (Table 3).
| Scientific Name | Common Name |
| Abies concolor | White Fir |
| Acer saccharum | Sugar Maple |
| Cladrastis lutea | Yellowwood |
| Cornus florida | Flowering Dogwood |
| Fagus spp. | Beeches |
| Hedera helix | English Ivy |
| Pinus strobus | White Pine |
| Quercus rubra | Red Oak |
| Rhododendron sp. | Rhododendrons, Azaleas |
| Taxus sp. | Yews |
| Tilia cordata | Littleleaf Linden |
| Tsuga canadensis | Canada Hemlock |
Dig the planting hole as wide as you have the ambition to do, but at least two times the diameter of the root ball or spread. Some authorities recommend a planting hole in compacted soil three times the root spread in diameter. This is usually, practically speaking, unrealistic. However, remember that you are basically loosening the surrounding compacted soil for better horizontal root growth. Thus, this is truly a case of “if a little (width) is good, more (wider) is better.” Hole depth should be as described above, unless digging deeper allows you to break through a compacted soil layer and significantly improve drainage. If you do dig down to break through a hard pan layer, be sure the soil that ends up directly under the plant is firmed enough to avoid excess plant settling following planting. Use only the soil from the hole as backfill.
You may be tempted to backfill with looser soil or a lighter, amended soil mix. Don’t do it! If you do, you likely will create a water-holding bowl, commonly called the “bathtub effect.” The light backfill readily allows rainfall or irrigation water into the hole, but the surrounding heavy or compacted soil only slowly allows water to drain away from the hole. Voila, a bathtub! Too much water suffocates roots and kills plants.
If you absolutely must plant species of small ornamental trees or shrubs that require excellent drainage in poorly drained soils, create a raised bed for them. Plan for a bed at least 6- to 8-inches high and at least 4 feet wide for a shrub or 8 to 10 feet wide for a small ornamental tree. To build a raised bed, rototill or hand spade the existing soil. Then place a 3- to 4-inch layer of well-drained soil on top (Figure 11). Spade or rototill the added soil in place. Follow with a second 3- to 4-inch layer of soil and a final pass with the rototiller. You may choose to build a wall around the raised bed to prevent the soil from eroding away; however, where space permits, slope the bed’s outer edges to the original level of the soil.
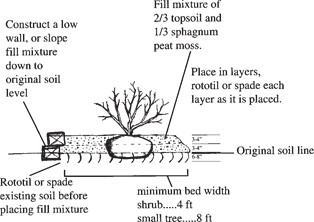
Figure 11. Raised bed planting for poorly drained sites.
Planting in Excessively Sandy or Light Soil
For extremely sandy soil and if regular irrigation is not certain, prepare a better water-holding backfill mixture. A mix of one third sphagnum moss peat and two thirds native soil is commonly used, but proportions may vary (Figure 12). You may dig the hole wider than the minimum, but, as always, set the plant no deeper than it had originally been growing. Backfill with the prepared mix and add a 2 to 3-inch layer of mulch over the planting hole. DO NOT allow the mulch to lay against the plant stem. Be sure to apply water-soluble fertilizer at planting and again once or twice during the first season. If regular irrigation is expected, research suggests plant survival does not increase due to soil amending. But in this case, it won’t harm anything and may be considered “cheap insurance” against an interruption in irrigation.
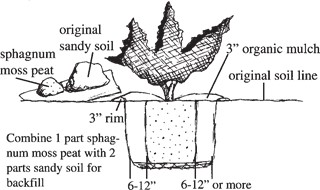
Figure 12. Optional backfill amending when planting in very sandy soil.
Planting Under Extreme Environmental Conditions
Transporting and/or planting landscape plants under conditions of extreme heat and dryness, especially in combination with windy conditions, can cause extreme moisture stress on the plants. While in transit, plants should always be covered. Periodic water misting of foliage can help reduce the immediate stress on plants. Experience suggests the periodic sprays may im- prove transplant performance and/or survival.
Pruning After Installation
Planting time is excellent for pruning off diseased or damaged branches, basal (sucker) shoots, and tree limbs with extremely narrow crotch angles. For shade trees, you can take this time to select major scaffold limbs to retain, then prune out excess branches.
Research suggests that shoot pruning specifically to “balance” roots and shoots is not desirable at planting. Container trees retain intact root systems so the root-shoot balance is maintained. B&B nursery stock, dug at the proper time in early spring prior to leafing out, generally compensates for reduced root mass in the soil ball by producing smaller leaves the first year. The leaves on newly planted trees are important for photosynthesis. They produce the “fuel” that supports new root growth following planting. Only under the most extreme conditions of hot summer planting without irrigation should pruning be done to balance roots and shoots.
Staking and Guying
To keep trees from tipping due to “wind throw” before new root growth has adequately anchored them, stake and guy bare-root trees larger than 6-feet tall, and balled and burlapped trees 8 to 10-feet tall or larger (Figure 13). Small trees usually don’t need the support.
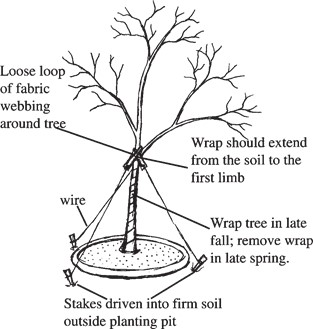
Figure 13. Stake and wrap large trees.
Drive stakes into undisturbed ground adjacent to the planting hole, but 1 – 2 feet away. This will provide firm anchorage and avoid damage to the roots of the newly planted stock. For guys, use fabric mesh bands specifically made for tree support. Attach the bands to the three stakes and to the lowest whorl of scaffold limbs in the tree. Loop the bands around the tree limbs; don’t tie them tight. Guys should be taut, but still allow for some minimal sway of the tree trunk.
Don’t forget to remove the stakes and guys in a timely manner. Generally, remove supports after one growing season for a 1 to 2-inch diameter tree. For larger trees, guys may need to remain for two seasons or more. They should be inspected regularly, adjusted as needed and re- moved promptly. Failure to attend to guy removal can be injurious, or fatal, to landscape trees.
Trunk Wrapping
Wrap the trunks of newly planted trees, especially thin-barked trees like red maple and honeylocust, with a light-colored, commercially available tree wrap in the late fall for winter protection from sun- scald/southwest injury. Remove the wrapping material in spring. Wrap trees each fall until the bark is rough and corky, which may not occur for several years following planting.
Start the wrap at the base of the tree, and extend it to the first limb. Spiral the wrap around the trunk with each turn overlapping the previous turn by half the width of the material. Secure the wrap with an expandable, flexible tape, twine, (such as vinyl electrical tape or twine).
For small trees, you may want to protect the lower part of the trunk with wire or plastic guards. This will discourage rabbits and rodents from feeding on the bark in winter.
Irrigation
Watering, in correct amounts at proper timing, is critical to landscape transplant survival. Overwatering is just as harmful as underwatering. How often and how much you water depends upon your soil type and the amount of rainfall. All irrigation recommendations are based on the assumption that there is no natural rainfall and should be adjusted accordingly for rainfall events.
On well-drained soils, during the first month following planting, apply 1 inch of water every 4-5 days. After the first month, apply 1 inch per week through the summer and fall. On sandy soils, give plants at least 2 inches of water every 4-5 days at first, then per week. Plants in poorly drained, clay soils need less irrigation water be- cause the soil tends to hold water longer.
Don’t water a little every day. Water thoroughly, then refrain from applying water for the recommended interval of days. This approach provides adequate moisture, but also allows roots to get enough air. Both are essential. A little water every day or every other day excludes air and can cause root death.
Optimizing Transplanting Within a Landscape
Moving a small tree or shrub from one spot to another in a landscape is best done with lots of lead time. Two years before the move, start pruning roots in early fall while trees are still growing. This gives the plant the best chance for survival following the move. If you don’t root- prune the plant before the move, it may still survive, but the chances of success are reduced.
To prune roots of small trees, first measure the trunk diameter at your waist height. Then, measure about 9 inches from the trunk for each inch of diameter. For example, a tree with a diameter of 1-1/2 inches should be root pruned 13-14 inches from the trunk. For shrubs, make the root-pruning cut half the distance of the radius of the branch spread of the shrub. For example, a shrub with a spread of 36 inches from the center to the outer-most branches should be root pruned at 18 inches from the center.
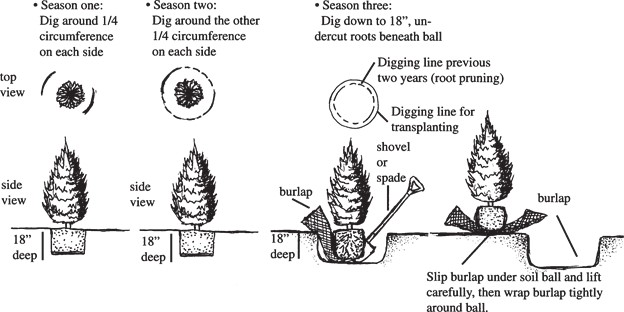
Figure 14. Before digging and moving a tree or shrub, root-prune for two years and transplant during the third.
When plants are dormant, cut straight down through the soil around two quarters of the plant on two opposite sides (Figure 14). Use a sharp spade to cut 12-15 inches deep. During the dormant season the second year, cut around the remaining two quarters of the perimeter of the dormant plant. This two-year process cuts off many long roots and encourages new roots to grow closer to the plant stem. Move the plant during the third dormant season.
When you’re ready to move a plant, tie the branches to the central trunk to minimize the width of the plant. Then start digging 6 inches further away from the trunk than the root-pruning line. Dig a circular trench 18 inches deep. When the circular hole is completely finished, push the shovel blade beneath the root ball. This will cut any deeper roots. Then, gently rock the plant (with the soil ball attached) from side to side while cutting the roots on the bottom of the soil ball. Finally, slide burlap under the ball.
Grasp all four corners of the burlap, and lift the soil ball out of the hole. Wrap the burlap tightly around the soil ball. Tie the burlap so it cannot get loose in handling. Handle the plant carefully, by lifting the soil ball, not the trunk. Do not break the soil ball. Plant as described above.
Fertilizing Landscape Plants
Proper fertilization results in vigorous tree and shrub growth with attractive foliage and in- creased disease and pest resistance. Growth rate will vary somewhat among different species and from season to season, but generally, young, healthy trees produce 9 to 12 inches or more of terminal growth per year. Mature trees usually average 6 to 9 inches of annual growth. The amount of growth for the current year can be measured from the tip of the twig to the first ring of bud scale scars; for previous years, the distance between one ring of bud scale scars and the next ring measures growth. Growth rate for an individual tree can be determined by comparing the growth of several seasons.
Fertilizing can quicken growth of young plants and can help stimulate growth of slow- growing species. Under proper nutritional care, even the so-called slow-growing trees may grow as rapidly as many other species. Although mature trees and shrubs that have reached full size need less fertilizing than young specimens, regular light fertilizing will maintain good color and health while limiting excessive growth.
When nutrients are the primary reason for fertilizer application (rather than soil structural improvement), inorganic fertilizers are preferred. They cost less per unit of nutrient, contain greater percentages of a given nutrient, and are easier to handle and apply because they are more concentrated and less bulky. The nutrients are more quickly available to the plants and are not dependent on the rate of organic decomposition, which, in turn, is dependent on temperature, moisture, and soil composition. A comprehensive presentation of the types and forms of fertilizers is found in Chapter 5, Soils and Plant Nutrition.
If trees and shrubs are growing in a lawn where a complete fertilizer program is followed to promote healthy turf, the woody plants probably will not need additional fertilizer. If grown in beds, however, the woody plants should be fertilized as described below. Note that fertilizer-herbicide mixes (“weed and feed”) designed for turf should never be used in plant beds. In general, turf herbicides such as 2,4-D and dicamba should not be used over the roots of trees or shrubs because they may enter the plants through the root system and cause damage. Damage can include disfiguring of new growth, dieback of twigs and branches, and, in severe cases, death of the plants.
A soil test should be used to determine pH and whether or not adequate levels of phosphorus (P) and potassium (K) are present in the soil. Usually, for woody ornamental plants, nitrogen (N) is the nutrient in short supply. All three, plus other elements in lesser amounts, are necessary for healthy plants, but nitrogen (N) leaches out of the root zone and must be replaced annually. Rarely are all three elements deficient in the same soil.
Generally, an application of phosphorus (P) and potassium (K) every three to five years is adequate for satisfactory growth of woody plants. Phosphorus (P) forms relatively insoluble compounds in the soil and becomes available slowly through several growing seasons. Potassium (K) is available in the soil as an exchangeable ion.
Nitrogen (N) should be applied as required to maintain green leaves and vigorous growth. For rapidly growing plants, an annual application is preferred to ensure adequate amounts, while in poor, sandy soils, which do not hold fertilizers well, it may be necessary to make more frequent applications, or via annual applications of granular controlled-release fertilizers containing ample nitrogen.
If a soil test shows that P and K are at low or medium levels, use a fertilizer mix such as 10- 10-10, 16-8-8, or 20-10-5. If the soil is high in P and K, use a straight N fertilizer such as 21-0-0, 33-0-0, or 45-0-0.
Rates of Application
A fertilizer program for trees and shrubs needs to maintain a fertility level that will provide nutrients as required during the growth of the plant. Calculate the size of the planting bed or lawn area containing the woody plants. Fertilizer should be applied to the feeder root zone of shrubs and trees. For shrubs, consider either the entire bed area, or an area twice the diameter of the shrub, as the feeder root zone. Tree feeder roots occur in an area below and on either side of the dripline of the tree canopy (end of branch spread).
To calculate an appropriate area to fertilize, include the area from one-half the canopy radius from the trunk extending to one-half the canopy radius beyond the dripline. For several trees in a yard, calculate the entire yard as the tree root zone. A rate of 2 to 4 pounds of N per 1000 square feet of soil per year is considered optimal. To reduce the risk of fertilizer injury, this total amount may be divided into two or more portions and used in two or more applications during the growing season. Even if applied all at one time, a nitrogen treatment of 4 pounds/1000 square feet is not considered excessive for well established planting in beds. For plants growing in turf, however, split applications should be used to avoid damage to turf.
If four pounds of N are to be applied annually, apply 2 pounds of nitrogen per 1000 square feet in spring before growth begins, or just as buds are swelling, and 2 more pounds per 1000 square feet in fall about the time of leaf drop or the first killing frost. If only 2 pounds of N will be applied per year, make a single application in the fall.
As long as soil temperatures are above 40°F, roots can absorb nutrients (Table 4). Both spring and fall are active periods of root growth. An added advantage is that in spring and mid-fall, soil moisture conditions favor plant nutrient uptake.
| Month | Date | Under Bare Soil | Under Turf |
| March | 15 | 38.1 | 38.2 |
| 22 | 41.1 | 41.1 | |
| 29 | 43.9 | 43.7 | |
| April | 5 | 46.7 | 46.1 |
| 12 | 49.4 | 48.7 | |
| Oct. | 20 | 55.1 | 55.6 |
| 27 | 52.5 | 53.4 | |
| Nov. | 3 | 49.9 | 51.2 |
| 10 | 47.2 | 49.1 | |
| 17 | 44.5 | 46.9 | |
| 17 | 44.5 | 46.9 | |
| 24 | 41.9 | 44.7 | |
| Dec. | 1 | 39.3 | 42.5 |
| 8 | 36.5 | 40.3 |
If desired, quick-release nitrogen may be applied in late spring. Avoid fertilizing during mid-summer. The late season growth stimulated by such treatments may be injured by fall and winter cold snaps in some areas.
To calculate the amount of fertilizer needed to supply 2 pounds of nitrogen per 1000 square feet, use the percent nitrogen figure in the fertilizer analysis. N is the first number of the three numbers in a fertilizer analysis. If the fertilizer has a 10-6-4 analysis, a 50-pound bag contains 5 pounds of nitrogen (10% of 50 lb. = 5 lb.). Applied at a rate of 20 pounds of fertilizer (2 lb. actual N) per 1000 square feet, the 50-pound bag will cover 2500 square feet. Stated another way, for 1000 square feet, use 20 pounds of 10-6-4 fertilizer, or, for smaller beds, apply 2 pounds for every 100 square feet. Table 5 gives rates for applying some common fertilizers.
| Fertilizer Product | Approx. lb. of fertilizer needed | ||
| 4 lb. Nitrogen per 1000 square feet. | 2 lb. Nitrogen per 1000 square feet. | 1 lb. Nitrogen per 1000 square feet. | |
| Urea (45-0-0) | 9 | 4.5 | 2.2 |
| Ammonium nitrate (33-0-0) | 12 | 6 | 3 |
| Ammonium sulfate (21-0-0) | 20 | 10 | 5 |
| 10-10-10 | 40 | 20 | 10 |
| 12-12-12 | 33 | 16.7 | 8.3 |
To re-emphasize a point made earlier, once woody plants have reached their desired size, little fertilizing is needed.
Caution: Too heavy a rate of application can lead to weak excessive growth or to damaged plant tissue, including the roots. A damaged root system can result in deficiency of nutrients within the plant, even when soil nutrient levels are adequate.
If injury from fertilizer salts occurs, two or more heavy waterings may leach excess salts from the soil. Gypsum worked in to the soil prior to the irrigation may aid in displacing excess fertilizer salt ions.
Keeping plants well-watered during the growing season after fertilizer application will help prevent injury. If rainfall is sparse or infrequent, supplementary thorough watering will be beneficial. Use of a slow-release fertilizer product is another safeguard against the possibility of injury. This type of N breaks down gradually over a period of several months and supplies plants with an even amount during this period. Its disadvantage is its higher cost, which may not be justified due to the fact that many trees and shrubs only grow in one flush per year, so a continuous nutrient supply is not needed. Use of slow-release products at less than recommended rates give poor results because insufficient N is available at any given time for plant needs.
Calculating fertilizer amounts on the basis of size of the bed or spread of the tree (see next section) is preferred over basing amounts on the trunk diameter of the plant.
Methods of Application
Fertilizers are available in granular or pelleted forms for dry application and in water-soluble or liquid forms that can be applied with a hose or sprayer.
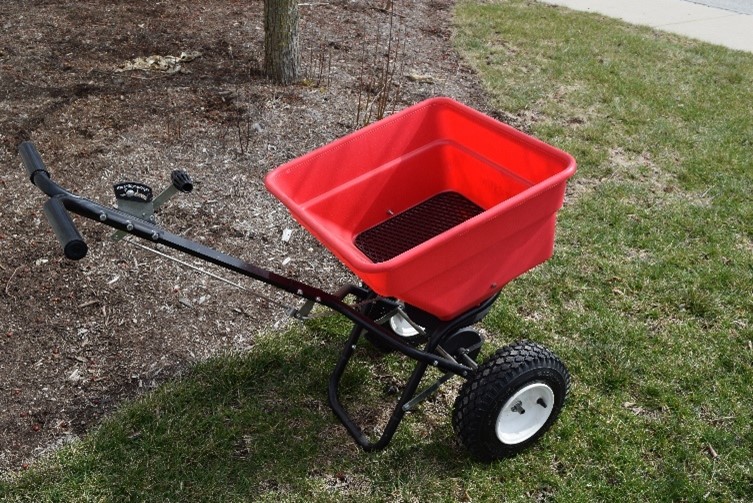
Figure 15. Rotary and drop-type spreaders are useful for dry fertilizer distribution.
Dry fertilizers may be broadcast by hand or spread by drop-type or rotary distributors. Figure 15 illustrates rotary type spreaders. Avoid uneven distribution by dividing the fertilizer to be applied in half, then applying one- half lengthwise over the area, the remainder crosswise over the area. If isolated trees within a lawn are being fertilized, the turf will be stimulated by the treatment and will be greener and faster growing than untreated areas. This so- called “oasis effect” can be avoided by extending the fertilizer treatment beyond the area the trees cover. Water the area thoroughly after application to remove the fertilizer from grass or ground cover and move it down into the soil.
Since nitrogen moves through the soil readily, surface application as described above is suitable if only N is being applied. If soil tests indicate a need for either phosphorus or potassium, placing the nutrients in holes in the root zone of the trees is preferred (Table 6). Fertilizer in holes 1 or 2 inches in diameter and 12 to 18 inches deep will reach many of the feeder roots of trees. Feeder roots of most trees are abundant in the top 12” – 18” of most soils.
| Fertilizer Product | Quantity needed/ 1000 sq ft | Amount/hole based on 250 holes/1000 sq ft (holes on 2 ft grid) |
| Phosphorus (P) Superphosphate (0-20-0) |
18 lbs. | 2 tsp. |
| Treble super Phosphate (0-46-0) |
8 lbs. | 1 tbsp. |
| Potassium muriate of potash (0-0-60) | 10 lbs. | 1 tbsp. |
| 12-12-12* | 30 lbs. | ½ cup |
*This supplies full phosphorus, but only half potassium rate.
Holes may be punched in the soil with a steel bar or drilled with an auger attached to an electric drill. The latter method is preferred in heavy soils since it does not compact the sides of the holes and permits dissolved fertilizer to move more freely from the hole. Such drilling has the added bonus of improving aeration in heavy soils. When the added fertilizer is combined with organic-matter backfill, the hole drilling and filling process is known as “vertical mulching” (Figure 16). In addition to supplying nutrients to the root system, vertical mulching can relieve compacted soils around trees.
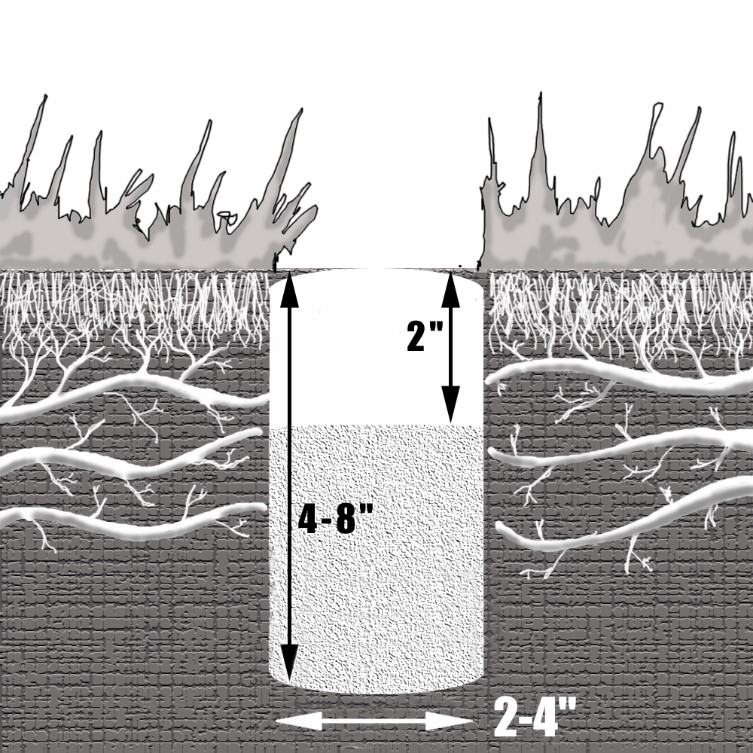
Figure 16. Vertical Mulching Diagram
Space holes 2 feet apart in a rectangular pattern beneath and somewhat beyond the spread of the branches (Figure 17). Do not drill holes within 2 feet of the trunk of trees with a 12-inch trunk diameter or within 3 feet of trees with an 18-inch trunk diameter. The required amount of fertilizer, based on the area to be covered and rate of application, should be divided equally to fill the number of holes, and can be applied with a funnel or a can with the top edge bent to form a pouring spout. After the fertilizer has been added, water thoroughly. The holes then may be filled with sand, topsoil, or organic matter.

Figure 17. Placing fertilizer in holes, evenly spaced in the root zone of the tree, is recommended for potassium and phosphorus.
So-called “tree spikes” that are driven into the ground at intervals beneath and around trees and shrubs may be used as an alternative to drilling and filling holes, but they are more expensive than the method described above.
Other methods of application are a) injection of liquid fertilizer below the ground, using a special injector wand and water pressure to force the solution into the soil; b) application of liquid fertilizer to the foliage of the plant; and c) injection of nutrients into the tree trunk, using special equipment. The latter two methods are usually reserved for treating deficiencies of specific micronutrients such as iron or manganese. Foliage treatment and trunk injection give quick results, but are more costly and less long-lasting than nutrients applied to the root zone of the plants. Foliar feeding of small and medium-sized shrubs may be done by the homeowner; proper coverage of trees and large shrubs will require the services of a professional arborist. Injection methods will also call for employment of a professional; often equipment available to home owners will not supply an adequate amount of fertilizer.
Special Cases
Deciduous Trees
Mature trees need little fertilization as long as they have good leaf color and grow reasonably well. Stimulating increased growth may increase foliage density to the point that interior foliage and plants growing beneath the trees may be weakened by heavy shade.
For trees growing in confined areas where roots are restricted by pavement, buildings, or other construction, fertilizer rates should be based on the area in which the roots are confined and not upon the branch spread when using the steel bar or auger method. Applying too heavy a rate will result in root damage.
Trees with very narrow crowns (i.e. very narrowly columnar cultivars) will have a broader root spread than crown spread. Fertilizer should be applied beyond the canopy spread, up to three times the distance of the dripline.
Deciduous Shrubs
Surface application is preferred to in-hole placement for small or shallow-rooted shrubs. Fertilizer should be scattered evenly beneath the shrub and beyond, to double the shrub diameter, or applied to the entire bed if plants are close together. Care should be taken to avoid contact between the stems or trunks of plants and the fertilizer, and application should be followed with a thorough watering. If the shrubs are known to be deep rooted, the fertilizer may be worked into the soil.
While plants are small and rapid growth is desired, higher rates of nutrients can be applied. As plants reached desired size, reduce or eliminate fertilizer to limit growth.
Newly Planted Trees and Shrubs
Damage to roots (“root burn”) can occur when inorganic fertilizer is incorporated into backfill soil used in planting. Surface application of a water-soluble fertilizer, watered in well, is preferred, if required from a soil test. Many people avoid using any fertilizer during the planting year as research suggests initial root growth depends mostly on stored nutrients in the plant and on photosynthesis. Slow-release fertilizers or fertilizer pellets carefully placed in the planting hole well away from roots may pay future dividends as the roots expand. There can be some benefit to applying fertilizer after one to two years after transplanting. Too much nitrogen will encourage shoot growth, thus disrupting the root:shoot ratio, which will increase transplant shock.
Coniferous and Broadleaf Evergreens
Evergreen trees and shrubs require lower rates of nutrients than their deciduous counterparts. Over-fertilizing conifer trees leads to open growth with widely spaced branches. Narrowleaved evergreen shrubs generally need only about one-half the fertilizer of deciduous plants to maintain good foliage color, especially if used in small scale plantings.
Many broadleaved evergreens have shallow root systems which are easily burned by highly concentrated chemical fertilizers. These plants need an acid soil pH for efficient nutrient uptake. Most landscape suppliers carry special acid- based fertilizers formulated for broadleaved evergreens. These fertilizers contain both an inorganic source of acid-type nitrogen, which is quickly available to a plant, and an organic source, which will supply N over a period of time. Lime, wood ashes, or bone meal will raise the soil pH and should be avoided. The punchbar method of fertilizer application should not be used with broadleaved evergreens, nor should surface applications be worked into the soil. An acid-type organic mulch, such as sphagnum moss peat or rotted oak-leaf mold, will help conserve moisture, keep weeds down, and protect the roots from excessive summer heat.
Pruning Landscape Plants
Correct pruning is an essential maintenance practice for landscape trees and shrubs. However, many workers regard pruning with considerable, though unnecessary, apprehension. Pruning is not difficult if you understand the basics; learn why, when, and how to prune.
Trees and shrubs should be examined annually for pruning requirements. Too often, pruning is ignored for several years. Then some trees and most shrubs become overgrown and often weak, making drastic pruning a necessity to bring the plant back to usefulness. Regular pruning will help keep the plant in bounds and keep its growth vigorous. To prune successfully, you must 1) know why you are pruning, 2) be correct in your timing, and 3) follow proper techniques using proper tools: why, when, and how.
Reasons to Prune
There are several good reasons to prune your trees and shrubs – however, the right plant in the right place can minimize the need for most pruning. Here are some of the most common reasons to prune.
- Maintain or Reduce Plant Size; however
- Pruning can prevent a plant from overgrowing its space in the landscape and eliminate the need for you to drastically cut crowded, overgrown plants. Pruning also allows plants to grow under or adjacent to the pruned plant.
- Pruning reduces leaf area on newly planted trees and shrubs. This promotes survival through transplanting and consequent root loss.
- Remove Undesirable Growth
- Pruning can encourage plant vigor when you remove weak, overcrowded growth. Such thinning often improves the plant’s visual balance or symmetry.
- Remove Dead, Diseased, or Broken Branches
- Pruning will help maintain the plant’s shape, vigor, and health.
- Stimulate Flowering and Fruiting
- Remove the current year’s old, faded flowers and fruit clusters. Doing this will promote flower buds to grow the following season.
- Rejuvenate and Restore Old Plants
- Proper pruning can restore a youthful, natural growth habit in certain overgrown shrubs.
- Prevent Damage to Life and Property
- Pruning can help keep branches and limbs away from power lines and buildings. You also should prune to remove weak branches before strong winds can break limbs and fall on people or buildings. Good pruning also opens blocked sight lines, such as when overhanging limbs block the views from driveways or street
Myths About Pruning
There are a number of myths and misconceptions about pruning which should be laid to rest.
Myth: Pruning Is Difficult
Pruning is straightforward if you know a little about how the plant grows and what it should look like when the process is complete.
Myth: Plants Die if Pruned at the Wrong Time
If you don’t prune at the optimal time, you may injure plants. But seldom, if ever, will you kill a tree with a poorly timed pruning.
Myth: Prune Only in Winter
Actually, it is best to prune many plants during the growing season to facilitate rapid sealing of the wound.
Myth: Topping Trees Prevents Damage to the Home
Topping a tree is drastically removing or cutting back large branches in a mature tree. After a tree has been topped, the shoots that grow are weaker than the original limbs. This new, weaker growth is more likely to split off and cause damage unless you remove them every few years. Also, topped trees are more susceptible to wood rots, which results in poorer tree health and a greater likelihood that limbs will break due to poor branch attachments.
Myth: Removing a Tree Is a Crime Against Nature.
If a plant is in the wrong place, from a functional or aesthetic viewpoint, it is by definition a weed and you can remove it with a clear conscience. This is especially true if you must mutilate a tree beyond recognition to eliminate the problem it is causing.
Myth: Most Trees Need Pruning
Mature trees seldom require pruning. When transplanting, young trees should only be pruned if needed to correct a structural issue.
Myth: You Only Need Hedge Shears to Prune Shrubs
Hedge shears are intended to prune hedges only! You will destroy the natural growth and beauty of your plants if you use hedge shears on shrubs or trees not intended as hedge plants.
Myth: Anyone with a Pickup and a Chainsaw Is Qualified
Indiana has no licensure for tree pruners, so there are some individuals pruning trees who may not be knowledgeable or skilled in proper techniques. Never hire someone who stops and tells you that your plants need pruning and that he will do it right away.
The best recommendation is to consult with an International Society of Arboriculture Certified Arborist for best pruning and tree care practices. Obtain references, and see their work first! You can find a Certified Arborist in your area on the ISA website, www.isa-arbor.com/findanarborist.
Myth: You Must Treat all Cut Surfaces with Tree Paint
We no longer recommend using tree paint. Wound dressings provide no benefit and may hinder natural wound closure.
Times to Prune for Specific Purposes
Timing of pruning is based on the flowering, fruiting, or growth habits of a plant, its tendency to “bleed,” and the fact that pruning usually stimulates a flush of re-growth. Most plants can be pruned at almost any time of year without jeopardizing basic survival. However, it is preferable to prune specific plants at specific points in the year.
Pruning According to Season of Bloom
Trees and shrubs that flower before July are best pruned immediately after flowering. Flower buds develop during the previous season’s growth, thus, the flowers for the current year’s bloom developed last year and overwintered in the bud. If pruned before spring flowering, the flower buds will be removed, thus eliminating flowering. Table 7 shows examples of plants which are best pruned after flowering.
Later flowering trees and shrubs are best pruned in late winter or early spring before new vegetative growth starts. These plants develop flower buds during the spring on current season’s growth (often referred to as “new growth “ or “new wood.“)
These tables contains all 127 tree, shrub and vine species listed in IAH Chapter 3 – Woody Plants. In the columns that follow the Common Name, the correct time to prune is listed. For plants without ornamental flowers and for evergreens and conifers, the suggested times for pruning are listed.
Trees
| Scientific Name | Common Name | Blooming On | When to Prune |
| Abies concolor | White Fir | Conifer | After new growth extends >50% |
| Acer griseum | Paperbark Maple | Spring, after leaf growth is active | |
| Acer palmatum | Japanese Maple | Spring, after leaf growth is active | |
| Acer rubrum | Red Maple | Spring, after leaf growth is active | |
| Acer saccharum | Sugar Maple | Spring, after leaf growth is active | |
| Acer tataricum spp. ginnala | Amur Maple | Spring, after leaf growth is active | |
| Aesculus × carnea | Red Horsechestnut | Old wood | After blooming |
| Acer × freemanii | Freeman Maple | Spring, after leaf growth is active | |
| Amelanchier arborea | Downy Serviceberry | Old wood | After blooming |
| Amelanchier laevis | Allegheny Serviceberry | Old wood | After blooming |
| Amelanchier × grandiflora | Apple Serviceberry | Old wood | After blooming |
| Betula nigra | River Birch | Spring, after leaf growth is active | |
| Betula platyphylla | Japanese White Birch | Spring, after leaf growth is active | |
| Carpinus caroliniana | American Hornbeam | Spring, after leaf growth is active | |
| Celtis occidentalis | Common Hackberry | Late winter to early spring | |
| Cercis canadensis | Eastern Redbud | Old wood | After blooming |
| Chionanthus virginicus | White Fringetree | Old wood | After blooming |
| Cladrastis kentukea | American Yellowwood | Old wood | Summer before mid-August |
| Cornus alternifolia | Pagoda Dogwood | Old wood | After blooming |
| Cornus florida | Flowering Dogwood | Old wood | After blooming |
| Cornus kousa | Kousa Dogwood | Old wood | After blooming |
| Cornus mas | Corneliancherry Dogwood | Old wood | After blooming |
| Crataegus phaenopyrum | Washington Hawthorn | Old wood | After blooming |
| Gymnocladus dioica | Kentucky Coffee Tree | Late winter to early spring | |
| Fagus grandifolia | American Beech | Spring, after leaf growth is active | |
| Fagus sylvatica | European Beech | Spring, after leaf growth is active | |
| Ginkgo biloba | Ginkgo | Late winter to early spring | |
| Gleditsia triacanthos | Honeylocust | Late winter to early spring | |
| Halesia tetraptera | Carolina Silverbell | Old wood | After blooming |
| Koelreuteria paniculata | Goldenraintree | New wood | Late winter to early spring |
| Liquidambar styraciflua | American Sweetgum | Late winter to early spring | |
| Liriodendron tulipifera | Tuliptree | Old wood | After blooming |
| Magnolia ‘Ann’, ‘Betty’, ‘Jane’ | Little Girl Hybrid Magnolias | Old wood | After blooming |
| Magnolia stellata | Star Magnolia | After blooming | |
| Magnolia × soulangeana | Saucer Magnolia | After blooming | |
| Malus sargentii | Sargent Crabapple | After blooming | |
| Malus sp. [hybrids] | Flowering Crabapple | After blooming | |
| Metasequoia glyptostroboides | Dawn Redwood | Conifer | Late winter to early spring |
| Nyssa sylvatica | Black Gum | Late winter to early spring | |
| Picea abies | Norway Spruce | Conifer | After new growth extends >50% |
| Picea omorika | Serbian Spruce | Conifer | After new growth extends >50% |
| Picea pungens f. glauca | Blue Colorado Spruce | Conifer | After new growth extends >50% |
| Pinus strobus | Eastern White Pine | Conifer | After new candles extend but before terminal buds are formed |
| Platanus × acerifolia | London Planetree | Late winter to early spring | |
| Platanus occidentalis | American Planetree | Late winter to early spring | |
| Prunus serotina | Black Cherry | Old wood | After blooming |
| Prunus subhirtella | Higan Cherry | After blooming | |
| Pseudotsuga menziesii | Douglas Fir | After new growth extends 50% | |
| Quercus alba | White Oak | After first frost in fall until April 15 | |
| Quercus bicolor | Swamp White Oak | After first frost in fall until April 15 | |
| Quercus imbricaria | Shingle Oak | After first frost in fall until April 15 | |
| Quercus macrocarpa | Bur Oak | After first frost in fall until April 15 | |
| Quercus muehlenbergii | Chinquapin Oak | After first frost in fall until April 15 | |
| Quercus palustris | Pin Oak | After first frost in fall until April 15 | |
| Syringa reticulata | Japanese Tree Lilac | After blooming | |
| Taxodium distichum | Baldcypress | Conifer | Late winter to early spring |
| Thuja ‘Green Giant’ | Arborvitae | Conifer | After flush of vegetative growth |
| Thuja occidentalis | Eastern Arborvitae | Conifer | After flush of vegetative growth |
| Tilia cordata | Littleleaf Linden | Fall or early spring while dormant | |
| Tsuga canadensis | Canadian Hemlock | Conifer | After flush of vegetative growth |
| Ulmus ‘Frontier’ | Frontier Elm | After first frost in fall until April 15 | |
| Ulmus parvifolia ‘UPMTF’ | Bosque Elm | After first frost in fall until April 15 | |
| Ulmus parvifolia ‘Emer II’ | ALLEE Chinese Elm | After first frost in fall until April 15 | |
| Xanthocyparis nootkatensis | Nootka Falsecypress | Conifer | After flush of vegetative growth |
| Zelkova serrata | Japanese Zelkova | Fall or early spring while dormant |
Shrubs
| Scientific Name | Common Name | Blooming On | When to Prune |
| Aesculus parviflora | Bottlebrush Buckeye | New wood | Winter to early spring |
| Aronia arbutifolia | Red Chokeberry | Old wood | After blooming |
| Aronia melanocarpa | Black Chokeberry | Old wood | After blooming |
| Berberis thunbergia | Japanese Barberry | Old wood | After blooming |
| Buddleja davidii | Butterfly Bush | New wood | Winter to early spring |
| Buxus ‘Green Gem’, ‘Green Velvet’, ‘Green Mountain’ | Boxwood | Insignificant | Spring |
| Buxus microphylla var. koreana | Littleleaf Boxwood | Insignificant | Spring |
| Calycanthus floridus | Sweetshrub | New wood | Winter to early spring |
| Clethra alnifolia | Summersweet Clethra | New wood | Winter to early spring |
| Cornus sericea | Redosier Dogwood | Old wood | After blooming |
| Cotinus coggygria | Smoketree | Old wood | After blooming |
| Cotoneaster apiculatus | Cranberry Cotoneaster | Old wood | After blooming |
| Deutzia gracilis | Slender Deutzia | Old wood | After blooming |
| Euonymus alatus | Winged Euonymus | Insignificant | Prune in fall after leaves drop |
| Forsythia x intermedia | Border Forsythia | Old wood | After blooming |
| Fothergilla gardenia | Dwarf Fothergilla | Old wood | After blooming |
| Hamamelis virginiana | Common Witchhazel | Old wood | After blooming |
| Hamamelis vernalis | Vernal Witchhazel | Old wood | After blooming |
| Hibiscus syriacus | Rose-of-Sharon | New wood | Winter to early spring |
| Hydrangea macrophylla | Big Leaf Hydrangea | Old wood | After blooming |
| Hydrangea paniculata | Panicle Hydrangea | New wood | Winter to early spring |
| Hydrangea arborescens | Smooth Hydrangea | New wood | Winter to early spring |
| Hydrangea quercifolia | Oakleaf Hydrangea | Old wood | After blooming |
| Ilex x meserveae | Meserve Holly | Old wood | After blooming |
| Ilex verticillata | Winterberry | Old wood | After blooming |
| Itea virginica | Virginia Sweetspire | Old wood | After blooming |
| Juniperus chinensis | Chinese Juniper | Conifer | Late winter to early spring |
| Juniperus horizontalis | Creeping Juniper | Conifer | Late winter to early spring |
| Juniperus procumbens | Japanese Garden Juniper | Conifer | Late winter to early spring |
| Juniperus virginiana ‘Grey Owl’ | Red Cedar | Conifer | Late winter to early spring |
| Ligustrum obtusifolium | Border Privet | Old wood | After blooming |
| Myrica pensylvanica | Northern Bayberry | Old wood | After blooming |
| Pinus mugo | Mugo Pine | Conifer | After new candles extend but before terminal buds are formed |
| Potentilla fruticose | Bush Cinquefoil | New wood | Winter to early spring |
| Rhododendron catawbiense | Catawba Rhododendron | Old wood | After blooming |
| Rhododendron x ‘PJM’ | P.J.M. Rhododendron | Old wood | After blooming |
| Spiraea japonica | Japanese Spiraea | New wood | Winter to early spring |
| Rhus aromatica | Fragrant Sumac | Old wood | After blooming |
| Mahonia aquifolium | Oregon Grapeholly | Old wood | After blooming |
| Syringa meyeri | Meyer Lilac | Old wood | After blooming |
| Syringa vulgaris | Common Lilac | Old wood | After blooming |
| Taxus x media | Anglojap Yew | Conifer | Late winter to early spring |
| Viburnum carlesii | Koreanspice Viburnum | Old wood | After blooming |
| Viburnum dentatum | Arrowwood Viburnum | Old wood | After blooming |
| Viburnum dilatatum | Linden Viburnum | Old wood | After blooming |
| Viburnum opulus | European Cranberrybush Viburnum | Old wood | After blooming |
| Viburnum plicatum var. tomentosum | Doublefile Viburnum | Old wood | After blooming |
| Viburnum prunifolium | Blackhaw Viburnum | Old wood | After blooming |
| Viburnum x rhytidophylloides | Lantanaphyllum Viburnum | Old wood | After blooming |
| Viburnum sieboldii | Siebold Viburnum | Old wood | After blooming |
| Weigela florida | Old Fashioned Weigela | Old wood | After blooming |
Vines and Groundcovers
| Scientific Name | Common Name | Blooming On | When to Prune |
| Campsis radicans | Trumpetcreeper | New wood | Winter to early spring |
| Clematis × jackmanii | Jackman Clematis | New wood | Winter to early spring |
| Euonymus fortunei | Wintercreeper Euonymus | Ground cover | Late spring, before mid-August |
| Hedera helix | English Ivy | Ground cover | Late spring, before mid-August |
| Hydrangea anomala ssp. petiolaris | Climbing Hydrangea | Old wood | After blooming |
| Lonicera sempervirens | Trumpet Honeysuckle | Old wood | After blooming |
| Pachysandra terminalis | Japanese Spurge | Ground cover | Late spring, before mid-August |
| Parthenocissus tricuspidata | Boston Ivy | Insignificant | Winter to early spring |
| Vinca minor | Periwinkle | Ground cover | Late spring, before mid-August |
| Wisteria floribunda | Japanese Wisteria | Old wood | After blooming |
| Wisteria macrostachya | Common Kentucky Wisteria | Old wood | After blooming |
More information on pruning of additional varieties is available in these Purdue Extension Publications:
HO-4-W (Pruning Ornamental Trees and Shrubs) https://www.extension.purdue.edu/extmedia/HO/HO-4-W.pdf
FNR-506-W (Tree Pruning Essentials). https://extension.purdue.edu/extmedia/fnr/fnr-506-w.pdf
Both publications offer excellent information to increase your knowledge and understanding of pruning practices and techniques. Your knowledge and understanding of Apical Dominance (see IAH Chapter 1) will allow you to make intelligent decisions regarding the pruning of most landscape plants. Just remember that pruning causes the plant to produce new vegetative growth.
Pruning Needle (Coniferous) Evergreens
To promote a compact plant, coniferous evergreens can be pruned in late spring as the new branches elongate, but before they become stiff. Otherwise, they, like broadleaved evergreens, can be pruned whenever the wood is not frozen. However, coniferous types will generally not develop new shoots on older wood, so don’t cut back beyond the living foliage portion of the branches.
Pruning Trees Known as “Bleeders”
Some deciduous trees have an exceptionally heavy sap flow in the early spring. If cuts are made then, the trees will “bleed.” While this sap loss does not injure the tree, it can be objection- able aesthetically and cause problems for pedestrians, automobiles, etc. passing underneath. “Bleeding” can be avoided by pruning in midsummer or late fall. Maple, birch, dogwood, elm, walnut, and yellowwood are examples of “bleeder” trees.
Pruning in Anticipation of Growth Stimulation
In general, except for the cases already cited, the best time to prune is when the plant will re- cover the fastest. Severe pruning should be done just before regrowth starts in the spring so cuts will be hidden quickly. Heavy pruning in late summer should be avoided. It stimulates succulent growth which may not harden sufficiently to avoid winter dieback. Storm-damaged plants should be pruned immediately after the damage occurs.
Tools for Pruning
Before you prune any plants, make sure you have the proper tools (Figure 18). Your tools should be the highest quality you can afford, and they should be sharp. Keep pruning tools (like all gardening tools) in good condition by regularly lubricating them, cleaning them to prevent rust, and using them only for their intended function. If you prune more than one plant, disinfect the pruning tools in between plants to avoid spreading disease — immerse tools in rubbing alcohol or household bleach to disinfect them.
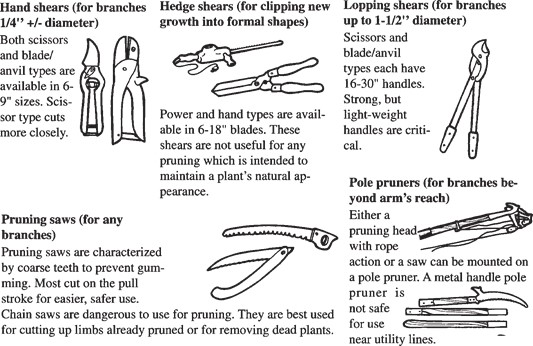
Figure 18. Examples of common pruning tools.
Basic Procedures in Pruning
There are two basic techniques at the heart of all pruning situations: heading back and thinning.
Heading back (Figure 19) shortens a stem or branch. A cut is made some distance behind the branch tip at a point just above a bud or lateral branch. A proper cut should not leave a stub. An angle cut is best. Make the cut about ¼” above the bud or branch.
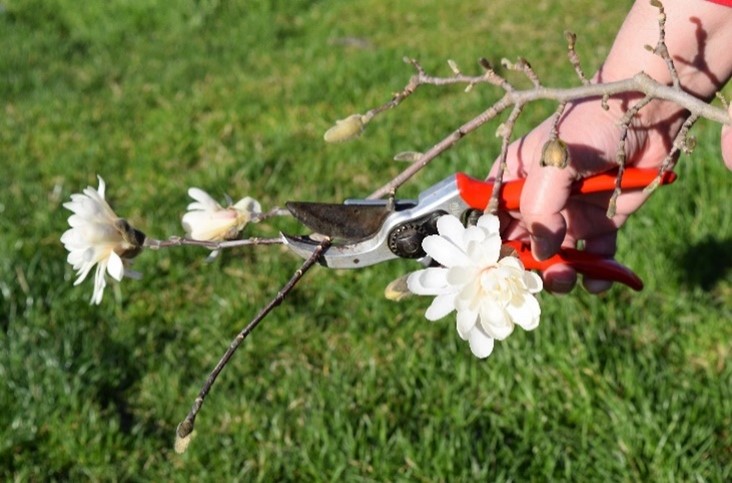
Figure 19. Heading back for size control and proper cuts.
A specific type of heading back is pinching (Figure 20). It is generally done by hand, with- out shears, and is done only on the current season’s shoot growth when it is still soft and succulent. It’s a good way to slow down growth and control plant size. It is also useful to increase the shoot density in a plant.

Figure 20. Pinching out growing tips of shoots.
Thinning completely removes a branch or stem. The cut is made at the point of origin of the stem; that is at a larger branch, the tree trunk or the soil line. A proper thinning cut does not leave a long stump. More importantly, a thinning cut should never cut into or remove the “branch collar”.
The branch collar is a zone of wood at the base of a branch where the branch attaches to a larger stem or the tree trunk. The branch collar is usually recognizable as an enlarged area, often with the bark having a distinctly different surface texture and/or color. It may be a few up to several inches long. The branch collar is important because it contains plant cells that function as a barrier preventing fungi and bacteria from successfully penetrating into the interior of the branch or trunk that remains as part of the pruned plant. Branch collar protection decreases the likelihood of heart rot and probably helps extend the useful life of any tree that has had limbs removed by pruning. Always make a thinning cut at the outer edge of the branch collar zone!
The Wound Dressing Question
Wound dressing or tree paint is not essential, or desirable, for plant health. Dressings may actually harbor disease organisms rather than exclude them. Wound dressing slows wound callusing (the growth of a corky ridge around the edge of a pruning cut, often called “healing”) which is responsible for wound closure. On the basis of tree health alone, pruning cuts should never be painted or dressed.
Basic Safety Rules for Pruning
- Only do pruning work, especially on large trees, with proper equipment.
- Keep all equipment sharp and in good
- Use a piece of equipment only for the job it was designed to do.
- Be conscious of electric lines when pruning near them.
- If a power line is touching a tree limb, call the power company promptly and stay clear of the tree.
- Never climb a tree without using a safety rope, with or without a ladder.
- Keep your fingers clear when using hand
- Use care in handling pruned limbs and brush to avoid eye injury.
Procedures for Pruning Specific Trees and Shrubs
Deciduous Shrubs and Trees
Generally, allow a shrub or tree to develop its natural shape, except when special effects are desirable, such as for hedges. “Haircut” pruning should be avoided (Figure 21). Perfectly sheared globes and squares aren’t appropriate except in extremely formal landscapes. Instead, use thinning and heading back techniques on both shrubs and trees. Cut back branches at different lengths, 1/4″ above an active bud. Remove twigs or branches selectively and thus reduce overcrowding. Some stems should also be removed at ground level. The length of new shoots should be reduced 1/3 to 1/2 of their length, which allows side shoots to develop.

Figure 21. “Haircut” pruning should be avoided
Cutting above a bud prevents dieback of the stem and encourages a new branch to develop from the bud. The haircut technique causes a dense growth at the ends of the pruned branches which shades the rest of the plant, thus causing the plant to eventually develop a leggy appearance. If a shrub develops a weak, dense growth, thin out many of the smaller branches and twigs. This promotes the vigorous growth of the remaining branches. Also remove branches which tend to rub against one another, opening wounds for the entrance of disease.
Always remove dead, damaged, or diseased branches and limbs from established plants as well as newly planted trees and shrubs. Also, re- move dead flower branches, dead flowers, and old fruit stocks as soon as the flowers have wilted or the fruit has dropped. This stimulates new growth and helps to make a stronger tree or shrub. It also encourages plants such as rhododendrons to produce more flower buds for next season.
Evergreen Shrubs and Trees
With evergreen shrubs, generally avoid shearing to artificial shapes. If the evergreen plant has a soft, feathery appearance, prune to maintain that character. Use the thinning technique, thus keeping the natural shape of the evergreen. Remember, the non-green portion of needle-leaved evergreen branches does not normally put out new branches. Therefore, do not cut branches back to leafless old wood (yews (Taxus) are an exception to this rule). Reduce new growth annually, and when removing the larger branches by thinning, cut close to the main trunk, leaving no stubs. Heavy thinning is needed only every few years.
With certain evergreens such as yews (Taxus), a new flush of growth will occur in the early fall. Head back these long shoots to keep the plants in shape.
Broadleaved evergreen shrubs are pruned in the same manner as narrowleaved evergreens, by thinning and heading back. Light pruning every year is preferred, but heavy pruning every three years is acceptable. Rhododendron species benefit from removal of flower heads immediately after flowering. Most types, such as hollies, pyracantha, azaleas, and euonymus, can be cut back severely, but avoid cutting all the way to the ground. Holly trees may be pruned at Christmas time.
To thicken the new growth of coniferous trees such as pines, spruce, or fir, pinch out 1/2 or more of the candle (the new shoot growth on each branch) when it is fully extended (Figure 22). Do not use shears, since they damage the needles that are around the candle and cause the cut edges to turn brown. This gives the tree an unsightly appearance. Do not top or remove the central leader if the natural, conical growth habit of the tree is desired.

Figure 22. Pinch needle evergreen candles when new growth is about 2 inches long. Remove 1/2 or more of the candle.
If the terminal of a needle evergreen tree has been lost, it is necessary to aid the plant in growing a new terminal shoot. Without assistance, a single terminal will probably not be re-established, and multiple leaders will result.
To form a new terminal, bend one of the youngest lateral branches near the terminal into an upright position. Secure it to the dead terminal stub or insert a stake for rigidity. After a season, this branch will take over as a terminal “central leader” shoot. Once this occurs, remove the stub or stake, and the plant will maintain its characteristic growth habit (Figure 23)(Figure 24).

Figure 23. Replace a lost terminal leader by tying a lateral branch in a vertical position and se- curing it to the stub of the dead terminal, or to a stake secured to the main stem.

Figure 24. Example of replacing a lost terminal leader.
Newly Transplanted Trees
The pruning of trees at the time of transplanting should focus on three goals. One is the improvement of branch spacing and distribution (Figure 25). The second is retention of limbs with desirable attachment angles (Figure 26). Both are accomplished by selective thinning of limbs in the center of the crown. The third is removal of competing central growing points (central leaders) (Figure 27).

Figure 25. Establish alternate branching.

Figure 26. Remove branches with a narrow angle that becomes a weak crotch (a), and leave wide-angled, strong crotches (b).
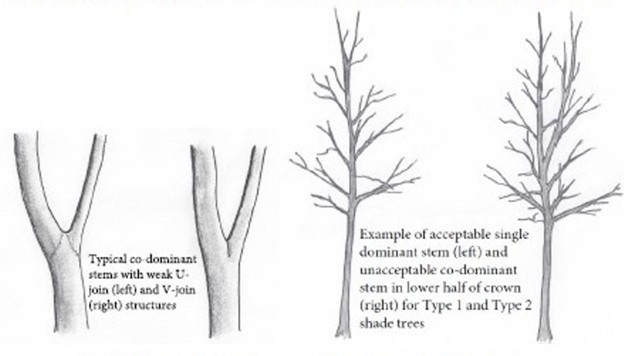
Figure 27. Maintain a single dominant, central leader shoot at the highest point in a shade tree.
When a tree is young is the best time to establish a strong interior structure of limbs that can bear the necessary weight as the tree matures. The attachment points of major limbs to the main trunk should alternate up the trunk so they are widely spaced vertically. They should also be widely distributed radially. This distribution will mean each major limb will have enough room to grow and increase in diameter.
The angle of limb attachment (crotch angle) is important for strength. Crotch angles that are narrow (generally less than 30°) become weak and are prone to failure in high winds or under ice loading in winter. Crotch angles of 60° – 90° tend to be strong. Crotch angle is, to some degree, a genetic trait of a tree species. Some trees, such as silver maple, often develop narrow angles while others such as sycamore and white oak tend to produce nearly perpendicular crotches. Prune to retain the limbs with the best crotch angles and to eliminate the really narrow ones prone to failure.
On most shade trees, the top-most growing point (central leader) is critical to achieving a form typical of the species. It is seldom desirable cut a central leader. It should be pruned only if absolutely necessary (for height reduction, because it is damaged, etc.) and then, only with care and knowledgeable consideration of the future growth of the tree. Sometimes more than one central leader may develop. This is known as co-dominant leaders. Select the most promising (healthiest, best positioned) from among the multiple leaders and remove the others.
Pruning at planting simply to remove leaf area to “balance” roots and shoots is no longer an accepted practice. It reduces the plant’s photosynthetic capacity which, in turn, reduces the “fuel” available to grow new roots. Only under the most extreme conditions of hot summer planting without irrigation should trees be pruned just to balance roots and shoots.
Large Trees
Proper pruning also helps to prevent injury and damage to life and property. This usually involves the removal of large branches or limbs from trees. Where tree limbs are near power lines, call the power company and ask them to remove them. Do not try to remove tree limbs from power lines yourself.
Low-hanging branches may cause injury to individuals mowing the lawn or walking under the tree. Also, branches sometimes rub against the house and roof. To remove branches that are over 3″ in diameter, use the double cut method. If the double cut method is not used, the branch may tear and splinter the trunk. This removes a large portion of the bark, causing a large wound which calluses with difficulty and may further result in permanent damage to the tree (Figure 28).

Figure 28. Failure to use the double cut method can result in trunk damage and bark stripping.
To ternary cut, first make a score cut on the underside of the limb (about one foot from the tree trunk). Several inches further out, make the first through-cut on the upper part of the limb (Figure 29) (Figure30). When the branch falls away, there is no splintering or tearing of bark off the main tree trunk. Then remove the stub with a second through-cut, taking care not to cut into the enlarged base of the limb called the branch collar. (See “Basic Procedures in Pruning”).

Figure 29. Ternary cut method for large limb removal.

Figure 30. Ternary cut order of operations.
Old, Overgrown Shrubs
Another aspect of pruning is the renewal of declining shrubs. In renewal pruning, plant stress is minimized and continued survival is promoted if you remove one-third of the oldest, mature stems per year for three years. These large, old branches are removed at the ground level, leaving the young vigorous branches. The basal shoots that develop should be headed back to different lengths and selected for vigor by the thinning process (Figure 31).
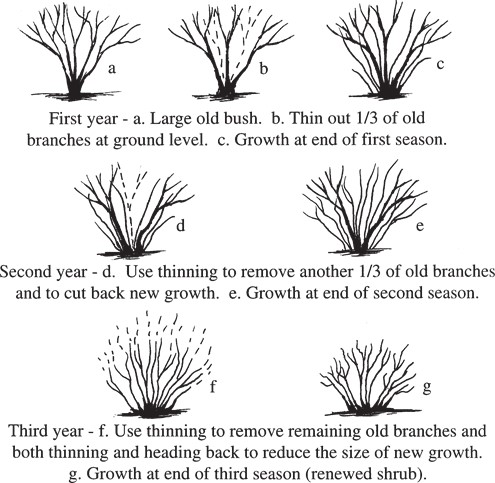
Figure 31. Renewal pruning is best accomplished as a gradual process to reduce stress on the shrub.
Lilac wood often is more than 3 years old before it flowers. Therefore, large, overgrown lilac bushes can gradually be cut back over a period of years, but do not remove all the old flowering wood until the new growth begins to flower. Then the bush will flower every year and will not have any barren years.
If it is essential to immediately reduce the size of a shrub, rejuvenation pruning is appropriate for some species (Table 11). Cut back the entire top of the plant to the ground line. Many new shoots will grow from the base, and they will require thinning. As much as 3/4 of the new growth should be removed, depending on the species (Figure 32).

Figure 32. Rejuvenation pruning involves cutting back the top of the plant to the ground. Thin the new shoots as they begin to grow to prevent excessive crowding.
| Scientific Name | Common Name |
| Buddleia davidii | Butterflybush |
| Forsythia | Forsythia |
| Hibiscus syriacus | Shrub-althea |
| Hydrangea arborescens ‘Grandiflora’ | Hills-of-snow |
| Hydrangea quercifolia | Oakleaf hydrangea |
| Kerria japonica | Japanese Kerria |
| Ligustrum vulgare | Privet |
| Lonicera | Honeysuckle |
| Spiraea | Spirea |
| Syringa | Lilac |
Some plants frequently suffer winter die back of all above-ground stems. These may be safely rejuvenation pruned to produce rapid new growth. These “die-back” plants are considered to be usefully winter hardy. They can be used for landscaping purposes similar to an herbaceous perennial, even though severe rejuvenation pruning often is necessary.
Hedges, Espaliers, and Topiary
Plants are occasionally sheared to unnatural shapes. Hedges as barriers are most common. However, hedges are often improperly pruned, with the sides sloped inward so that the base is more narrow than the top. This shades the lower portion of the hedge, preventing dense leaf growth. Thus, the plants become leggy, the hedge becomes straggly, and the screening function is not achieved. In proper hedge shearing the top is shaped more narrow than the base. This means that light can penetrate to the lower portions of the plants, growth can be maintained, and a leafy appearance over the entire height of the hedge can be attained (Figure 33).
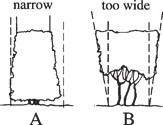
Figure 33. A properly pruned hedge with narrow top (A) and an improperly pruned hedge with wide top (B).
Two other types of pruning plants to unusual shapes are espalier and topiary. An attractive plant requires both dedicated effort and constant attention. Not all landscape designs are appropriate for such plants, and in all cases, their use should be limited to focal points due to their highly unusual appearance.
Espaliering is the practice of training a tree or shrub to grow flat. Almost any tree or shrub can be trained flat by continually removing growing points that go in unwanted directions. Allow the rest of the growing points to develop in their own way.
Figure 34. Some examples of classical espalier forms.
Before locating a plant next to your house for espaliering, place an iron or wooden support a few inches away from the wall. This prevents damage to the wall and allows for plant support and easy plant removal at a future date (Figure 34).
Topiary is a shearing technique occasionally done on boxwood, juniper, pyracantha, yew, and privet. Sometimes fanciful figures are created. More typically, pompom forms of stems with clumps of foliage are desired. Part the branches to find a basic form. Remove limbs you don’t want. Wherever you want to form a foliar clump, leave some branches and shear them to the out- line you desire. Remove all twigs and leaves along branches between clumps. Each season new branches and leaves will tend to fill in the spaces between clumps. Topiary plants should be considered “high maintenance” landscape compone
Review and Study Questions – For Thought and Discussion
- Describe the characteristics of bare root versus balled and burlap nursery stock.
- Compare balled and burlapped root systems with those of container grown nursery stock.
- Is summer a good planting time? Why or why not? What about fall?
- What is usually the best backfill to use when tree planting? What might make you change from using this material?
- What should be done with the burlap on a B&B tree at the time of planting?
- What should be done with the wire basket on a B&B tree at the time of planting?
- What is meant by the bathtub effect? Under what soil conditions is it likely to occur?
- When is staking and guying desirable? What is the correct way to do it?
- What is a desirable annual rate of nitrogen fertilizer for woody plants?
- When should fertilizer be applied to landscape plants?
- What factors influence correct timing for pruning? Give some
- What are the two basic pruning cuts? Define
- Describe what is meant by the branch “collar” and how it should be treated when limb removal is
- What is a “candle” on a needle evergreen tree and how should pruning be practiced on such candles?
- Where is a central leader found on a shade tree? What should you do if multiple central leaders develop?
- What is the purpose of using the double-cut method of large limb removal?
- Describe and differentiate between renewal and rejuvenation
- What is the key to success in hedge pruning to produce a hedge which is a solid wall of foliage all the way to the ground?
- (True or False): Container grown nursery stock has field soil surrounding the root system.
- (True or False): Fall is a universally (for all species) optimum time for transplanting nursery stock.
- (True or False): Staking and guying larger trees at planting is an antiquated practice and should be avoided.
- (True or False): The branch collar should always be retained intact when large tree limbs are removed.
- (True or False): Multiple central leaders are desirable in young shade trees to guard against future loss of one due to bad weather or disease.
- What is the best time of year for planting nursery stock to optimize success?
- Spring
- Summer
- Fall
- A pruning cut made on a stem part of the way back from the shoot tip is called what?
- Tipping
- Heading back
- Thinning
- Topping
- When a B&B tree comes with a wire basket around the root ball, the best research and current thinking say you should do what with the wire basket?
- Remove it completely
- Ignore it and plant the root ball with the wire intact
- Cut the top of the wire basket away leaving the bottom 2/3rds intact
- What is considered to be the optimal annual rate of application of nitrogen fertilizer to woody plants?
- 1-2 lb
- 2-4 lb
- 6-8 lb
- 10 lb
- (True or False): On a needle evergreen, the upright new shoot, before the new leaves (needles) elongate, is called a “candle.”
- (True or False): Pruning of needle evergreens at the stage described in the previous question, should always be done with very sharp pruning shears?
- Apical dominance is a term that refers to:
- The reason trees grow upright and not sideways
- The elongation growth of a stem during a growing season
- The reason leaves change color in the fall
- None of the above
Answers to Review and Study Questions
-
- False
- False
- False
- True
- False
- A
- B
- C
- B
- True
- False
- B