Confluence Essentials
Activity 1: Getting Started with Confluence
Objective: This activity will define what a wiki is, introduce some terms to know with Confluence, demonstrate how to navigate the Confluence interface, to locate individual sites within Confluence (spaces), and to set spaces as favorites for easy future access.
Step 1
Things to Know
- A wiki is a website that allows for group collaboration.
- In Confluence, a space is a specific site used by a course, a research group, a department, etc.
Step 2
Logging in to Confluence
- Open a Web browser and type wiki.itap.purdue.edu into the address bar.
- Click Enter.
- Click Log In in the upper right hand corner. Use your Purdue career account username and password to log in.

Step 3
Locating a Confluence Space and Setting as a Favorite
- Spaces that you have access to will appear to the left side of your Confluence screen.
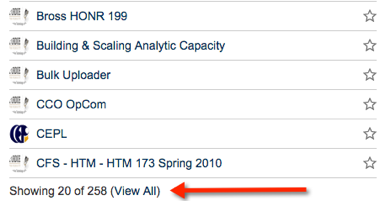
- Spaces will be listed in alphabetical order. Only the first 20 spaces you have access to will appear. To open the Space Directory to see more, click the View All link at the end of the list of spaces.
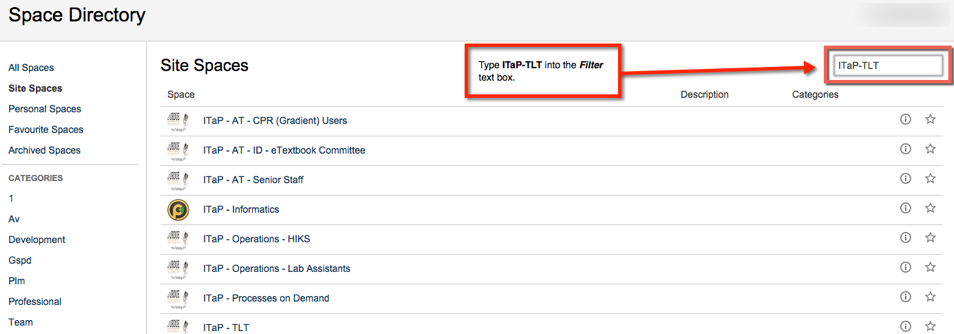
- In the Space Directory page, you will see a partial list of the spaces you have access to; up to 25 spaces can be listed at a time. To quickly find a space, in the Filter text area in the upper right hand corner of the screen, type any part of the name of the space.

- You will need to find the space that will be used for training. Type ITaP-TLT into the filter text box. Locate the space called ITaP-TLT-Confluence Training.
- Click the star to the right of the name of the space to make ITaP-TLT-Confluence Training a favorite. Making a space a favorite will ensure you will always see that space on the main Confluence page without having to search.

Activity 2: Managing Content in Confluence
Objective: Wikis allow individual users to add and edit pages. This activity will show you the basics of how to create and modify pages within a Confluence space.
Step 1
Adding a Confluence Page
- Click on the link for the ITaP-TLT-Confluence Training space.
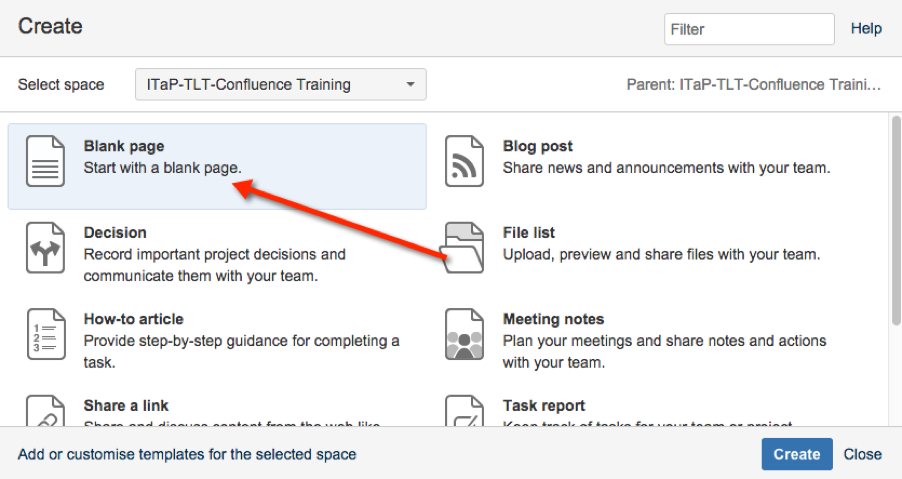
- Click the Create button at the top of the screen. On the menu that opens, click Blank Page to add a page to the Confluence space. Then, click the Create button in the lower right-hand corner of the menu.

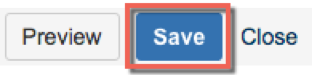
- On the page you have created, you will see the words “Page title” in gray text in the upper left of the screen. Click on the words “Page title” and replace them by typing your name. Click Save in the lower right-hand corner to save the page.
Editing Confluence Pages – Adding Text
Step 1
- In the upper right hand corner of your screen, click Edit.
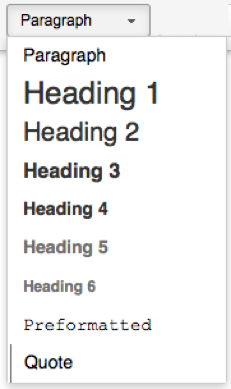
- Click the button that says Paragraph on the left hand side of the screen – this is the Font Style menu. From the menu that opens, select Heading 1. Click on the text area again.
- Type “Confluence Training”. Click Enter. Your header will display, and the font style will immediately change back to Paragraph font style.
- Type a short paragraph (2-3 lines) below the header you created.
- Click Save.
Step 2 – Modifying Existing Text
- In the upper right hand corner of your screen, click Edit.
- Highlight the text heading “Confluence Training” by clicking to the left of the heading with your left mouse button. Then, while holding down the left mouse button, drag the mouse to the right until the entire heading is highlighted blue.
- Click the Paragraph button and click Heading 2. Click on the text box to remove the highlighting from the words “Confluence Training”
- Change the words “Confluence Training” to “Confluence Exercise”. Delete the word Training, and then Type “Exercise”.
Note: Confluence offers a Preview button on the Edit screen to allow you to view your changes before you save the page. It is located next to the Save button in the lower right-hand corner of the screen.
Click Preview to view the page as it will appear with your desired changes. If your changes appear as desired, and you are finished making changes, click Save. Otherwise, click Edit to resume making changes to the page. It is recommended that you preview a page before saving your changes.
Step 3
Adding Additional Content
- Stretch your skills by adding two more headers (Heading 3) and some additional paragraph style text to your page. Click Preview to view your changes before saving the page. When you are finished adding this content, click Save.
Step 4
Checking Page Versions
- To view changes to the page you are editing, at the top of the page you will see information about who added the page, and who last edited the page. Click on the date when the page was last modified to see more information about the last edit to the page.

- You will see the most recent changes to the page on the next screen.
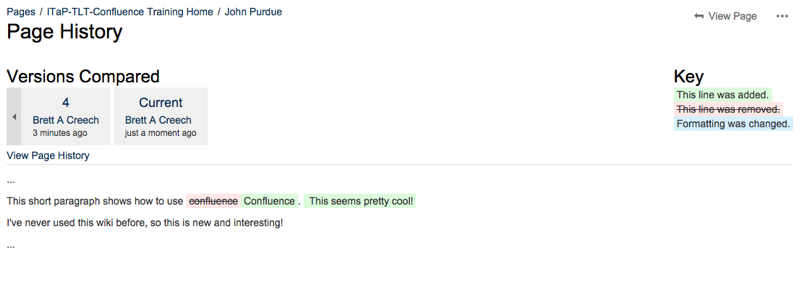
- You will see all text added highlighted in green. If text was removed, it will be highlighted in pink with strikethrough font. If formatting is altered, it will be highlighted in blue.
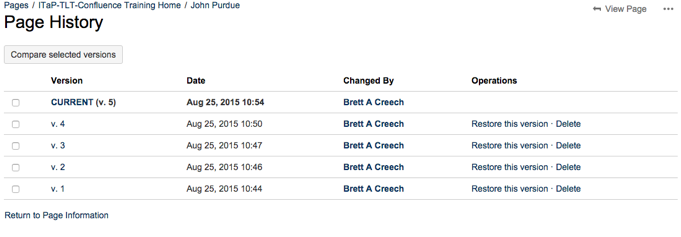
- To see previous versions, click View Page History. From the View Page History screen, you can view and restore previous versions of the page.
- Click View Page in the upper right-hand corner of the screen to return to the page.
Activity 3: Adding Attachments to a Confluence Page
Objective: Confluence allows users to add attachments to a page. Attachments can be any type of file that a user can download to their computer. This activity will show you how to upload and link an attachment to a space page.
Step 1
Add an Attachment to Confluence
- Click Edit in the upper right-hand corner of the screen to open the text editor.
- Type “Download this file” somewhere within the text area.
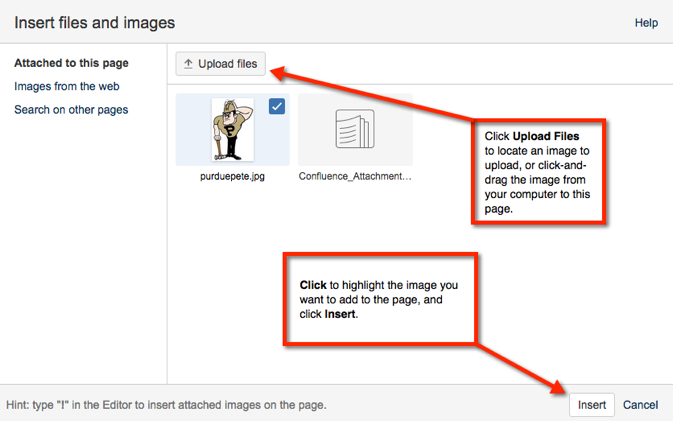
- Click the Insert Files and Images button
 on the text editor.
 - On the Insert Files and Images screen that opens, click the Upload Files button to upload a from your computer to Confluence. Select the file and click Open. The file will upload to the page. Do not click the Insert button. Instead, click Cancel. Your file will still be uploaded.
- Note: you may also click and drag files from your computer into the Insert Files and Images page.
- Next, highlight the “Download this file” text you added. Click the Link button in the formatting bar. On the Insert Link screen that opens, click Attachments. Highlight the file you uploaded and click Insert.
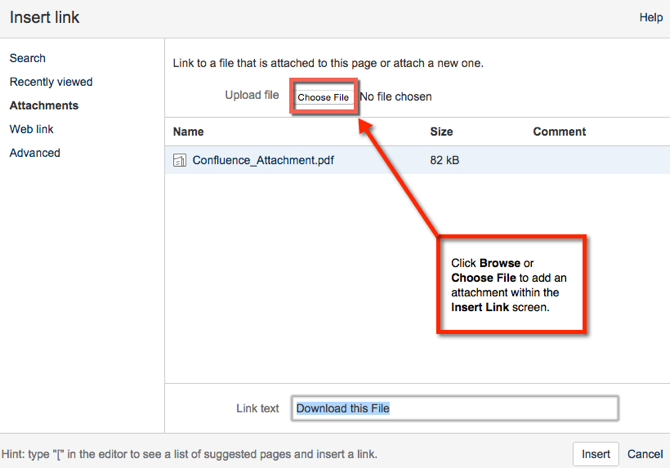
- The words Download this file will now be changed to a hyperlink. Click Save.
Activity 4: Adding Images to Confluence
Objective: Confluence allows you to add images to a space page. This activity will show you how to upload and use images within your page.
Step 1
Insert an Image to Confluence
- Click Edit in the upper right hand corner of the page.
- Click the Insert Files and Images button
 on the text editor.
 - The Insert Files and Images screen will open.
- Click Browse or Choose File at the top of the screen and select the image from the computer. You may also click and drag the image onto the Insert Files and Images page.
- Click the image you wish to add to your wiki page and click Insert.
- The image will appear in the text box where you placed it.
- Click Save to save the image with the rest of your content.
Stretch Your Skills: Editing Images
- You can make changes to the image. Click Edit in the upper right hand corner of the screen.
- Click on the image to open the options bar.The image options bar will display the size of the image – in this example, the image is 150 pixels in height.

- Using the image resize buttons, you can resize the image from small to large, or return the image to its original size by clicking the Original button. You can also click on the resize image button (which shows the original size of the image) and type in your desired image size.
- The Border button will allow you to place a simple border around the image.
- The Link button will allow you to link to a web site or another space or page within Confluence.
- The Properties button will allow you to change image properties:
– TheEffectsarea will allow you to add special effects to the image.
– TheTitlearea is where title text (which appears when the cursor hovers over the image) or Alt Text (which is used by screen readers to describe the picture) may be entered. - After making any changes to the image, clickSaveto save your changes to the image.
Activity 5: Adding a Link
Objective: This activity will demonstrate how to add a web link on a Confluence page to a website or another Confluence page.
Step 1:
Add a Web Link
- Click Edit in the upper right hand corner of the page.
- Click on the location on your page where you want to add your link. Click Insert to open the Insert menu, and click Link.
- The Insert Link screen will pop-up. Click Web Link.
- Two text boxes will appear to the right: Address and Link Text.
- In the Address text box, type in http://www.purdue.edu.
- In the Link Text text area, the default text will be the same as what you have typed in the Address text box. Delete the text in the Link Text area, and type Purdue University Website.
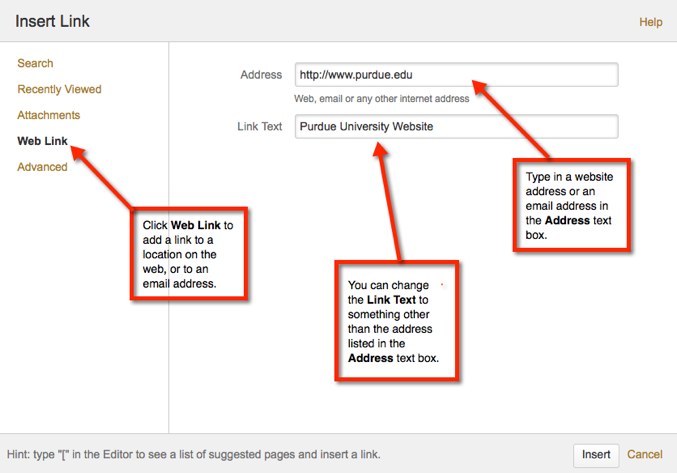
- Click Insert on the bottom right-hand side of the Insert Link screen to add the link to the page.
- The link will appear on the page where you placed it. The text color will be the same as all other text on the page, so if you want to change the text color, highlight the link text and use the text color selection option
 on the menu.
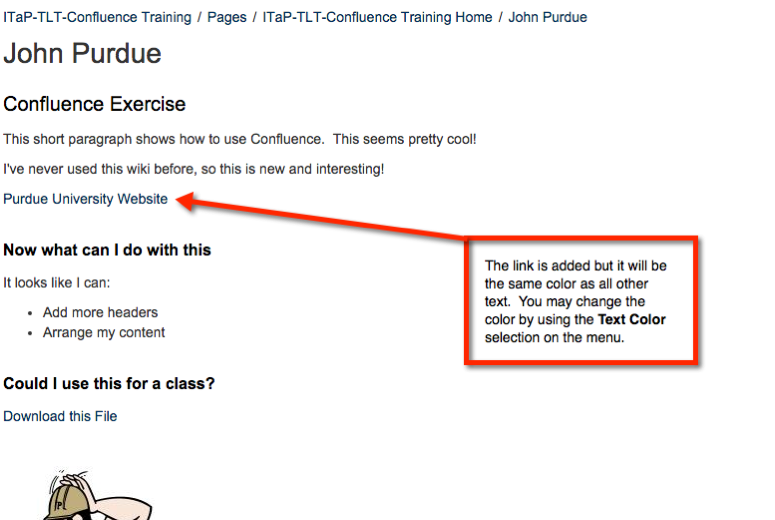
- Click the link you added. An editing toolbar will open below the link.
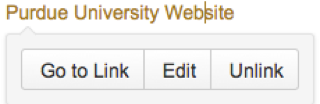
There are several options on the toolbar:
Go to Link: Will open the page you’ve linked to in a new browser window.
Edit:Will open theEdit Linkpop-up screen (similar to theInsert Linkscreen) to allow changes to the web link.
Unlink: Removes the link to a webpage from your text. - ClickSaveto save the link to your page.
Activity 6: Adding Tables to a Confluence Page
Objective: This activity will show you how to quickly add and edit a table within a Confluence space.
Step 1 – Adding a Table
- Click Edit to open the text editor.
- To add a table, click the Table button in the text editor.

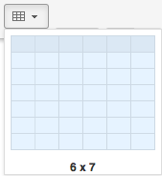
- The Table menu will open, and give you the option to create a new table. Drag your mouse to make the table larger or smaller. Set the new table to six columns by seven rows (6×7). Click on the table to add it to your page.
- After the table is created, a row of options for the table automatically appears just below the text formatting options in the text editor.

- Insert or remove rows
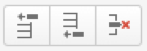
- Cut, copy, or paste table row content
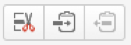
- Insert or remove columns
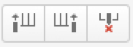
- Merge or unmerge table cells

- Highlight rows, columns, or individual cells

- Change cell color

- Remove the table

Step 2
Modify the Table
- Next, click on the third row of the table, and then click the insert row above button to place a new row above the row you clicked on. Your table should now have 8 rows.
- Now, on the first row of the table, click on the fourth column. Click the remove column button. Your table should now have 5 columns.
- Type any content you want into the table. After you are finished adding content, click Save.
Note: Tables can be used to not just display data; you can also use tables to display content more effectively. For example, you can create a 1 row, 2 column table and in one cell insert an image, and in the other cell provide a description of what the viewer will see.
Stop here. Do not move on to the next activity until told to do so by the instructor.
Activity 7: Changing Page Layout
Objective: This activity will show you how to change the layout of your Confluence page to allow you to better select how your content will be displayed to users.
NOTE: In this activity you will change the display of the content within your page. It is strongly recommended that you carefully plan how to display your content prior to adding it to your page. Changing the layout after adding content to the page can result in that content not being displayed correctly.
Step 1
Select and Apply a Page Layout
- Click Edit on the page to open the text editor
- In the text editor, click the Layout Menu button.

- The page layout bar will open.

- Page layouts allow you to add sections and then divide the sections into columns. By default all pages are created with one section. New sections can be added by clicking the Add Section button in the page layout bar.
- Click Add Section on the page layout bar to add a new section. You will see all the content you have created in one section (bordered by a dashed line), and a second section underneath.
- Click in the new section that you have created. Next, select the three column section button. You will see the new section subdivide into three equal parts.
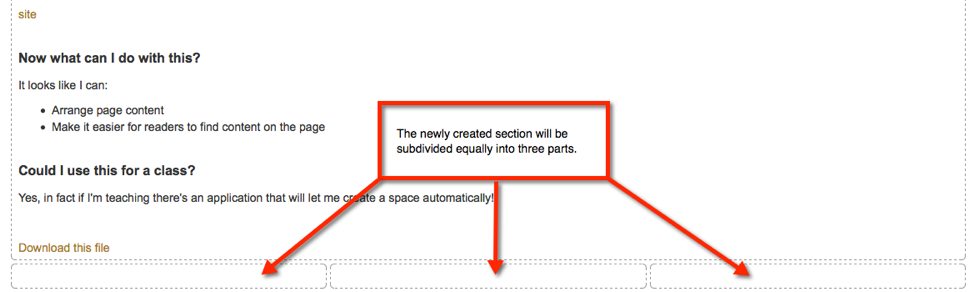
- Scroll to the new section you created. In the left column, type your name. In the center column, type in the name of your favorite music artist. In the right column, type today’s date.

- When you are finished, click Save to save the page. You will see your new content at the bottom of your page.

- Several notes with regards to using layouts:
– You cannot change the background color of a section area, nor can borders be added to a section.
-Section layout areas are fixed and cannot be expanded or contracted.
-Changing a page’s layout after content is added may disrupt the display of your content.
-You can change all font alignments and font styles within individual section columns.
Activity 8: Introduction to Macros
Objective: Macros are small modules within Confluence that extend what Confluence can do. In this exercise you will learn how to add a macro to your Confluence page. In this activity, you will add a Table of Contents to your Confluence page.
Step 1
Adding the Table of Contents Macro
- To add a table of contents macro to assist with page navigation, it is important to ensure your wiki page is using headings. The macro will use heading levels to create the table.
- Click Edit in the upper right-hand corner of the Confluence screen to edit the page.
- Click Insert to open the Insert Menu.
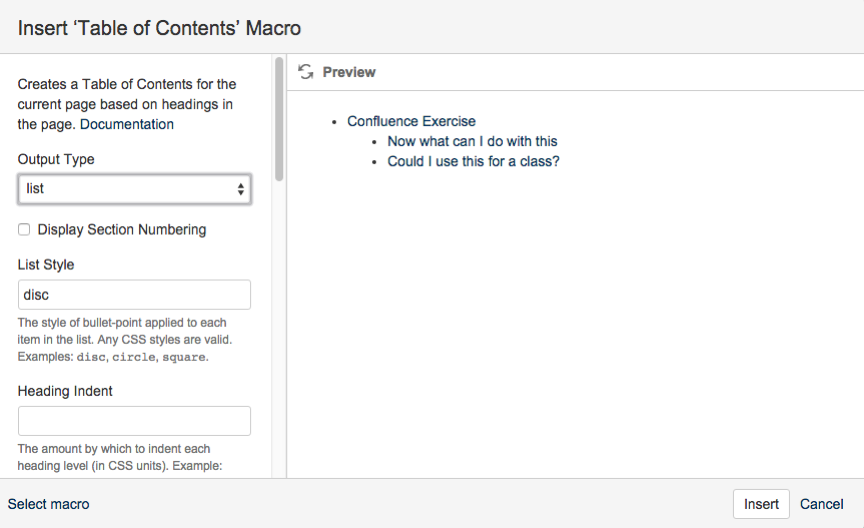
- On the Insert menu, a list of common macros will appear immediately following the Task List option. Select the Table of Contents macro.
NOTE:When the Table of Contents macro is selected, it will generate the list for your page based on the headers used on your page. This macro is dynamic so any future changes to headers and header levels will be automatically updated in your table of contents. - A new screen will pop up asking you to set various settings for the macro. In most cases the default settings will suffice. ClickInsertto add the macro to your page.
- The table of contents will appear as a small gray box in your Confluence page. You will not see the full table of contents until the page is saved.
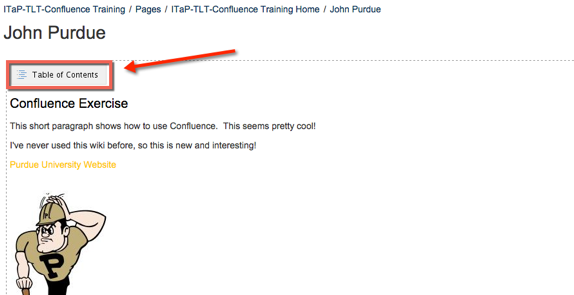
- ClickSaveto save the page with the table of contents added. The table of contents will be visible where you placed it on the page.
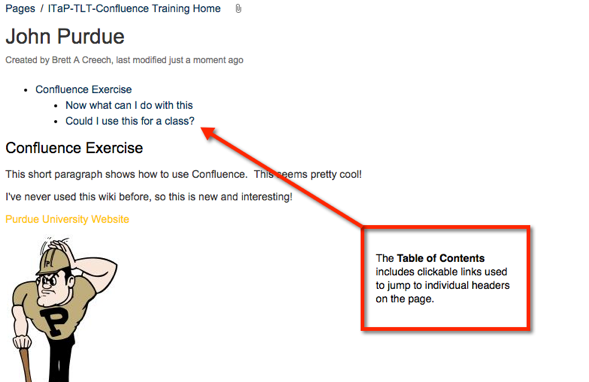
NOTE:The table of contents is made up of clickable links, allowing users to jump to individual headers within the page. For individual pages with multiple sections and a large amount of content, a table of contents can allow page viewers to quickly go to areas of your page they may not have viewed yet.
Stretch Your Skills: Add a YouTube Video with a Macro
Objective: To show how to use another macro to add video content to a Confluence page.
Step 1 – Locate the Widget Connector Macro
- Click the Edit button in the upper right-hand corner of the page.
- Click on the location of your page where you want to insert the YouTube video.
- Click on the Insert menu. On the menu, select Other Macros.
- The Select Macro screen will open. On this screen you will see a list of additional macros available in Confluence.
- In the Search text box in the upper right hand side of the Select Macro screen, type YouTube.

- As you type you will see the macros filter automatically. After you type in YouTube you should see only one macro – the Widget Connector macro.
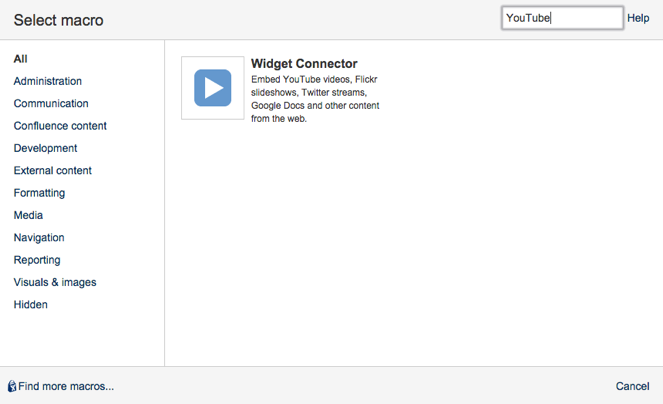
- Click on Widget Connector. The Insert Widget Connector Macro pop-up will open.
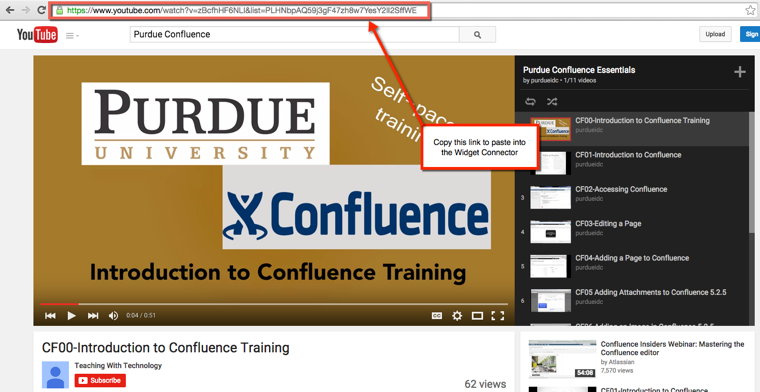
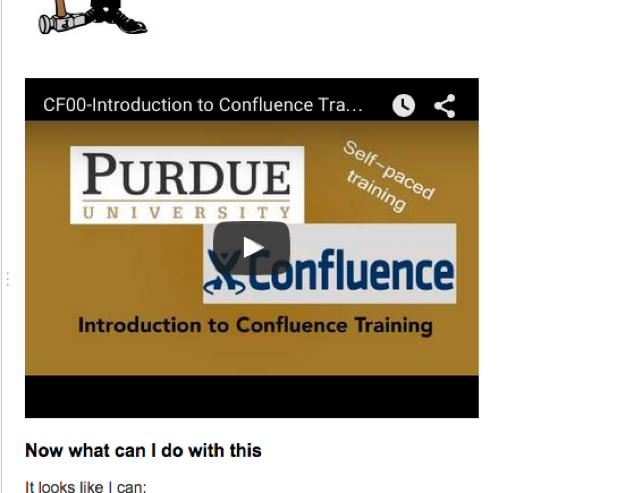
- Next, in a separate browser window, go to http://www.youtube.com. On YouTube, search for “Purdue Confluence”.
- Click the video titled “CF00 – Introduction to Confluence Training”.
- At the top of the YouTube screen, copy the web address for the video.
- Return to Confluence. On the Insert ‘Widget Connector’ Macro screen, paste the YouTube address into the Web Site’s Widget URL text area.
Make sure that the URL begins with https://. If the URL is just http://, change the http to https. This will ensure that the video will open as secured content.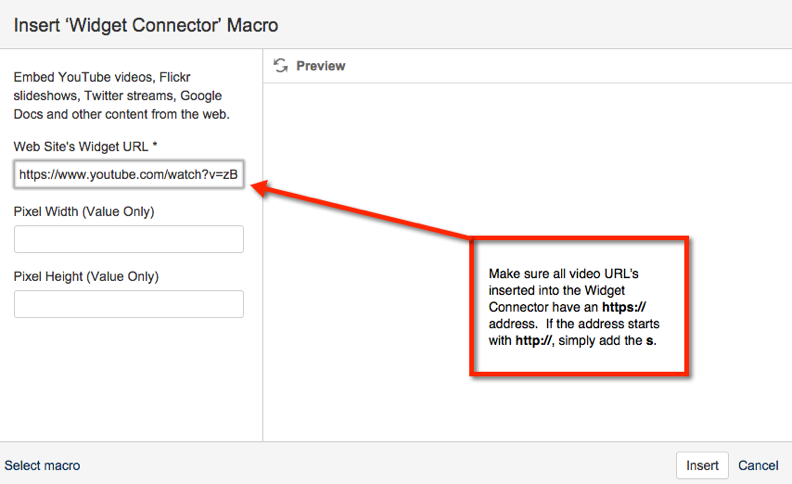
- Click Insert to add the video via the widget. The widget will be added to the page.
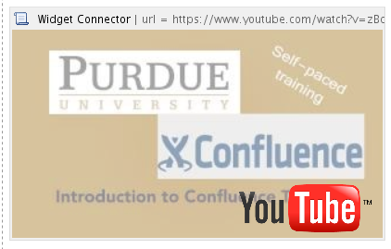
- Click Save.
- The video attached will appear on your screen. Click the Play button on the video to view it.
Appendix: Obtaining a Confluence Space
Requesting a Wiki Space for a Course
- Requests for a wiki space for a course should not be made until academic courses are loaded into Blackboard for the semester the specific course and section will be taught.
- Once the course is in Blackboard, create a wiki space for the course automatically by completing the forms at http://www.purdue.edu/apps/Confluence.
Requesting an Administrative or Non-Academic Space
- Submit a request for creating the space via email to itap@purdue.edu. In the request, specify the name you want for the space and any individuals you want added as users. Also note any users that should have administrative privileges on that space.
Requesting a Personal Space
- Submit a request for creating the space via email to itap@purdue.edu. Make sure to note in your request that you want space administration privileges.
Appendix: Wikis at Purdue
Wikis at Purdue
- Purdue supports two wiki platforms – Confluence and Blackboard Wikis.
- Blackboard Wiki sites are located within courses within Blackboard. Only individuals enrolled in a course can see that course’s wiki.
- Confluence offers wiki sites (spaces) that can be fully open to the public without logging in, to being available only to certain users. Confluence also supports academic and non-academic spaces.
- Confluence also allows for non-Purdue affiliated individuals, such as research and program collaborators, to have accounts.
Comparison
Comparing Blackboard Wiki to Confluence wiki
| Blackboard Learn | Confluence | |
|---|---|---|
| Content Publicly Available | No | Yes, if desired. New spaces, by default, require users to log in to Confluence first. |
| Tracks changes to content | Yes | Yes |
| Enrollment in Wiki automatically managed | Yes, based on course enrollment | Yes, but only in spaces linked to an academic course |
| Integration with Blackboard Grade Center | Yes; this is an instructor option | No |
| Allows for non-Purdue contributors | No. Wiki is only available to individuals enrolled in the specific course where the wiki is located. | Yes; accounts for non-Purdue contributors must have accounts created by a Confluence administrator |
| Allows for third-party macros to be installed | No | Yes; however, macros must be installed by a Confluence administrator |
| Privacy Settings can be set for individual spaces/pages. | No, only at the wiki level based on group membership | Yes |
| Attachments- including images, documents, and videos – can be included. | Yes | Yes; however multimedia may have to be embedded on a page using a macro if the browser does not support drag-and-drop. |